Pages
Sunday, April 27, 2008
Thanks, Angela!
I'm supposed to pass this along to five other bloggers who inspire me. I don't even think I could narrow it down to just 5, but I'll try!
Kathi at Kathi's Creative Corner because I copy most of what she makes...she obviously inspires me. She is so talented and has a great perspective on life.
Kim at Clearly Inspired because she comes up with neat ideas. I don't know how she finds time to create a video tutorial each week!
Melissa at Just Dandy is another gal whose work makes me happy just looking at it.
Erin from Inky Smiles. She is inspiring because of her heart and enthusiasm for papercrafting and sharing. Love ya, sweetie!
Kelleigh at Ratzlaff Reflections. She's an amazingly talented digi scrapper whose creations inspire me to want to step outside my box and create more.
There are so many others who inspire me, not the least of whom is Angela herself!
Thanks again, sweet friend!
Enjoy the Moment and Gift Card Holder...
Credits: Cardstock-Topiary (CTMH), Patterned paper-Two Scoops 6x6 pad (Basic Grey), Inks-Black, Topiary (CTMH), Stamps-Patterned Bugs (Inkadinkado), Mixed Messages (Papertrey Ink), Ribbon (Big Lots), Acrylic discs (Michaels), foam tape.
My good friend's son is having a birthday at the beginning of May and for the past few years (when I was a consultant) it literally snuck up on me! This year I've been thinking about it most of the month and trying to decide how to package the usual gift card I send. I am bound and determined to send it out so he will get it before his actual birthday, rather than a few days after! Sending a gift card isn't a surprise, but I do try to "dress" them up a bit and they are always curious to see what I come up with. Here's is the latest version of a gift card holder, inspired by this one I saw (and others similar to it around the blogosphere) on Dawn's Stamping Thoughts blog.
She posted a tutorial so I'll let you go look there rather than be redundant with directions. I had pulled out this birthday set because I liked the candles. I colored them with markers, then added Stickles and glitter glue and also some Paper Glaze (like CTMH's Liquid Glass) to make them shiny. This was after I clear heat embossed the image so my black ink wouldn't smear. You probably can't read it, but I stamped the sentiment image that says "blowing birthway wishes your way," You slide the gift card in the cut-away part. I used a file folder tab punch and a circle punch to punch out the opening. I hope he likes it!
Credits: Cardstock-Holiday Red, Outdoor Denim (CTMH) Ink-Outdoor Denim, Archival black pads, Holiday Red, Topiary, Honey, Moonstruck, Orange, Sunny Yellow markers (CTMH), Stamps-Birthday Brackets (Stampendous), Stickles (Yellow) Glitter Glue-Orange, Green, Paper Glaze, Gingham ribbon (??) White Gel Pen (American Crafts)
Thanks so much for visiting. I hope you have a great beginning to your week!
Kathi Inspires Again!
Kathi inspires me again! Actually, I made this first card yesterday, set it aside to dry and then forgot to take a picture of it. Silly me! Kathi's card is here. Kathi, I hope you don't mind my copying your ideas!
Credits: Cardstock-Lilac Mist, Spring Iris (CTMH), Ink-Spring Iris-first and second generation (CTMH), Stamps-Garden of Life (CTMH), White grosgrain ribbon (Dollar Tree), Just Bloom (CTMH), silver brad, Stickles
And this card drew me into making this lady bug one. :o)
Edited to add: It's pretty straight forward, but thought I'd mention that I ran the Holiday Red cardstock through the Cuttlebug with the Swiss Dots embossing folder, and then sanded the dots. I have a really hard time not smearing the white ink, so this was an easy out. It needed a little something, so I decided to punch small circles and add a tiny sentiment. I think it works. I used a black marker to fill in the dots of the ladybug, then added some Stickles for a little bling.
Credits: Cardstock-Holiday Red (CTMH), black textured (Hobby Lobby), Inks-Holiday Red, Black (CTMH), Stamps-Patterned Bugs (Inkadinkado), Mixed Messages, Polka Dot Basics (Papertrey Ink), Thank you set (Hero Arts-gift from Archiver's and I used the flower image from the set), Red Gingham ribbon (??), Swiss Dots, punches-scallop and circle, Coluzzle, Circle template
Oh, sorry to post and run, but we are going out to dinner, yum, and the girls got ready way quicker than I thought they would. I'll edit with credits later this evening. Edited to Add: The girls kept asking if we were going to a restaurant tonight, and I kept telling them to ask their dad. He said okay, so we went to Chili's. The food was good, as was the company, but the service...not so much this time. I had my fill of chips and salsa though. Love 'em!
Thanks for popping by! And thanks, Kathi! You keep inspiring me!!!
Saturday, April 26, 2008
Three More Cards!
This next card was inspired by this one on the My Life blog. I really like the simple, clean lines of her cards. I found out about this blog from Kathi, who is also a fan of clean and simple cards. Thanks, Kathi and Silke (who designed the card). I modified it by making it a standard size card and using similar items in my stash. I tried layering the ribbon for something a little different and it looks, well, different! Not bad, I don't think, but different. :o)
This next card was fun to make, but hard to photograph! This is the best I could do and it still looks pretty yellow. Oh well. Thanks to my friend, Kim, at Clearly Inspired, she mentioned this blog where the author shares a video of a card/technique each Monday. This card was featured on April 14th. My version is a big larger, but the technique is the same. Check out the video here and her card that inspired my card! Then check out all the really neat ideas she posts!
Credits: black, white textured cardstock (Hobby Lobby), Ocean (CTMH), black grosgrain ribbon (CTMH), white grosgrain (Dollar Tree), felt flower (American Craft), punched flower, brad, glue dots.
Thanks so much for visiting today. I am hoping to get back out to the craft room tomorrow, so until then, have a good one!
Inspired By Kathi's Cards
I've made a few other cards, but I am also re-tagging all my digi supplies, so I'll wait a bit before posting! Argggghhhh, when I moved all my goodies to a new hard drive, I lost all the tags I had set up for organizing and finding what I want. So, I'm going back and re-doing that as well as purging supplies I no longer want. While a little frustrating, it's a good thing, too. I can fine-tune, once again, how I have the stuff organized to make it even easier find what I want to use when digi scrapping.
Wednesday, April 23, 2008
Meet "Peanut" and "Juanita"
Peanut is a hungry little chick! They are feeding it the yolk of a hard-boiled egg, with some dirt/sand mixed in. Yea, I'm feeling a little weird about the egg part...
Jessica is fascinated!
This is little Juanita! It is hard to get a picture with no flash, and the overhead lights reflect on the plastic cover of the incubator. Her tush is yellow, which is interesting. Unfortunately, the teachers think the third one didn't make it. It apparently hadn't moved since the director arrived at 7:30ish this morning. She told me that even if they helped it out of the egg, it probably wouldn't have survived anyway. Just the way it goes, sometimes.
Anyway, just thought I'd share. I think this whole process is utterly fascinating! Being a city-bred girl, I've never had the opportunity to see something like this "up close."
Tuesday, April 22, 2008
I almost forgot!
I've never seen this before, so it was just as exciting for me to see a newly hatched chick. The other two eggs have cracks in them and we're hoping to maybe see a new chick sometime tomorrow, or Thursday. It'd be so neat for the kids to actually see the act of being hatched!
I may bring my camera tomorrow to see if I can capture a few shots. Everyone is so excited to see some success with this incubation.
Til next time...
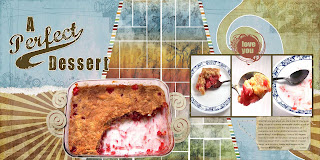
A Perfect Dessert-Lesson 4 Digi Layout!
This layout just about did my computer in! Only because the file was getting so large. The tasks were plain fun and neat to do, but man, when I hit save (which you do often while you are creating, if you are smart), I had to get up and walk away because it took a while longer and longer to save each time I added a task. By the end, I thought my computer was going to go belly-up gasping for life. LOL Thank goodness it didn't fail me.
Now, I decided to do a different take on the subject matter for this layout. I could have taken pictures of the girls showing their love for each other (yea, right) or the family. But, in the end, I thought it would be more fun to play with food. LOL (it doesn't wiggle, or talk back), plus I got to eat some of it for that last shot...but NOT the amount that is taken away from the dish. I found the recipe on The Pioneer Woman Cooking Blog, which I highly recommend you check out, not only for some of the recipes, but for the pure entertainment factor in her style of writing.
Okay, here's the "schtuff" we used to create the layout and the things I learned how to do.
Torn Journaling Card template: from Torn-n-Tattered Paper Templates by Anna Aspnes
Green patterned paper and paper Swirl: From Hope kit by Amanda Rockwell
Cream floral paper: From Love kit by Amanda Rockwell
Starburst paper: from Patience kit by Amanda Rockwell
Dictionary text paper: From Botanist No. 4 kit by Katie Pertiet
Number overlay: from Counting Trash Overlays set by Katie Pertiet
Graphic pop edge: from Graphic Pop Edgers Set No. 2 by Katie Pertiet
Storyboard frame: from Storyboard Negatives set by Katie Pertiet
Love You circle embellishment: From Romantics Brushes-n-Stamps set by MaryAnn Wise
Create a mask with the Polygonal Lasso tool
Create a mosaic mask using three different shapes
Extract a scanned cutout from its background
Add torn paper edges to a patterned paper
Extract a photo from its background
Mask accents to appear dimensional
Create your own alphabet with patterned paper and fonts
Create journaling using a template
Blend embellishments to polish a layout
Whew! Hope you enjoy the layout. Thanks for visiting!
Monday, April 21, 2008
No New Layout...YET!
d o w n. I could read emails, blogs and light stuff, but there was NO way it would be able to handle an intense PSE session as well. It finally finished while I was out picking Jessica up from school. SHE wanted to snuggle most of the time until we picked up Amy. Today we also started a new swim class session. This time however, I couldn't get both girls in a class at the same time, so they are back to back. We get home earlier, though, so I'll deal with it! Got home in time to start dinner, do homework, called my dad who had left a message earlier while we were out. Snuggle with them til bedtime. So, I'm sorry to say, I don't have a new layout to share with you. I am hopeful to have it done tomorrow sometime.
To tide you over, I found a couple of cards I made awhile ago, but never shared. They are kind of different and maybe that's why?! I remember I got that patterned paper at Hobby Lobby (thanks, Becky!). I thought I was getting the double sided satin ribbon when I picked up some rolls on sale at Hobby Lobby, but it's one sided, which means it's stiff and almost paper like. Now I don't like it, so that's another strike.
This one just looks too busy.
Ah well, I won't go into all the credits right now because for one, I will probably get them wrong! And two, my computer is acting a little wonky right now, so I think it's better to close while I can!
Thanks for visiting!
Oh and Jessica's preschool is incubating eggs and today one was hatching! I've never seen this happen before and it's fascinating. You can see the egg moving and a little hole that is pecked out. I guess it takes a few days for it to break through.
Okay, that's it! Til tomorrow...
Sunday, April 20, 2008
Celebrate, Sending My Love, Hello cards
Lisa's Creative Corner is a blog I really am enjoying. She creates such fun cards like this one. I changed the colors, but cased everything else. Thanks, Lisa for inspiring! One little twist on this card, I used a scrap circle as a mask over the image and inked a sponge in Chocolate ink. Then starting from the center of the of the scrap, I put down the sponge and pushed it toward the edge and off the scrap, creating an interesting look for the inside of the card. I didn't take a picture of it though. You can sort of see it toward the bottom of the circle. I also sanded and inked the edges to add interest.
Credits: Sweet Berry butterfly paper (K&Co), blue and green textured cardstock (DCWV), satin ribbon (Big Lots of all places), Just Bloom flower (CTMH), punched flower (used Honey-CTMH), rounded jewel (Hobby Lobby), yellow brads, concave punch (EK Success)
And now my girls would like me to snuggle with them before bedtime. Hope you have a great night and a super week!
Inkspired by Kathi!
Same supplies and added some narrow white organdy ribbon, silver brads and
:o)
Saturday, April 19, 2008
Enjoy and Friendship Cards
Enough of that. This card was inspired by this one on iSTAMP.
I found this DCWV Purple Flowers paper on sale at Joann's the other day (6 for $0.96). I thought it looked similar to some of the cute Stampin Up paper that is used on blogs I read. To make the polka dots, I ran my Crystal Blue cardstock thru the Cuttlebug using the Swiss Dots embossing folder. Then I rubbed the Crystal Blue stamp pad over it. The letters for enjoy are the smaller letters that come with the Solos (CTMH). I used a large scallop scissors to cut the scallop edge and the brads and ribbon were in my stash. I really like how it turned out.
This next card was inspired by this card on Paper Hearts Card Co. blog. I spent the most time trying to find a small stem and leaf stamp. Then getting the stems to look a little random.
I ended up using a stamp set called Kindred Spirits from CTMH-it was a special set and isn't available anymore. Then sentiment is from the same set. I added the stitching look using Fabric Finishes from CTMH. Colors are Sweet Leaf, Hollyhock and Crystal Blue. The "flowers" are the discs I picked up at Michaels. I just got the lavendar looking ones on clearance. I thought this card was adorable. I really liked the idea of using the discs for the flowers. Simple, but nice.
With that, I will close for tonight. My twitching eyes are telling me they want to close! LOL Thanks for visiting. :o)
Home-made Light Box and Just Saying Hi card
And here's a card taken using my new box! I'm not sure if there is a huge difference, but I think there is less of a shadow and you can't see where I used to set up two pieces of cardstock.
I actually made this card a week ago, but had put some Stickles on it and set it aside to dry. Then I forgot to bring it in the house for picture taking. I was inspired by this card on Oodabug Alley. It was the butterfly that drew me in as well as the bright green contrasted with the black.
A little bit of this and a little bit of that went into this card. I used my Cricut to make the black circle and the scallop circle. I think I used a punch to make the yellow circle. I used my EK Success concave punch on the corners, added the rhinestones on the corners for interest. The butterfly is from CTMH's Flutter stampset and is stamped in Citrus Leaf (which now looks TOO bright to me, but oh well). Just saying hi sentiment is from a stamp set whose name escapes me right now (and I cannot find my post it note-darn it), It has circular frames with sentiments. I punched some small black circles and added the green brads (mainly so I wouldn't have to poke the brad through the card front). I do have the ribbon wrapped around the inside of the card as well, since white is the base. I used my x-acto knife to cut a slit in the fold.
Anyway, I think it's a fun card. I've got a few more. We'll see how many I can post this evening.
Wednesday, April 16, 2008
This is Me 2nd Page (Makes Me Happy) Challenge Layout
I had the bright idea to take another picture of me in the mirror, only this time focus on my camera.
Then I bipped around the house and took pictures of things I love or that make me happy. Anyone who knows me, knows I love popcorn and Diet Coke, and lately have been eating peanuts while I work!
The afghan and cross stitch were made by my mother. The cross stitch being made well before I even thought of marriage, and maybe even before I met Steve. As I'm told, my mom started the project, got well into creating the piece and realized it wasn't going to fit on the cloth correctly. So she had to rip it out and start again! Talk about a labor of love. She passed away almost 2 years before I got married, and I knew nothing of this project until our reception, when my dad presented it to me in a beautiful frame. My sister-in-law stitched in the pertinent information. The tears flowed freely, let me tell you!
When I'm in my craft room by myself, I love listening to CDs and my current faves are pictured, Brad Paisley and Trace Adkins (thanks to Celebrity Apprentice, I've developed a whole new appreciation for him).
I wanted a picture of Buster AND Sarah, but didn't have enough space for them each to have their own spot, and I didn't have a good photo of them together, so I took two photos and blended them (knew how to do that because of this class)! I think it looks pretty cool, if I do say so myself.
After all this and putting the two layouts side by side, I don't really like them together. I think the eye is drawn straight to the camera and not the cool fingerprint side. But I don't HAVE to put the layouts side by side. I think the camera one stands well alone, so it's all good. I got to practice some more and had fun!
Oh, did I mention it got up to something like 83 degrees yesterday? It was wonderful. Today...not so much! It hasn't gotten much above 45 degrees and believe it or not, there is SNOW falling as I type this! Incredible, huh?
Thanks for visiting!
Tuesday, April 15, 2008
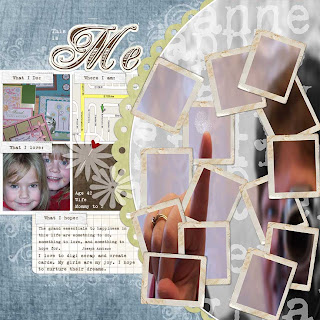
This is Me...Week 3 Layout
First, there were some technical difficulties that made the lesson offline for a couple of hours. I had gotten through 3 tasks at that point. Then there's those pesky kids that keep distracting me (just kidding...about the pesky part). Then when I sat down again last night, I realized I blurred myself too much and had to start ALL over again. I even worked a bit past my bedtime to try to get it done, but decided my being tired might open the way to making mistakes.
Remember my mentioning that I had to take a particular photo? Well, we were to take a picture of ourselves pointing in a mirror and get the reflection with the focus being on the finger, not ourselves. Um, okay, I am game, even though most of my pictures are happy accidents-this one being NO exception. It took several attempts over 3 days to finally get this one that I chose to use.
This layout is WAY out of my comfort zone stylistically (<---I spell checked and that is spelled correctly :o) ) but the techniques I learned were SO very cool! Making the photo blurrier, while keeping the finger in focus is one. Making those frames that show the parts in color...fantastic! Text as texture in the background of the picture-WoW. Scanning in our fingerprint and adding it as an element...never would have thought of that in a million years. Being able to make those ghosted flowers-fabulous!
NRJ PDQ Patters: From PDQ Textures Vol. 6 set by Nancie Rowe Janitz
Grid notebook paper: from Notebook Paper Pack by Katie Pertiet
Journaling strip: from Stitched Journaling Strips set by Katie Pertiet
Grungy flourish brush: from Grungy Clusters Brushes-n-Stamps by Katie Pertiet Torn frame: from Photo Booth Frames by Katie Pertiet
Heart pin: from Apron Strings kit by Leora Sanford
Install a Photoshop .pat file
Create a custom background from pattern adjustment layers
Use Photoshop to “fake” a shallow depth of field on a photo
Create a multi-photo effect using masks and a .png frame
Experiment using text as texture
Create a lacy edge on a scalloped circle
Use the Rounded Rectangle tool to create a journaling block
Use the Burn tool with grunge brushes
Create semi-transparent ghost shapes
Hope it was worth the wait. :o)
Sunday, April 13, 2008
I've Been Thinking About You-Flap Card
I used Holiday Red ink and my Dove Blender to fill in the red on the flower. Wasn't sure I liked it so, add the Stickles and some bling to dress it up a bit.
I tried taking the photo for Jessica's next lesson today. I just looked at them and none of them work, so back to the drawing board tomorrow.
It's glorious today and the weather is expected to get up to the 70s the next few days! Oh my!
Well, I'm off to get supper going. Decided to grill some hamburgers-yum!
Have a great night and hope your week is super!
Dots and Flowers Card
Happy Birthday, Friend
Let's see...who inspired this card? Um Melissa Bickford at the Just Dandy blog! Here's her card...with that Basic Grey paper I'm finding I like, but cannot find around here (can you imagine that, Kathi?).