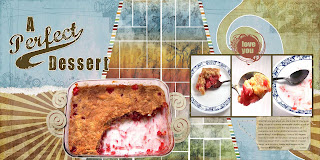
This layout just about did my computer in! Only because the file was getting so large. The tasks were plain fun and neat to do, but man, when I hit save (which you do often while you are creating, if you are smart), I had to get up and walk away because it took a while longer and longer to save each time I added a task. By the end, I thought my computer was going to go belly-up gasping for life. LOL Thank goodness it didn't fail me.
 Now, I decided to do a different take on the subject matter for this layout. I could have taken pictures of the girls showing their love for each other (yea, right) or the family. But, in the end, I thought it would be more fun to play with food. LOL (it doesn't wiggle, or talk back), plus I got to eat some of it for that last shot...but NOT the amount that is taken away from the dish. I found the recipe on The Pioneer Woman Cooking Blog, which I highly recommend you check out, not only for some of the recipes, but for the pure entertainment factor in her style of writing.
Okay, here's the "schtuff" we used to create the layout and the things I learned how to do.
Supplies:
Torn paper edge: From Chunky Torn Paper Edges set by Anna AspnesTorn Journaling Card template: from Torn-n-Tattered Paper Templates by Anna Aspnes
Green patterned paper and paper Swirl: From Hope kit by Amanda Rockwell
Cream floral paper: From Love kit by Amanda Rockwell
Starburst paper: from Patience kit by Amanda Rockwell
Dictionary text paper: From Botanist No. 4 kit by Katie Pertiet
Number overlay: from Counting Trash Overlays set by Katie Pertiet
Graphic pop edge: from Graphic Pop Edgers Set No. 2 by Katie Pertiet
Storyboard frame: from Storyboard Negatives set by Katie Pertiet
Love You circle embellishment: From Romantics Brushes-n-Stamps set by MaryAnn Wise
What I Learned:
Create a diamond patterned overlay using a custom shapeCreate a mask with the Polygonal Lasso tool
Create a mosaic mask using three different shapes
Extract a scanned cutout from its background
Add torn paper edges to a patterned paper
Extract a photo from its background
Mask accents to appear dimensional
Create your own alphabet with patterned paper and fonts
Create journaling using a template
Blend embellishments to polish a layout
Whew! Hope you enjoy the layout. Thanks for visiting!

Goodness . . .This is lovely. You did a beautiful job, and it's is so much fun to see you so excited about what you're learning. So cool!! As for the recipe and the website, I'll have to check that out, too. TFS.
ReplyDeleteYummilicious!!!!!
ReplyDeleteI love the PW recipes!!! Now you've gotta try the Apple Dumplings.... they're made with MT DEW and LOADS of butter! Delish Delish Delish!
Love your take on the layout, and you're so much better at recapping what we learned than I am! LOL!
You're right, this class was a BLAST and I am SOOOO SAD to see it end.... thank goodness for the forums and galleries that we can keep posting to and learning from each other.
Love ya J!
E.
YUMMY! Wow! You sure learned a lot. I can't imagine starting digi...seems like you have to be techy. I love your layouts!
ReplyDeletePioneer Woman is hilarious. I've been following her Black Heels to Tractor Wheels story - she should publish that!
ReplyDeleteI like that you used a unique theme for the 2 page lo. Awesome!
WHat a sweet layout! And nice photography too! You did a great job. I just finished several double page layouts that took ages to save too, but after loosing lots of things once because I accidentally closed the wrong doc, I started saving more often. Meanwhile, I'm not trying to promote myself at all, but did you know I have digital freebies every week on my blog? Off to browse some more....kay (serendipity-firefly)
ReplyDelete