Pages

Sunday, April 28, 2013

Digital Project Life Week 10

I used templates from the same set as Week 9, but moved around some of the spots so I could add some collage cards. I had some pictures I wanted to add that I couldn't really fit otherwise. That's the neat thing about templates. You don't have to start from scratch and you can fiddle and futz to your heart's content with out messing up the paper. 


Templates: LIFEtime Templates Set 2 by Julie Billingsley (Sweet Shoppe Designs)
Cindy's Weekly Layered Titled Cards 4x6 by Cindy Schneider (Sweet Shoppe Designs)
Cindy's Layered Cards: Everyday 3 by Cindy Schneider (Sweet Shoppe Designs) 
Cindy's Layered Cards: Everyday 4 by Cindy Schneider (Sweet Shoppe Designs)
365 Unscripted Collage Cards 2 by Traci Reed (Sweet Shoppe Designs)
Kit: Hello Sunshine by Mary Fran (Nitwit Collections)
Fonts: Rochester and Traveling Typewriter

Thanks so much for stopping by. I accidentally removed my little name image from this post and I don't remember where I stored it. Oh well. I hope I can get last week's layout done today and then will be caught up for a minute. LOL

Jeanne


Digital Project Life Week 9

I snagged the computer before the girls really could yesterday and wouldn't give it up, so I was able to finish a couple of weeks of Digital Project Life. Yay! I love Cindy Schneider templates from Sweet Shoppe Designs and I used 3 card ones on this layout. The week title, the happy, happy, joy, joy one and the good times together one. They look great, but take a little time to pick out the papers one wants to use. 

Supplies:
Template: LIFEtime Templates, Set 2 by Julie Billingsley (Sweet Shoppe Designs)
Cindy's Layered Weekly Title Cards by Cindy Schneider (Sweet Shoppe Designs)
Cindy's Layered Cards, Everyday 4 by Cindy Schneider (Sweet Shoppe Designs)
Kit: One Birdie Lane by Mary Fran at Nitwit Collections

Thanks for stopping by!
Photobucket

Sunday, April 21, 2013

Creative Cards from Cricut

I sat down yesterday to play with the Creative Cards cartridge again. I was inspired on one from a new Northridge Publication called Cricut: Simple + Stylish. I saw that cover in a store and was instantly smitten. I thumbed through the magazine and saw several ideas I liked. So, I went home and bought the digital edition at Northridge Publishing.

Here's my version of that cover card.
I'm really happy with the final outcome. 
The directions indicated one should cut two of the trifold pieces and fill in the frame on one using Cricut Craft Room. I by passed that. I just cut two and cut off one section to cover the back of the gingham paper because it is a double sided print. I figured the brightly colored popsicles on the flip side didn't quite go with the feel of the rest of the card. LOL.  I also used an embossing folder to add a little more texture. 
Supplies:
Flower Box 6x6 pad, CTMH Heavenly Blue cardstock. AC white cardstock. Button from stash. Center of button CTMH, PTI Mixed Messages, Cuttlebug Swiss Dots embossing folder Cartridges: Creative Cards, Flower Shoppe (leaf), Artiste (banner)

I'm also very happy with this card. I love that peachy color! Want more, please!

Supplies: Doodlebug's Flower Box again and all the accessory cuts for this card are cut at 5 1/2. I didn't cut the base using the Cricut because it's simply a rectangle. As you can see I dry embossed the butterflies to add a little more interest as well as adding some pearls. I'm thrilled to have some of the fish tail cuts on this cartridge that I can use on other cards. *Ü*

Pretty straight forward cards, but pretty, in my humble opinion. I'm really glad I picked up this cartridge. 

Thanks for stopping by. Hope your weekend is going well. 
Photobucket

Thursday, April 18, 2013

Cricut Creative Cards

Provocraft recently released a new cartridge called Creative Cards. I really liked the window cut on the cartridge. It reminded me of a Memory Box die that is available for purchase. Anyway, I picked up the cartridge when it was on sale at Michaels. And I made the window card on Sunday at the crafty playdate.

It's not easy to tell, but this is a trifold card, which is kind of neat. I cut and layered the pieces just as shown in the photos. I'd like to make it again and add a little more detail.

I was also struck by this cut. I really liked the scalloped edge and that flower is very appealing. 
I used papers from DCWV's Green Tea stack from a couple of years ago. Instead of the white cut to go across the card, I decided to use some ribbon. 
This card I modified a little. The blue piece is supposed to be a flap that opens up, but I cut it and adhered it down. I also trimmed the background piece so the white card base would show. 
Again this is DCWV's Green Tea stack as well as an older CTMH birthday stamp set. I added some green gems as well. 

I like that the cuts aren't too intricate and will be fun to play with and add details. 

The sun shone brightly all day today and it warmed up to the 30s. Let the warm up and melt off begin. 
Until the next storm, slated to arrive on Monday. 

Thanks for stopping by!
Have a great day.
Photobucket

Tuesday, April 16, 2013

Crocheted Flower Cards

My friends and I had another crafty playdate on Sunday. Whoo hooo! I wasn't quite as productive this time, but I do have a couple of cards to share. I found a pattern online (via Pinterest) for a nice looking coaster flower here. That link sent me here. I decided to see if I could comfortably crochet and used Aunt Lydia's cotton crochet thread and a size 8 hook for the flowers. I really like how the flowers look.

This first card was inspired by one I saw on the cover of a special issue of Cardmakers magazine. I don't have the magazine, I was just struck by the green and white card. The inspiration card used a Martha Stewart anywhere punch, but I found this cut on the Paper Lace 2 cartridge and I cut it at 4 inches. The inspiration card used a button, but I couldn't find a good match, so that's why I thought I could crochet the flower. 

This next card was inspired by this one on Pinterest.  On Sunday I was having a devil of a time getting the quilt look I wanted, so I gave up then. Today I sat down and knocked this out in just a little bit. I think I was trying too hard earlier. LOL 


In case you didn't know, that paper is Family Ties, one of my most favorite 6x6 pads!

And, I think Mother Nature got her seasons mixed up. This is a photo taken of our deck this morning.

We've had more snow this spring than we had all winter. 
I'm not really complaining as we desperately need the moisture, but I'd be happier if it came in the form of rain this time of year.

Thanks for stopping by! 
Hope the sun is shining in your neck of the woods!
Photobucket

Saturday, April 13, 2013

Digital Project Life-Week 8

I had started Week 7 earlier in the week and finalized it today. I pushed myself a little to get Week 8 started and finished. I got input from the girls on the colors. 
Click photos to enlarge if you like


Template: The Easy Life Template 2 by Jady Day Studio (Sweet Shoppe Designs)
Kit: So Eggciting by Kay Miller (Kay Miller Designs)
Layered Cards Everyday 4 (Good Times Together) by Cindy Schneider (Sweet Shoppe Designs)
Fonts: Camellia Dee, Rochester, Teletype

Whew, feeling a little better now. I just need to get going on last week and I'll be caught up. Whoo, hoo!

Thanks for stopping by. Hope you are having a wonderful weekend!
Photobucket

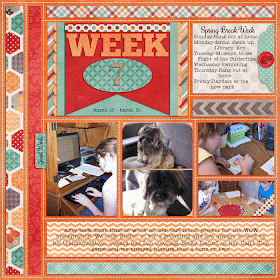
Digital Project Life-Week 7

A few days after I posted the add on pages for my last digital project life week, I realized I "added" them to the wrong week. Sheesh. I am a bit more behind than I thought! Ooops. And I'm doing my best to catch up.

So here I have Week 7, which was our Spring Break week. Click photos to enlarge if you like.


Supplies:
Template-Easy Life Layouts 1 by Jady Day Studio (Sweet Shoppe Designs)
Kit-The Best is Yet to Come by Meghan Mullens , Title Cards Weeks 1 by Cindy Schneider (Sweet Shoppe Designs)
Fonts: Rochester, Traveling Typewriter, Teletype

Thanks so much for stopping by!

Photobucket

Wednesday, April 10, 2013

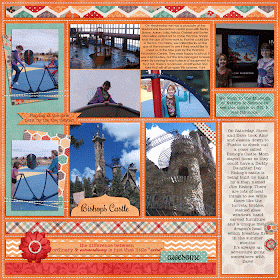
Digital Project Life-Add on to Week 6

Gosh darn it, I'm falling behind on Digital Project Life. I should have already finished Week 7 (Easter) and I haven't even started it yet. In my defense, my husband has been working on my computer, adding a new solid surface hard drive and also upgrading Windows yet again. That means I have had to reinstall a few programs. Okay, that's my story and I'm sticking to it. Ha!

A few days after I posted Week 6, I realized I hadn't included pictures of a day trip that Steve and the girls took with our friend, Dave. We always call these trips, "Adventures with Dave" because he finds unique and interesting things to do. On this day they were going to drive to Pueblo (wayyyyy south of Denver) to go see Bishop's Castle. You can read about Bishop's Castle here. It's really quite fascinating. I didn't go because, well, Easter was the next day and I wasn't quite ready for the holiday what with being busy with the girls during their Spring Break. Amy and Steve did a good job taking photos of the castle, which is being hand built by a man named Jim Bishop.


These are basic templates (American Crafts brand for Digital Project Life) with nothing really added to jazz them up. The pictures are neat in and of themselves, I think.

Thanks for stopping by.
Enjoy!

Photobucket

Monday, April 8, 2013

Butterfly Flourish Card

The card I'm sharing in this post was inspired by this card on the Clearly Besotted blog. I really liked the colors in the card and well, I love me some butterflies, so that was a big draw as well. Here's my version.

Recently I picked up a stamp set by Inkadinkado called Flower Flourishes and I've been wanting to ink it up. This was a perfect opportunity to do so. The stamps are cling mounted and the main image needs a pretty big block. Thankfully I had one. It was fun stamping this background. I got the little heart stamp from Close To My Heart's Whoo's Your Valentine stamp set. I used CTMH's Ocean and Seafoam ink. The butterflies are also from CTMH. Butterfly Wings is the stamp set name. I don't think it's available anymore. For just a bit more interest, I decided to add some silver gems. 

A simple but striking card, I think. 

Thanks for stopping by.
Have a great day!

Photobucket

Take Note Circle Happy Birthday Card

I saw a neat looking card here on the Bug Lover Cards blog. I really liked the cut out circle portion of the card. I know the person who created the card shown used an SVG file from Lori Whitlock, but I don't have that file. I thought I might be able to mimic the look using some circle punches. It was a little harder than I thought, but I managed to get a decent look with the punches I have. 

I was at Michaels over the weekend and they had some new product (to me at least) out from the Recollections line. You can see the two wooden leaves. They are small laser cut wood embellishments. Kind of like the butterflies I have used on previous cards, but these have  more detailed cuts. They are on sale this week 40% off, in case you are interested. They come in a wooden tray with six spots and a total of 18 embellishments. There are flowers, butterflies, leaves, houses and even mushrooms in one set. I was excited to use some on a card. I just used a glue dot on the side that would be covered by the flower.
Speaking of the flower, it's from CTMH's Hello Blooms stamp set stamped in Sunset ink. The happy birthday banner is from the Kudos stamp set that comes with the Artiste cartridge. And the happy birthday sentiment is from Papertrey Ink's Birthday Basics set.
The pattern paper is from Doodlebugs Flower Pot 6x6 pad. 

Thanks for stopping by. 
Hope your week is off to a good start.
*Ü*

Photobucket

Sunday, April 7, 2013

Take Note Flower Happy Birthday

There is a new challenge blog out there called Fusion Card Challenge. I found out about by reading Kay Miller's blog (she's on the design team). If you follow my blog at all, you know that I don't enter challenges much, if at all. And I'm not entering this one really. I just wanted to see what I could create with the ideas from the first challenge. They have a sketch and a photo and you could use one or the other or both in your card. So, I tried to use both, kinda. 
First up, I found out that my Cricut cartridges don't have a zig zag cut. Really? That seems odd, but whatever. I didn't have a stamp that I liked (that would go across the width of the paper). But I did like the Take Note zig zag paper, so that was my starting point.  The sketch had some squares on it, too, which is where the green square came from. It looked a little plain, so I added some polka dots to it. The photo had pretty flowers on it, so that's where the flower idea came from and I just got Hello Blooms from Close To My Heart (thanks, Becky) and wanted to use that set. I toyed with the idea of adding some gems somewhere, but it seemed to throw off the balance, so I opted to keep them off. 

All in all, I think it looks okay. And I stretched myself a bit. Baby steps, right?

Supplies:
Paper: Take Note Collection (Doodlebug Designs), Clover Meadow, Sunflower (Close To My Heart)
Ink: Clover Meadow, Sunset, Watermelon (Close To My Heart)
Stamps: Birthday Basics, Polka Dot Basics (Papertrey Ink), Hello Blooms (Close To My Heart)
Flower punch (McGill, I think), textured brad is from Hobby Lobby

Thanks for stopping by! *Ü*
Photobucket

Take Note Banner Birthday Card

I know I am a big time copy cat most of the time as my last card will attest. But on occasion I do try to pick out papers and such on my own. After I made the copy of Kay's card the other day, I worked on a version with papers I chose myself. Let me tell you, it wasn't easy. I think I probably should exercise that part of my brain more often. But here is what I came up with using Doodlebug's new line called Take Note.
It really is a trial and error process isn't it? I had initially picked out different papers, but upon working with them, I realized they really didn't look all that great, so I fiddled and futzed and ended up with this look, which I am much happier with. 

Supplies:
Take Note 6x6 paper pad
Cricut cartridges: Pretty Pennants (to make banner template), Artiste (label)
Nestabilities: Circle, Scalloped Circle
Stamp: Birthday Basics from Papertrey Ink
Border punches: Martha Steward, Fiskars
Flower punches, Gems: various from stash

Thanks so much for stopping by! Hope you are having a lovely weekend.
Photobucket

Thursday, April 4, 2013

Hello Card

My friend, Kay Miller posted a card this morning that made me smile. You can see it here. Just about anything Kay makes puts a smile on my face because she has a wonderful eye for design. I wish I could claim the same. I just recognize good stuff when I see it, I guess. Anyway, that I had some of the papers she used just made my grin even happier. Because I knew what I was gonna do today.

Yup, a shameless copy of what she did. But I did try to tweak it just a bit to make it my own. If I'd had that tree stamp she used, I'd have used it though. LOL 

Supplies: 
Kay & Co Sweet Nectar paper pack

Martha Stewart border punch

Close To My Heart: Hello Blooms stamp set (bird, Sunset flower)  
Kudos stamp set {comes with the Artiste Cricut cartridge} (tiny pink flower)   
 Bubblegum, Sunset, Watermelon ink
Artiste cartridge: Label (cut at 1 1/4)

Recollections stamp set called Elephant Flowers was used for the larger pink flower.

Nestabilities: Circle and Scallop Circle


Thanks so much for stopping by! Hope your week is going great!
Photobucket

Wednesday, April 3, 2013

Digital Project Life Week 6

I didn't mean to disappear! Last week was Spring Break for the girls and we were on the go for a lot of it so I didn't have a lot of time to get crafty. This week I've been catching up from last week, so still no real time to craft. Although I was able to finish up my layout for Week 6.


Supplies
Template: Misty Cato Words and Pictures 2 (Sweet Shoppe Designs)
Kit: Colors of Spring  (Pickleberry Pop)

Thanks for stopping by.
Now to start on Week 7
And take a few pictures for Week 8
Yikes.
*Ü*


Photobucket