Showing posts with label Cricut. Show all posts

Friday, October 11, 2013

Hello Card

One can always count on Pinterest for eye candy when one has a few minutes to browse. I saw this card and wanted to recreate it using products I had on hand. Here's what I came up with. I'm pretty pleased with how it turned out.
I cut the window with my Cricut and the Creative Cards cartridge. In hindsight, I would probably make the window a little bit larger, but it's not too bad. 
I bought the trees stamp a while ago. It's even a woodie! Wow, huh? I stamped it in Cocoa ink (CTMH) and then sponged some Tim Holtz distress inks. I've popped up the window on foam dots. I punched the leaves with a Martha Stewart punch and used a Spellbinders die for the sentiment. The Hello is from Hello Blooms (CTMH) and is stamped in Garnet ink. I used a Cuttlebug embossing folder for the bottom "wallpaper" and some Simple Stories Harvest paper for the top piece. The button was in my stash. 
I appreciate the inspiration I find out there on Pinterest and in blogland. 

That's it from me!
Hope you have a great start to your weekend.
Thanks so much for stopping by!

Photobucket

Sunday, April 21, 2013

Creative Cards from Cricut

I sat down yesterday to play with the Creative Cards cartridge again. I was inspired on one from a new Northridge Publication called Cricut: Simple + Stylish. I saw that cover in a store and was instantly smitten. I thumbed through the magazine and saw several ideas I liked. So, I went home and bought the digital edition at Northridge Publishing.

Here's my version of that cover card.
I'm really happy with the final outcome. 
The directions indicated one should cut two of the trifold pieces and fill in the frame on one using Cricut Craft Room. I by passed that. I just cut two and cut off one section to cover the back of the gingham paper because it is a double sided print. I figured the brightly colored popsicles on the flip side didn't quite go with the feel of the rest of the card. LOL.  I also used an embossing folder to add a little more texture. 
Supplies:
Flower Box 6x6 pad, CTMH Heavenly Blue cardstock. AC white cardstock. Button from stash. Center of button CTMH, PTI Mixed Messages, Cuttlebug Swiss Dots embossing folder Cartridges: Creative Cards, Flower Shoppe (leaf), Artiste (banner)

I'm also very happy with this card. I love that peachy color! Want more, please!

Supplies: Doodlebug's Flower Box again and all the accessory cuts for this card are cut at 5 1/2. I didn't cut the base using the Cricut because it's simply a rectangle. As you can see I dry embossed the butterflies to add a little more interest as well as adding some pearls. I'm thrilled to have some of the fish tail cuts on this cartridge that I can use on other cards. *Ü*

Pretty straight forward cards, but pretty, in my humble opinion. I'm really glad I picked up this cartridge. 

Thanks for stopping by. Hope your weekend is going well. 
Photobucket

Thursday, April 18, 2013

Cricut Creative Cards

Provocraft recently released a new cartridge called Creative Cards. I really liked the window cut on the cartridge. It reminded me of a Memory Box die that is available for purchase. Anyway, I picked up the cartridge when it was on sale at Michaels. And I made the window card on Sunday at the crafty playdate.

It's not easy to tell, but this is a trifold card, which is kind of neat. I cut and layered the pieces just as shown in the photos. I'd like to make it again and add a little more detail.

I was also struck by this cut. I really liked the scalloped edge and that flower is very appealing. 
I used papers from DCWV's Green Tea stack from a couple of years ago. Instead of the white cut to go across the card, I decided to use some ribbon. 
This card I modified a little. The blue piece is supposed to be a flap that opens up, but I cut it and adhered it down. I also trimmed the background piece so the white card base would show. 
Again this is DCWV's Green Tea stack as well as an older CTMH birthday stamp set. I added some green gems as well. 

I like that the cuts aren't too intricate and will be fun to play with and add details. 

The sun shone brightly all day today and it warmed up to the 30s. Let the warm up and melt off begin. 
Until the next storm, slated to arrive on Monday. 

Thanks for stopping by!
Have a great day.
Photobucket

Saturday, March 2, 2013

Happy Easter Trifold Card

When I saw this card on the Paper Creations by Kristin blog, I was instantly smitten! I thought it was absolutely adorable and I really wanted to make that card. Unfortunately, I don't have the svg files that she used in my stash and it would have been way too pricey for me to buy them for one card. So, unless the site has a super awesome sale, I'm out of luck on those for now. 

BUT, I do have a Cricut and I do have some cartridges with some similar style cuts, so I sat myself down and searched and by trial and error along with a SplitCoastStampers tutorial on how to make the card base, I made my own version of this card. I'm pretty tickled with the end result. 


I took this shot to show how the card folds so if you wanted to mail it, it could fit an envelope.

I used cuts from Create a Critter, Create a Critter2, Doodlecharms, and Simply Charmed
Most of the cuts are in the 1 1/2 to 2 inch range.

I had fun searching for most of the images, but that bottom center panel was giving me fits. I couldn't find a bow that I liked, which is what the inspiration card had. I cut a swirly thing, but it didn't match the feel of the rest of the card, so I pulled it off. Then I thought I'll just tie a bow, but I didn't like that either. As I was searching my ribbon, I came across a spool of the wired little pom-pons that I picked up at Christmas time, but never used. Hmmmm....those could be little bunny tails! I suppose it might work better if I added circles underneath, but I liked it on the pink ribbon. 

The letters for Easter are from a font on my computer called Showcard Gothic. I printed out the word in the size I wanted, then I cut out the letters. I put them backwards on the piece of cardstock and traced them and cut them out of cardstock. I could have used Make The Cut and the Cricut, but to be honest, I'd been working on this project most of the day yesterday and I was getting tired. It was easier for me to sit and do this over lugging my machine to the computer and hooking it up and cutting, then lugging the machine back to my craft space. LOL

Add a little inking around the edges, some white gel pen dots and bling here and there and it was finished.

All in all, this took a lot longer than I'd planned for, but I think the effort was worth it in the end.

Hope you are having a happy weekend so far.
Thanks for stopping by! 
*Ü*
Photobucket

Thursday, February 7, 2013

Casing a Card I Saw on Pinterest...

Before I show the card I cased (copy and steal everything), I have to ask about just how to link a project I see on Pinterest. I'm never sure. I usually click on the pin and have it take me to the blog post where the pin originates. But this completely bypasses the Pinterest site and the pin I saw. But if I copy the url for the pin itself, wouldn't that take you to my board and give you access to my account? I dunno, but it's on my mind as I start this post so I thought I'd ask and see if any Pinterest savvy folks know what I am talking about and if I am going about linking correctly. I always give credit to the post/person from where I get the inspiration, so I think I am covered. Right? (shakes head to get rid of any cobwebs)

Okay, so, as I said I saw this on Pinterest and I just loved the card and after I smacked myself on the forehead asking myself why I couldn't think of this pretty card, I got to work copying it. Well, maybe there is a small tweak or two, but mainly, it's copied.
Aren't the colors so springlike? This paper is from Pebbles, Inc and it's that new Family Ties 6x6 paper pad. I didn't have the exact butterfly, but I searched my cartridges for my Cricut and found this butterfly cut on Elegant Edges (the shadow feature). I cut the polka dot one at 2 1/4 inches and the smaller one at 1 3/4. And what I've been doing that I didn't do before, is I am using the Real Dial size. I never thought to do that before. Duh. And this time, because I wasn't sure what size I wanted the butterfly, I did some test cuts at different sizes using scrap paper. (taps forehead) Occasionally, I have flashes of being a little bit smart. Yes, I've been known to guesstimate and use the pattern paper and not get the size I want and say grrrrr.  The yellow mat is cut using Artiste and I forgot to note the size, I want to say 2 1/2 inches.  Instead of ribbon, I chose to use Heavenly Blue cardstock, cut at 1 1/2 inches wide and I used a Martha Stewart border punch on both sides of the strip to get that lace-esque look. You can't really see it in this shot, but I did bend the wings on the top butterfly up just a tad. The pearls are from my stash. I probably got them at Hobby Lobby.

In other news...I just watched a pretty good beginner video on using colored pencils and odorless mineral spirits. You can see it here. Fair warning, it's pretty long, so watch when you have some time, or just watch the supplies portion. I liked it because she gives a good lesson on products to use to color with pencils and odorless mineral spirits. I haven't watched her videos before and I have to say I liked her common sense approach to his technique. You can find the supplies pretty much at Michaels or Hobby Lobby. I personally use Walmart's Georgia Pacific white cardstock with no problems at all. 

Okay, that's it from me for now. Thanks for stopping by. Hope you have a great day!
Photobucket

Friday, February 1, 2013

Doodlebug Lovebirds Card

Not the most original of titles for a blog post, but I can’t think of anything else to call it.

As you know, I really like Doodlebug papers. Their designs are so crisp and sweet. I came across this post on a blog hop for Doodlebug and decided to make my own interpretation of the card.

Here’s the final result:

105_9977

While I like the 6x6 paper pads, I don’t often buy the accessories because, well, to be honest they get kind of pricey for just a few embellies and I’m definitely on a low spend budget. I usually just use the paper and call it good.  Oh and I buy the baker’s twine because it’s a good value, I think, especially when I have a coupon. Well, this time I wanted to challenge myself to mimic the items the designer used on her card. I’m pretty happy with what I came up with.

First of all, the red “doily” is cut using CTMH’s Artiste cartridge on my Cricut. I want to say I cut it at 3 inches, but that’s just a guess. I actually cut this a week or so ago and have let the pieces percolate until the other day.

Quick hijack of my own post. I’ve been on the look out for some good solid color cardstock that doesn’t cost an arm and a leg and came across some feedback in the Cricut forum about Michael’s Recollection brand cardstock. The ladies just raved about how well it cut. These packs of cardstock have been on sale off an on recently and I picked up some reds/pinks and finally decided to try it on this doily. I have to say I am very pleased with how well it seems to cut. Yay!

I do believe that most of the items used are self explanatory. Scallop Nestabilities, Martha Stewart heart punch and heart border punch, Fiskars scallop border punch and Cuttlebug embossing folder, Doodlebug’s Valentine Baker’s twine.

And there you have it.

Thanks so much for stopping by to visit. Til next time…

Wednesday, January 23, 2013

Oh Happy Day Card

I had some time today to work on a birthday card to hold a gift card and I have to say, I’m very happy with the end result. I started out in a completely different place and wound up with this result. What a happy surprise.

There is a blog I’ve followed for a while written by Kay Miller. She designs digital products and I just love her style. If you look back on some of my digital layouts, you’ll see plenty of Kay Miller Designs in use! Recently Kay has decided to utilize her blog, My Joyful Moments,  to share cards she has been making and what a treat it’s been to see her projects. She is so talented! I think I have starred each of the cards that has shown up on my Google Reader.  Okay, so yesterday Kay posted a card that thought I wanted to kind of CASE.  I haven’t used Linen Closet from DCWV for a while and I thought it’d be a great card. So, I started there, but I really don’t have any of the flourish type of stamps (that stamp well) and I couldn’t find a Cricut cut I liked so I got a little discouraged. In my rummaging around I remembered I recently picked up a new 6x6 pad of Pebbles Family Ties Collection that I’ve been wanting to play with.

I decided to ditch the floral clusters and ended up playing with my new Cricut Artiste cartridge/kit that I got from CTMH.  That’s where the chipboard banner and Oh Happy Day stamp came from. Fun, huh?! The little stickpin is also from CTMH.

105_0214 105_0217

On Artiste, there is a cut to hold a gift card and that’s what I decided to make for this card. I wanted to dress up the inside of the card, but didn’t want to use up paper, so I stamped the dots with a Papertrey Ink stamp and Sunflower (CTMH) ink.

The embossing folder used that you can see on the front of the card is from Hobby Lobby. It’s a Paper Studio brand folder. The blue and yellow cardstock is from DCWV’s Spring Cardstock stack.

So, there you have it! A fun way to dress up a gift card for a special someone.

Thanks so much for stopping by!

Sunday, October 21, 2012

Happy Birthday, Jessica…the Big 1-0

And now I can reveal why I haven’t had much crafty stuff to share the past week or so…I’ve been getting ready for Miss Jessica’s 10th birthday party. Screeech…what? There is no way that she is 10 years old. In fact, Steve kept telling her that we weren’t going to have a party after all so she would stay nine. She was on to that idea. She knew that wouldn’t stop her turning 10. Darn.

Warning…picture heavy post coming up…click on pictures to enlarge

Here’s the birthday girl this morning.

 103_9951 

She’s wearing a necklace my friend made and sent to her for her birthday.

And this is the main reason I haven’t posted. I know I said I wasn’t much of a knitter, but when Jessica found this book in Michaels several weeks ago, she pleaded ever so prettily about my getting it. Of course I told her no, we weren’t there to get that in my mean mom voice. 104_0019

Obviously, I knew I was going back without her to pick it up and to work on a project for either her birthday or Christmas, depending on if I could actually create a project. It is knitting after all and I’m not much of one.

So…I’ve spent several school hours working on the purple dress you see on the cover and I managed to finish on Friday.  Ta-da! Oh and a time or two I left a piece out and had to finagle a way to hide it so she wouldn’t notice.

 103_9957 103_9958

I had one happy 10 year old when I came out with Jessica Anne wearing the dress. Yay, mom says with a fist pump. Guess maybe smaller projects are okay.

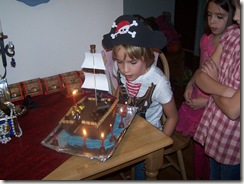
The theme of our party was Pirate, inspired by the tv show, Jake and the Never Land Pirates. Jess enjoys watching it in the morning before school.

 103_9959

Here is the cake table. Thanks so much to my friend, Susi, who graciously loaned us the candelabra, chest AND jewels to set the mood.

103_9961


 103_9955

The girl pirate on the show is Izzy and we made these little bottles of pixie dust for the girls who attended. Izzy wears a pouch full of pixie dust to help the fellow pirates out on occasion.
103_9960 

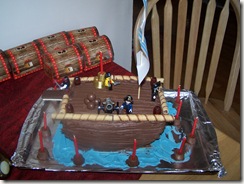
The cake is my take of the idea shown on the Family Fun website here. Thanks to Susi’s kids for loaning us the mini figure pirates and cannon.
 103_9962

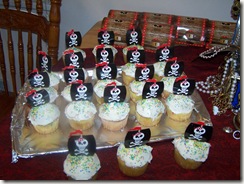
I knew the cake wouldn’t feed everyone, so we made some simple cupcakes, too .103_9967103_9968

A couple of more shots of the cake. It is reminiscent of Bucky, the ship in the Jake and the Never Land Pirates show. Jessica colored the sails and Amy added the Rolo candy for the Crow’s Nest. I personally liked the plank on the back end. LOL Anyone remember rootbeer candy? Or am I totally aging myself? We added some to the cake because they make great barrels. I ate one and was instantly transported back to when I was growing up.

 103_9965

Our pirate girl ready to par-tay. I found that shirt at the thrift store yesterday by a totally serendipitous fluke. The hat, too only we added the skull to it.

 103_9963 

Some of the decor. I found some great pirate themed party supplies at Hobby Lobby and took full advantage of their 40% off coupons. The die cuts on the window are cut from my Cricut using Life’s a Party. My friend, Felicia graciously loaned me that cartridge. Thanks, sweetie! I need to take a picture of the front door where we had a map and the phrase pirate party.

 103_9969

Playing a game where you drop a penny into the water. At the bottom is a small bowl or shot glass that you are trying to get the penny into. The kids seemed to like it.

 103_9973

Birthday girl looking pretty happy.

 103_9976

We also played the same dice game that we played at Amy’s party and the Cookie game as well.  This  young man sure likes this game! He’s pretty good, too.

 103_9996 103_9995

104_0016104_0018

And after the party, Jessica had a great time putting together one of the gifts she received.

Oh and the cake…

104_0015

Destroyed…but in the best way. Yay!

Whew, I’m pooped, but happy to have another party under the belt and a happy 10 year old.

Thanks for stopping by and reading this, if you even got this far!

Hope you had a fun weekend and are ready for a brand new week.

Saturday, October 6, 2012

Halloween Cards

Yay, I finally had some success in creating some cards. Halloween cards to be specific. The girls were invited to go swimming with a friend, which gave me the perfect opportunity to work on them. I could probably share one a day for the next several days, but what’s the fun in that? So, here we go…

All of the cards use Doodlebug’s Halloween Manor, the 6x6 pad. Love it!!

 110_9918

There’s not a whole lot to this card, but it’s fun nonetheless. The paper is double sided and when I flipped the piece I was using over and saw the spider paper I might have squealed just a little. While putzing around the room, I came across a couple of packs of these blingy spiders and web from Michaels. They are the Recollection brand and I remember getting them last Halloween or thereabouts. I thought they were cute. I think they were on clearance, too. Anyway, either I couldn’t figure a good way to use them or it was after Halloween, so they’ve sat on the shelf for one long lonely year. I saw them and connected that I could use them with this cute paper and Ta-Da! Easy peasy lemon squeezy cute card. No muss no fuss. Gotta love that, right?

One of the papers in the pack has these adorable owls and I was so itching to use the owl paper with the die cut owl on the next card, but it was just too busy. In the end, I held off and came up with this cutie patootie witchy owl.

110_9917

Okay, I didn’t come up with the owl, Provo Craft did on their Create a Critter 2 cartridge. I just made it super cute with the great Doodlebug papers and a little Doodlebug twine. The sentiment is the phrase cut for this owl, too. Only I had to change the size. The owl is cut at 3 inches, but the sentiment is cut at 1 inch. The circle/happy is supposed to have an overlay so that the letters are black, but I chose to glue those itty bitty letters to the circles. Yes, I know it’s nuts, but I liked the look better. Oh goodness, the time I spent figuring out which papers to use…but it was fun, kind of like paper dolls. And… you don’t know how badly I wanted to add some black Stickles to the mask. I had the tube in my hand and almost started and then pulled back a couple of times. I was so worried that it wouldn’t look as cute as I wanted it to and I didn’t feel like cutting out a second owl. Call me a wimp, I can take it.


Okay, this next card…oh my goodness, I can’t tell you how many times I looked at the stamp at Archiver’s after I saw their sample card in the store. I wanted to get the stamp sooo bad, but wasn’t sure if it would be worth it. The store sample is colored with Copics and it was so vibrant. Finally I figured if I couldn’t get the dang stamp out of my head, I’d go ahead and buy it (with a 43% off coupon, whoo hoo), so I did and had fun coloring it with my colored pencils and mineral spirits. What do you think??

110_9925

I had it colored weeks ago, but not put together onto a card. Ultimately, the image is too large to really do much else but mat it. Doodlebug to the rescue. Gosh, I do like those papers. While I was coloring my copy, both girls colored a copy for themselves. Only, I’m not sure where their versions are at the moment.  I just looked and cannot find them to take pictures…phooey. They aren’t home to ask. The same friend they went swimming with asked if they could spend the night…hmmmmmm…..SURE! *Ü* hee, hee.

Okay, now…when I saw this card on The Creative Closet blog, I fell in love with the image of little Hazel. I immediately went Wee Stamps and purchased the digi image (it’s about half way down the page). Oh my goodness, all of those images are adorable. Anyway,  Cindy Lawrence did an amazing job coloring her. So much so that I did my best to recreate the look with my pencils and odorless mineral spirits. Here is my version…she is just too sweet, I think.

110_9926   

I’m pretty dang happy with the results of my efforts on these cards today. I have to admit though, I took a bunch of photos of the two colored cards and they still look a little washed out. Darn. And on Hazel, you can’t really see that I chalked the background, green on the bottom and blue around the top. Oh well. They do look better in real life and you will just have to take my word for it.

And there you go, hope you had fun checking out the cards. You know, today is World Cardmaking Day, I guess I was able to celebrate after all.

Thanks so much for stopping by. I hope you have been able to do something crafty today.

Friday, January 27, 2012

I Stamped Today…

Well, hello there! I hope you are doing well and are excited to get to the weekend. Should be interesting around here.

I had several birthday cards that needed to be made for the staff at the girls’ school and I haven’t been able to sit down and make them until today in a marathon session. Thought I’d share them with you.

I didn’t enlarge the photos, just looked at them in the camera screen before I took the cards to be delivered.  I’m sorry to say that the pictures are slightly blurry. But I think you can still get a good idea of what they look like. :-s

   IMG_0127

This one has been sitting on my craft desk for a couple of weeks! I had most of it ready, but it needed to be glued down. The color is Indian Corn Blue (Close To My Heart). I used a Sizzix die for the flourishes (I cut three), a Cuttlebug embossing folder and a Martha Stewart paper “doily.” The sentiment is from Paper Trey Ink’s Birthday Basics. The doily is pop dotted for dimension. I’m pretty tickled with the final result. My inspiration for this card is from Dawn Easton’s Treasure Oiler Designz blog here.

IMG_0126

Can you believe I just stamped on this card?! Oh and added a little Doodlebug Twine, hee, hee. The set is Floral Frenzy and it’s an older set from PaperTrey Ink, but it’s definitely still a goodie. My inspiration card is here and was the introduction to the final floral set in the series by Melissa Bickford. I discovered that I didn’t have a straight line stamp for the stem, what’s up with that? So, I opted to just stamp the flowers in Indian Corn Blue, Watermelon and Crystal Blue, with Sunflower centers (CTMH). The PTI birthday sentiment is stamped in Indian Corn Blue as well.  I eyeballed the placement of the stamps, so they definitely are not perfectly lined up. If I wasn’t so down to the wire, I might have added some leaves, but I still like the look of this card. I am wishing I had the plaid flower set as shown on the inspiration card, though. *Ü*

IMG_0129

On my list were two male staff members. Since guy cards are so hard to come up with usually, I just made two of this card. I’m pretty tickled with how this one looks! My inspiration can be found here on The Paper Landscaper blog. I used the Cricut for this one. The circle and stars specifically are cut using the Ribbons and Rosettes cartridge. The stars are 2 1/2 and 3/4. The circle is three inches, but then I ended cutting it in half. The green piece is hand cut to get the edge.  I stamped the blue polka dots using Dutch Blue on a PTI polka dot stamp set. The sentiment is also from PTI. The papers are from DCWV’s Green Tea stack. The twine is from Doodlebug.

IMG_0125

I was getting down to the wire by this time and had to come up with one more card and something that wouldn’t take too long. The Paper Landscaper came to the rescue again as I starred this card in my Reader. I chose to use Linen Closet papers (DCWV) and couldn’t be happier with the final result. The swirly pearls are from Michaels Recollections line. The butterfly is a cut from Ribbons and Rosettes and I cut one at 3 inches and the other at 2 1/2. These colors really made me think of the teacher who got this card.

Whew, I got them all done with a little time to eat lunch, snap some pictures (albiet blurry ones) and head out the door to go to the school.  Hopefully the recipients will enjoy them!

Thanks for all the happy thoughts about our kitchen re-do. Last night he and his buddy took out the sink and the rest of the cabinets and countertop, while I was at Girl Scouts with Jessica.  The bottom half of my kitchen is well and truly gutted! Amy took a ton of pictures. Pretty much a blow by blow pictorial of what the guys did. Love it. Steve took today off and worked on laying some plywood down to fill in the space needed where there used to be old particle board (what apparently was used way back in the day).

Here are a couple of the shots she took, plus a little self portrait. *Ü*

IMG_0091 IMG_0107 IMG_0105 

What a happy smile. She just recently got her hair cut short again, but honest, it’s not quite as short as this photo looks.

Thanks for stopping by! Hope to see you again soon!

Jeanne