Thursday, October 18, 2012

Pinterest Leads to Dinner Inspiration

I posted several months ago about something that happened to a friend via Pinterest and I got nervous about having a Pinterest account and worried that by pinning, I’d be violating copyrights. Well, I’ve been emailing my good friend, Barb, who blogs at The Buzz (which is a fabulous blog. If you haven’t been there, you should stop by and see some of her fantastic cards). Anyway, Pinterest came up and she told me she’d been pinning for years without any problem. Another friend talked about pinning and I brought up my nervousness and she thought they’d fixed the issues. So, armed with Barb’s help and tips I have reactivated my Pinterest account and am dipping my toes into the Pinterest ocean. I’m still learning and haven’t pinned too much, but if you are interested at all in what I might pin, I’ve added a link on the sidebar ---->.

All that to lead up to today’s post. I was meandering around on Pinterest yesterday, while Jessica was doing homework and saw a pin that had something in muffin tins. I’m so green at this, that I didn’t immediately pin what I saw, but it took me to the Betty Crocker website for Bisquick and Impossibly Easy Mini Chicken n Broccoli Pies.  I decided to make them for dinner last night. I’ve made Impossible Pie before,  years and years ago, but these mini pies were new to me and I thought I’d share how it turned out.

103_9946

You put about a tablespoon of the Bisquick mixture in the bottom of the tins, then the meat/veggie/cheese mixture. I don’t profess to be a food blogger and you can see I oversprayed the cooking spray and got some of the mixture outside the tin area. Oh well.

 103_9947

Then you put another tablespoon of the Bisquick mixture on top and put them in the oven for about 30 minutes.

 103_9948

Here’s what they looked like after baking. To me they look delicious. I decided that we needed something gravy like on top to offset any dryness of the mini pies, but I didn’t have any gravy, let alone chicken gravy. So, I made chicken condensed soup and added the leftover broccoli I had. It was the perfect accompaniment to the little pies. 

 103_9949

Yum! The girls were quite happy with the taste and would like me to make this again. Yay!

I’ve been busy with life in general and haven’t finished any crafty projects to share, so I thought I’d pop in, share this and let you know I will post more crafty things soon.

Thanks so much for stopping by. If you are on Pinterest, I’d love to check out your boards. Have a great day!

Tuesday, October 9, 2012

Scary Muffins (??)

Okay, so how in the heck can muffins be scary? I guess if you think about the muffin top you can develop by eating too many, that can be pretty darn scary. But that’s not what I mean.

I’ve been a crocheting fool over the past few weeks and on Sunday, while watching the Broncos lose the game (darn), I finished up this scary muffins project.

TA-DA!!!

110_9938

Can you believe this? I came across this pattern at the Red Heart yarn website. I can’t remember why I was even there, but how fun is this find?

110_9939

Jessica, who is very afraid of spiders thought this one was cute and she even suggested the red eyes. Wow!

110_9940 

Not a very scary skull, but more ookey maybe?

110_9942

It’s not Halloween unless you have a pumpkin, right? I got some felt that had adhesive in it, so it would, in theory, stay put while I hand sewed the piece on. It’s a little wonky, but who cares, right?

110_9941

I think this eyeball one is the spookiest.

110_9943

And each muffin comes out of its holder! You can mix and match them if you want. Hey, want a little memory game with your Halloween decor??

Thanks for stopping by. Hope you are having a great week so far.

Fall Basket

I really like the paper projects you can find at SVG Cuts.  I wish I was as creative as the gal who comes up with the ideas. When I saw this Fall Harvest SVG kit, I oohed and ahhhed over the basket and the card, and that pie and bought the file. LOL And then I sat down to make said basket. It went together rather quickly and has sat for a few weeks while I tried something that I liked to put into the basket.  I bought some filler, put it in and didn’t like it. But, I wanted to show you the basket, so I just threw in a fall themed kitchen towel and took some pictures. I used DCWV’s Autumn Melody paper bought at Joann’s. 

110_9934 110_9935

Aren’t the flowers pretty? The Close to My Heart brads were a perfect match for some solid DCWV paper (not from the Autumn Melody stack).  The button is from my stash.

110_9936 

Love the colors, and the look of the project. Am happy I made it, but sure wish I could find something I liked to put inside it.

Here’s what I decided to put in the witch’s shoe from my previous post…(just in case you were in the least bit wondering…)

110_9944

Yummy butterscotch candies! *Ü*

Thanks so much for stopping by. Come back very soon because I’ve got another post to share in just a bit…

Saturday, October 6, 2012

Halloween Cards

Yay, I finally had some success in creating some cards. Halloween cards to be specific. The girls were invited to go swimming with a friend, which gave me the perfect opportunity to work on them. I could probably share one a day for the next several days, but what’s the fun in that? So, here we go…

All of the cards use Doodlebug’s Halloween Manor, the 6x6 pad. Love it!!

 110_9918

There’s not a whole lot to this card, but it’s fun nonetheless. The paper is double sided and when I flipped the piece I was using over and saw the spider paper I might have squealed just a little. While putzing around the room, I came across a couple of packs of these blingy spiders and web from Michaels. They are the Recollection brand and I remember getting them last Halloween or thereabouts. I thought they were cute. I think they were on clearance, too. Anyway, either I couldn’t figure a good way to use them or it was after Halloween, so they’ve sat on the shelf for one long lonely year. I saw them and connected that I could use them with this cute paper and Ta-Da! Easy peasy lemon squeezy cute card. No muss no fuss. Gotta love that, right?

One of the papers in the pack has these adorable owls and I was so itching to use the owl paper with the die cut owl on the next card, but it was just too busy. In the end, I held off and came up with this cutie patootie witchy owl.

110_9917

Okay, I didn’t come up with the owl, Provo Craft did on their Create a Critter 2 cartridge. I just made it super cute with the great Doodlebug papers and a little Doodlebug twine. The sentiment is the phrase cut for this owl, too. Only I had to change the size. The owl is cut at 3 inches, but the sentiment is cut at 1 inch. The circle/happy is supposed to have an overlay so that the letters are black, but I chose to glue those itty bitty letters to the circles. Yes, I know it’s nuts, but I liked the look better. Oh goodness, the time I spent figuring out which papers to use…but it was fun, kind of like paper dolls. And… you don’t know how badly I wanted to add some black Stickles to the mask. I had the tube in my hand and almost started and then pulled back a couple of times. I was so worried that it wouldn’t look as cute as I wanted it to and I didn’t feel like cutting out a second owl. Call me a wimp, I can take it.


Okay, this next card…oh my goodness, I can’t tell you how many times I looked at the stamp at Archiver’s after I saw their sample card in the store. I wanted to get the stamp sooo bad, but wasn’t sure if it would be worth it. The store sample is colored with Copics and it was so vibrant. Finally I figured if I couldn’t get the dang stamp out of my head, I’d go ahead and buy it (with a 43% off coupon, whoo hoo), so I did and had fun coloring it with my colored pencils and mineral spirits. What do you think??

110_9925

I had it colored weeks ago, but not put together onto a card. Ultimately, the image is too large to really do much else but mat it. Doodlebug to the rescue. Gosh, I do like those papers. While I was coloring my copy, both girls colored a copy for themselves. Only, I’m not sure where their versions are at the moment.  I just looked and cannot find them to take pictures…phooey. They aren’t home to ask. The same friend they went swimming with asked if they could spend the night…hmmmmmm…..SURE! *Ü* hee, hee.

Okay, now…when I saw this card on The Creative Closet blog, I fell in love with the image of little Hazel. I immediately went Wee Stamps and purchased the digi image (it’s about half way down the page). Oh my goodness, all of those images are adorable. Anyway,  Cindy Lawrence did an amazing job coloring her. So much so that I did my best to recreate the look with my pencils and odorless mineral spirits. Here is my version…she is just too sweet, I think.

110_9926   

I’m pretty dang happy with the results of my efforts on these cards today. I have to admit though, I took a bunch of photos of the two colored cards and they still look a little washed out. Darn. And on Hazel, you can’t really see that I chalked the background, green on the bottom and blue around the top. Oh well. They do look better in real life and you will just have to take my word for it.

And there you go, hope you had fun checking out the cards. You know, today is World Cardmaking Day, I guess I was able to celebrate after all.

Thanks so much for stopping by. I hope you have been able to do something crafty today.

Halloween Projects

Jessica was going to be staying after school an extra hour yesterday for a class she signed up for and I decided to ditch any and all obligations to just craft with all that time I had. Oh I had such grand ambitions. And I made two things. Really?? Yep, just two. Two cute things mind you, but only two. Sigh. In the end it’s okay, because that’s two things more than I had when I started, right? Wanna see? Sure you do, that’s why you are here.

Here you go!

110_9914

This is the first project that got completed. Notice I said got completed. I’ve actually made one of these before (but not yesterday) See?

110_9911

Whoa…totally different looks, yes?

Yep, and I made a taller jar, too(way to state the obvious, Jeanne). I really kind of liked them. Well, except for the dang white ink I sponged on the edges of the shorter jar, thinking it would look as neat as the project that started this all. SVG Cuts Toil and Trouble Kit. I even ran out and bought the embossing folder with the spider webs, the last one they had at Hobby Lobby. I didn’t get to make the label though, when I made these jars. So, yesterday, my first thought was to make the label to finish off the jar and hopefully hide that ugly white ink, that I tried to hide by inking black over it. Actually I disliked that inked look so much, I decided to start ALL over again and make a new one.

Okay, so here is why I CASE (copy and steal everything) so much. I cut out black pieces for the new jar. Then I started to make the label as shown in the project picture. Only, I don’t have the same designer paper and I don’t want to buy it for this one little part of the project. So, I thought I’d use some Doodlebug Haunted Manor paper. It takes me time to figure out which ones to use. But I also needed some solid paper, that takes time to ponder as well.  I CASE so much because I have the most difficult time decided what to use when I don’t CASE.

And to try to be more efficient, I don’t need full sheets of paper to cut out the smaller pieces to make the label. I can cut smaller pieces and put them in different places on my 12x12 mat and cut all the different components at one time, thus saving time and getting this dang label made so I can move onto another project. Only….only….the actually cutting out the pieces didn’t match the placement of the paper on the mat…SIGH. I had to start that over again! Arghhh. So I did that over again. And a paper moved, so I did it again, and it moved and the whole lets get this done in one fell swoop wasn’t going to happen. I ended up putting full sheets of paper  on the mat and cutting little bits out of it.  Not much of a time saver when that happens, but in the past the idea has worked perfectly.

Okay, so I got all the pieces cut out, but now….the skeleton cut out doesn’t match the feel of the Doodlebug paper I’m using. It’s not cutesy enough. Ugh…I know that sounds stupid, but it also looked stupid. So….okay, I can grab a Cricut cart or two and try to find something to use. It took me a while to figure out just what might look better. I decide on the treats in Mini Monsters. Get all those pieces cut out and….wait for it…now the black that I cut out for the jar no longer matches the feel of the Doodlebug paper. Sigh… My neck is starting to stiffen up. It’s taking me hours to get this one silly little label made! LOL 

Instead of black, I’ve now decided on Hydrangea (from CTMH) and instead of spider webs, I liked the big dots on a Cuttlebug folder. And to give the dots some depth, I rub the inked sponge over the raised dots. Okay, I’m using cardtstock that has a white core and I don’t like the white showing, so I ink all the edges of the pieces I’m using to make the jar. But I’m not inking any edges white, so we should be good to go there.  Then I decide the candies need some twine, oh and some pop dots and several hours later, I’ve got my one project finished…
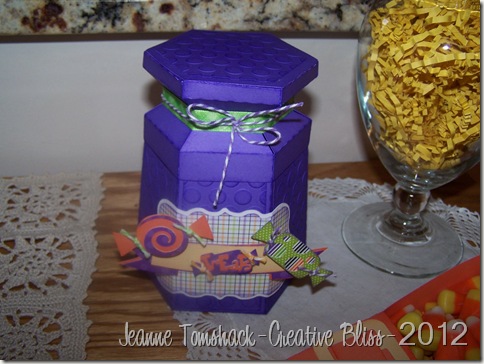
110_9914

TA-DA!!!!!

Okay, so it does look really cute as a purple candy apothecary jar, if I do say so myself. But man, oh man, what a long drawn out process to get this one little project completed. And the jar doesn’t have any dang treats in it!!! LOL And you wonder why I took such a long creative break do you? This was exhausting and my neck hurts at this point. LOL It was kind of worth it in the end though, right?

But, a look at the clock said I still had some time left so I decided to make the witch shoe from the same kit. I initially cut out the pieces with black paper, but now that the jar is purple, black just isn’t cute enough. More decisions…and orange it is! DCWV solid paper from their Ghosts and Goblins stack from last year.

110_9915 

TA-DA!!!!

Well, not quite that fast. I had to watch the little put it together video the site offers to show you how to get the pieces to fit. It was pretty easy, but I wanted to be sure I did it right. I did tear the paper by the heel (made you look, didn’t it?), but I wasn’t going to cut another piece of paper at this point.

I didn’t want to take a picture of the shoe empty because how silly would that look? So, I grabbed some candy corn and poured them into the shoe. An empty shoe would look silly, but one with candy corn would look…smart???? I dunno, but there you go. I was going to fancy up that buckle, but at this point, I was D O N E playing with paper.
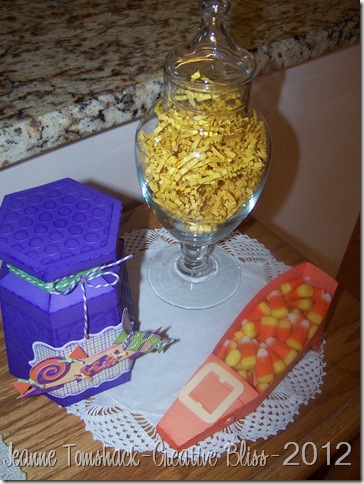
110_9913 

And here’s what I got accomplished.

Then I had to clean up the mess I made in creating these two relatively “simple” projects. It looked like a paper bomb exploded in the room! LOL

On a positive note, Jessica noticed these goodies right as she walked into the living room and loved them.

That my friends, made all the effort worth it! Amy doesn’t get home from school until about an hour after Jessica and I get home, so she got to see this in all its splendor first.  (Only I took the candy corn out right away. Didn’t want to leave them out…just in case any unwelcome guests manage to sneak into my house now that the weather is cooling down. We certainly don’t want to entice them in, either) .

In all honesty, I was done papercrafting after I got these two projects done. But I still had some time left before heading out to get Jessica from school, so I sat on the couch and worked on a yarn project. Which shall remain unnamed and unshown until  such time as I actually finish the project(s).

I really do enjoy papercrafting. I just always think I can get more done than I actually can. I wanted to make some cards yesterday, but obviously that didn’t happen. If you are still reading, thank you. I just wanted to share what really happens sometimes to get to the finished project.

Here’s hoping your papercrafting projects bring you much joy and happiness!

*Ü*

Tuesday, October 2, 2012

Halloween is On the Way…

Seeing that it is October, Halloween is going to be here before we know it. I saw a cute project on the Bug Lover Cards blog here and felt inspired to make a version for myself.   110_9908

That meant I needed to get that great spider web here and cut it using my Cricut and Make the Cut.

I’ve had the spider web brads since last Halloween. I picked up a Halloween themed package of brads at Hobby Lobby and never used them.  I found the pails at Target in the dollar spot. I liked the ribbon handles. The ribbon is from Michaels and the twine is Doodlebug. The orange paper is from DCWV Halloween themed paper from  last year and I inked the edge with black ink. Oh, I found the neat looking paper straws at Michaels not too long after they put out their Halloween stuff. I haven’t seen the package there since then. 110_9912

Not sure where they will look best just yet…

I was hoping to get more accomplished than I did today (isn’t that always the way).  But, at least I got something finished, right?

Thanks so much for stopping by. Hope you are having a lovely day.

Monday, October 1, 2012

I’m a Crochet-er, not a Knitter…

I was at Hobby Lobby not too long ago, checking out and looked over at the lady behind me. She had a piece of knitting work-in-progress in her basket and it was camouflage looking. She was making a little jacket or something and was buying the pink version of the camo yarn. I was so taken with the idea of a little camo jacket/sweater for a baby (that teacher we know who is pregnant, specifically) that I bought some of the same yarn and started knitting away all excited. For 3 days or so, I was knitting, knitting, knitting and not getting very far. I started feeling a little frustrated. I finished the back piece of the sweater I was working on and I realized my stitches were awfully loose. Grrrrr….I decided to ditch the knitting and pulled it all out. Humph. A little later that day I was at the library and came across a crochet pattern book for making things for babies. I checked it out and came across a pattern I liked. And I started crocheting. I literally was just about done in one evening. Granted, it’s not a full out sweater, but still…I made something I think is cute with that camo yarn…

110_9906

And I had enough left over to make a little hat to go with the vest. I love the texture of the stitches, which is alternating single and double crochets.

110_9907 

And this is why I say I am a crochet-er and not a knitter. I feel like I’m much more efficient at crocheting. I really like the idea of knitting, it’s the execution of it that bogs me down. LOL Maybe if I kept practicing, but a gift is not a good practice piece.

I’ve been doing a little papercrafting too, but I don’t have anything completed yet to share with you. Maybe soon, though.

Thanks so much for stopping by. Hope you are having a great start to your week.