Saturday, January 31, 2009

Quilled Posy Card

I'm back! We ended up going out to Chili's for dinner~yummy! That was a nice, unexpected treat.

I picked up a book called Handmade Paper Pierced Cards at Joann's recently because the cards inside are just gorgeous. I loved that the author showed paper piercing and quilling together. The drawback to this book is the lack of usable patterns to do the paper piercing and the labeling of the stencils used is very lacking. However, I managed to create one of the cards myself by looking at the picture. It took me the better part of the day to complete it, but I really, really like how it came out.

100_5528

I think you can see why it took so long. It wasn't hard, just detailed. I cut the 1/8th inch strips myself (3 inches long) and found some seed beads in my stash of craft stuff from the time I used to do some beading. (There's something to be said for hanging onto one's supplies for a long time...who knows when you'll use it again). I found the image for the paper piercing here (it's number 45) and just followed the picture in the book as best I could. Sorry, I don't have a link to the inspiration card. I used Vanilla Cream cardstock (CTMH) and sponged Parchment ink (also CTMH) on the edges. I also used the Oval Nestabilities. To glue down the pieces, I used PVA glue that I picked up long ago at a scrapbook store. I used a toothpick to dab small amounts of glue where needed.

I'm not sure what else to say about it. If you have any questions, feel free to ask away.

There's not much else to report right now, since most of the day was spent on the cards I shared. I'm going to go snuggle with the girls before bed and work on a yarn project for the evening. Oh wait! I DO have something else I've been meaning to share...a recent project!

100_5519

I found the pattern for this (I did make a pair of them) in the Nov./Dec. 08 issue of Crochet Today magazine. I showed the magazine to my friend, Susi, and she fell in love with these wristlets. Her birthday is coming up, so I decided to make them for her for a gift. It probably looks a little more complicated than it actually is to create. Each of those centers is done as a square motif and you join them. There are 6 motifs for each wristlet. Thank goodness I had experience doing the joining from one of Amy's ponchos, or I might have been hopelessly lost. The pattern was just a tad confusing on that part. LOL

That's all for now! Thanks again for stopping by. I hope your weekend is going great.

Jeanne

A Yo-Yo Flower and a Paper Flower Card

Happy Saturday to you! I spent most of the day working on cards...yea!

I will share two in this post and the third one in a separate post.

I signed up for an online class at Debbie Hodge called Embellishments:Beautifully Handmade. So far I'm enjoying it a lot even though I have seen/heard of the types of embellishments we are making so far. The class is 5 weeks long and has two lessons per week. I signed up after it started and I believe you have access to the information forever, which is very nice. Anyway, I feel it is worth the money because not only do you get the lessons, you also get lots of inspiration.

I'm telling you this as a prelude to why I have a yo-yo flower on my card. One of the lessons was about making yo-yo's. I've heard of them, but have never even thought to make them. After I saw the lesson, I knew I wanted to pick up some remnants of fabric and while doing so I discovered yo-yo templates. Yes, the idea in the class is to make your own template but these plastic templates appealed to me because they had stitch holes so your stitches are even. Not only that, I saw that there is a flower template and a heart template! So now you know why there is a yo-yo flower on my card. LOL

100_5530

I also crocheted the leaves (thanks to that Crochet Embellishments book I mentioned in a previous post). I actually had this card just about completed yesterday, but it still needed a little "something" which turned out to be the pierced border along the top. Got that done first thing this morning when I sat down. I used Basic Grey's Bittersweet paper, the Martha Stewart lacy border punch and a button from a collection I picked up at Walmart a long time ago. I added two colors of DMC floss to the button. I left it sentiment-less for now, but I think I could easily add one whenever I decide to send the card out. Isn't that flower neat? Fun to make, too! The flower and leaves are adhered with glue dot "strips" I picked up a year or so ago.

My next card was inspired by a card from Fred She Said. Specifically this one (actually scroll to see the second flower card). It was included in the file I purchased as an inspiration piece. I enjoyed coloring this one...it was straightforward and didn't take a whole lot of time. LOL

100_5529

And this time I did layer three pieces! After cutting out a couple of squares, I corner rounded them with the Iron Eagle corner adorner punch from EK Success. I used Prismacolor pencils and odorless mineral spirits to color. The center is a stud found at Hobby Lobby with a rhinestone adhered to the top. I used Amethyst and Hydrangea cardstock (CTMH), sponged with the same color ink along the edges. The Swiss Dots embossing folder is getting a work-out these days, huh?

Now I need to figure out something for dinner, so I will close for now. Check back later for the next card...it's a doozy! LOL

Thanks for stopping by!

Jeanne

Friday, January 30, 2009

Paper Piercing Medallion Card

Happy Friday to you!  Were you wondering if I fell off the planet? LOL Nah...I've just been busier than anticipated and haven't been able to complete cards I'm working on.

So just what have I been doing you may be wondering...let's just say I have more ideas of things I want to create than I can implement! I think I have a bit of creative attention deficit. You have seen how I am liking creating crocheted/stitched embellishments. That has kind of shot off into other directions. One look I REALLY like is paper piercing or paper pricking. Not a difficult technique, but finding templates other than online has proven to be difficult. I was spending time this week Googling this and that and came across a couple of websites that have nicely fed my desire to practice this technique. One in particular struck me hard. Fred-She-Said is a blog with an interesting name and even more interesting products! Click here to see what inspired the card I am sharing today...well card front for right now. I was loving the paper piercing and I think I have a thing for medallions. Then look around the blog and see if it doesn't inspire you in some way.

Here's the card...

100_5526

Now, my original plan was to color three layers of this medallion (downloaded and printed onto cardstock) and stack them like the author did. But, it was taking me way longer than I thought to just color (using pencils and odorless mineral spirits) in one layer, so for now that is all it is. But the layer is pop dotted for a little dimension. Isn't that piercing just the coolest? I think so! It takes time, but I think it is oh, so worth it.

I don't think you can see it very well unless you enlarge the picture, but I stumbled across some of the Shimmerz paints that have been popular recently. Yes, I know I could have ordered it online, but somehow never got around to it. I needed to get a prescription filled at the pharmacy (everyone's fine and healthy, no worries) and there is a small independent scrapbook store right by the pharmacy. I used the drive-up window and decided to pop into this store while waiting for the scrip to be filled. THAT's where I found the Shimmerz! I couldn't resist and bought the pink and white. I used both on here and I wonder if you can see it. It's very subtle.

The dp is Basic Grey's Bittersweet and while the colors aren't a match I think they coordinate fairly well.

I also got a very nice surprise in the mail from Kathi. Thank you SO much, my friend! I love it all! She made the card (the cardstock is shimmery...love it), the calendar and the origami box and she included the stampset she used for the calendar so I can make sets for next year...awesome! The book is wonderful too and just warms my heart! Love it, love it, love it!

100_5521

Well, that's going to do it from me for right now. I hope you have an awesome weekend...oh wait...been meaning to share that I think (hope and pray) that we are mouse-free now! I have been afraid to say anything for fear another one would show up, but I haven't seen signs of one for a couple of weeks...so maybe they are all gone! (either that or they are laying low, lulling me into a false sense of security). Maybe I should think of other ways to detail silly things that will entertain you??

Okay, now that's it for now! I am hoping that I will get lots of time to create this weekend! Check back and see if I am successful.

Jeanne

Tuesday, January 27, 2009

Another Crocheted Heart Card!

Happy Tuesday to you! It's stopped snowing, the sun is shining and it's a balmy 20 degrees F out right now! I just knew we were going to "pay" for the near record breaking warmth we enjoyed last week! Yesterday it didn't get above the teens! LOL Starting tomorrow it's supposed to warm up again and be in the 50s this weekend.

I found a book recently called Crochet Embellishments by Jean Leinhauser. I found the book at Joann's and used a trusty 40% off coupon. I'd been eyeing the book for awhile. I'd pick it up and put it back I don't know how many times. Finally, I just decided to get it and be done with the wishy washy-ness. Am I glad I did. Even though most of the samples are done using a worsted weight yarn, you are not limited to that type of yarn. I decided to try out a shape...a heart...using crochet thread. I even tried a border! Here are the results of my efforts...

100_5520

I actually got the crocheting done yesterday, but just didn't have enough time to finish the card properly. I'm glad I didn't rush things.

I used Basic Grey's Bittersweet paper and chose crochet thread colors to complement the colors in the pattern, which turned out to be CTMH's Hollyhock and Vineyard Berry with a little Baby Pink ink thrown in sponged around the edges of the white paper.

I used a concave corner punch (EK Success) and Martha Stewart edge punch as well as some pearl stickers. I had a scrap piece of white that I had already run through my Cuttlebug with the Swiss Dots folder. The sentiment is from Stampendous' Paisley Spring stamp set from Archiver's.

All in all, I'm very happy with how this card came out. Hope you like it, too! I've started on another card with some crocheting, but ran out of time to finish it once again. It's not that it takes so long to do the crocheting, it's that I am doing a few other things first before I sit down to craft and am not getting the full time that Jessica is at school to work on cards right now. Hopefully that one will be ready to show-off tomorrow.

Thanks for stopping by...I can't tell you how fun it is to combine the crocheting and card-making! My mind is spinning with ideas of cards I want to make.

Oh and before I forget, thanks so much for all the support and encouragement to start selling my creations. I've honestly been thinking it over, and have decided not to delve into it. The main reason being...I don't design what I create, I copy ideas from others. The critters I've been making are all from patterns/books. The authors of those patterns/books specifically say not to sell the items made using their patterns. The cards I make are usually lifts of cards I've seen on a blog somewhere. Since I'm not coming up with original ideas, I don't think it's ethical to sell what I am creating. I hope you understand! If you have a request of a card or project let me know and maybe we can work it out as a gift from me for your support and encouragement of my efforts. That's the best I can offer. Thanks for understanding. I truly appreciate your encouragement!

Hope you have a great night!

Jeanne

Sunday, January 25, 2009

Crocheted Heart Card

I have had this idea in my head for a while and finally got to try it out today! I found a pattern online for a crocheted heart swag that I fell in love with. I wondered how it would translate to create just one of the hearts and put it on a card. Now I know...

100_5518

What do you think? I know the card itself is fairly simple, but all the ideas I thought of seemed to detract from the heart. I used a pink bedspread weight cotton thread. It took a little longer than I anticipated to get the heart finished, but only because I hadn't done this pattern before. The second round confused me a little as there were a lot of stitches and the directions were written in paragraph form. Once I wrote them out line by line, it worked much more smoothly. After I finished crocheting, I ironed the piece so it would lay flat. To do this I put it face down on a hand towel and ironed on the cotton setting, being sure to keep the iron moving and not snag the scallops. You put it face down so that the texture on the front side won't be flattened by the iron.

To attach the heart to the card, I used clear thread and poked holes in the cardstock so they would be hidden by the outer scallops. I brought my needle up through the hole from the backside and back down again through the same hole, bringing the clear thread over the top of the scallops. It worked perfectly, except for the fact that I got my finger in the way one time and poked my finger with the needle! Ouch! Dr. Jessica got me a band-aid and fixed me right up, though. The girls have discovered all the glitter I own and have been having a field day decorating with the glitter. Yes, I think we'll see sparklies for a long time now. Jess was sitting right by me when I poked my finger and was quick to respond.

The dp is called Sabrina and it's from Making Memories. I found it at Michaels earlier this month and have been itching to use it. I love the pink, cream and black together. And if you will notice, I am no longer lacking black pearls! I took a quick run to Archiver's after my morning chores and picked some up.  I also used that new Martha Stewart heart edge punch.

I decided to leave the card front sentiment-less for now. I worried that putting one on the front would also detract from the heart. Any thoughts on that?

I got a later start on this project than I thought, so it's all I was able to create today. I am very happy with the result though and my mind is spinning with the possibilities this opens up for me in terms of crocheting items to use on cards!

Thanks for stopping by. I hope you have had a relaxing and productive weekend!

Jeanne

Amigurumi Butterfly!

Happy Sunday morning to you!

Jessica has been literally hounding me for the past few days for a new critter. First, she wanted a giraffe, then she thought she wanted a hot pink kitty (I think because I made these two critters this week, the giraffe for Amy and the kitty for the birthday girl yesterday) and I showed her a picture of a cute butterfly in one of my books. I would be willing to make her a giraffe and kitty in time, but after having made two of each now, I wanted a break from the patterns. The butterfly in this book is partially what drew me in to purchase the book.

I have to confess however, if this was my first Amigurumi attempt, I may never have gotten into making these critters. Thanks to my crocheting experience, I was able to finagle the wings despite a very poorly executed pattern in the book. They alone have made this a one time project. It came out very cute, but this project wasn't nearly as much fun to create as the others have been.

Without further comment, here you go!

100_5514

The very happy Jessica with her new friend.

100_5516

100_5517

Thanks for stopping by. My plan is to work on creating some new things, so try back later today and see what I manage to finish!

Have an awesome Sunday!

Jeanne

Saturday, January 24, 2009

I'm Really Liking Martha Stewart Punches...

Happy Saturday! After the birthday party, I wandered back into my corner to make a couple more cards. As my post title says, I seem to be having an obsession with Martha Stewart punches. Maybe it's because Michaels now accepts 40% off coupons for her products. LOL I am trying to limit my obsession to those punches that are classic and can be used over and over again.

I told you the other day that I was in need of two thank you cards, but had only gotten the one done. Today I made the second one after I was inspired by this card from Faith Hofrichter, aka Markie's Mom, of the Stampin' With Markie's Mom blog. I love all the details she adds to her cards!

Here's my version:

100_5512 

I originally thought to use a different color for the heart and even embossed it with white for interest. Silly me forgot that stamping over an embossed image acts more as a resist than getting a clean image. That attempt went into the trash can. LOL So I thought a bit more and remembered this beautiful dp from Close To My Heart's Heart of Winter promotion a year or so ago called Promise of Spring and decided to use that instead. I love the serene feel I get from this paper.  The swirly leaves image is from a set of See D's that I picked up a long time ago...maybe from Archiver's? Anyway the brand is Inque Boutique and I think they sell some of the stamps at Hobby Lobby these days. They are rubber stamps, but they cling to acrylic blocks and the side that clings has the image on the rubber so you can see where your image is going. This set is called Memoirs 50787. I tried to find a link to the website, but it appears to no longer be online. I found a blog where the author says the company was sold and she's no longer affiliated with the company. Sad. See the butterflies and little hydrangea flowers? Those are Martha Stewart punches. The punches I used have three of the image that gets punched out. More bang for your punch! LOL I didn't have any black rhinestones (gasp, I know!), so I used Martha Stewart glitter, or rather I should say, I attempted to use the glitter and some glue. It was kind of messy and glitter ended up every where. I don't love the look I got, but I don't hate it either. I think I need to find some black rhinestones! hee, hee.

Anyway, I added some ribbon that I picked up at Michaels over the holiday season and I ran a piece of Bamboo cardstock through the Forest Branches embossing folder to get that texture you see. Thanks so much is from Papertrey Ink's Mixed Messages set.

So there's that card...this next one has been meandering through my head for a couple of weeks and I finally decided to play with the idea. I love the layered daisy look and there's a nice MS punch! Well, actually I saw some 3-D daisy stickers (by Martha Stewart) that were different colors. What really attracted me was the glittery centers on some of those stickers. So here's my attempt to get a card idea out of my head.

100_5513

I knew I wanted to make the daisies with a bit of (Sunkiss) Yellow ink and I knew I wanted to use the Swiss Dots embossing folder on white cardstock. I punched small circles in Sunkiss Yellow cs (CTMH) and added Yellow Stickles. I used a large stylus over the backside of the circles (before I added the Stickles) to get the centers to curve a bit and I added them with little pop dots. THEN I added the Stickles. LOL The ribbon is light yellow (which is harder to see than I thought it would be). The plaid paper is from the Spring Matstack by DCWV. I used a little trimmed off piece under the ribbon for added interest.

I like it and look forward to making more daisies of different sizes.

Thanks for stopping by and I hope your weekend is going great. I may be back tomorrow with more projects. Right now my brain is overflowing with ideas, but executing them in a timely manner doesn't always happen.

Jeanne

Glittery Bunny Birthday Card

Hi there!

We have a 3 year old's birthday party to go to in just a bit and I wanted to share the card I made.

100_5511

I think it should be sparkly enough for a little girl having a princess party, shouldn't it?

I used a downloaded image called Kisses and Hugs from All That Scraps and colored it in with Prisma pencils and odorless mineral spirits. I used a clear stamp that I have no name for to stamp the background. I think I might have gotten the set from Archiver's or Hobby Lobby, but it's been so long ago, my memory is failing me. I had to stamp in sections, using Versamark and embossed each section so I could see where to place the stamp for the next part of the background. My inspiration for the card came from this card posted by Julie Buhler of the Paper Pleasing Ideas blog. I really liked the white embossed on pink and thought this flower stamp would work well as the background instead of the swirls.

I tried scraping the edges of the focal image onto a glue pad so that I could add just a touch of prisma glitter. It worked so-so. My pad may need a re-inking. Then I embossed the Happy Birthday (from CTMH) in Pearl White embossing powder (also CTMH), thinking it would stand out more. It didn't, so I rubbed Baby Pink ink (CTMH) over the Baby Pink cardstock. I also used 1/8th inch wide super sticky tape around the edges and poured prisma glitter over the tape. The ribbon may be a little much but I felt like it needed a little pop of color.

The focal image and sentiment are attached with pop dots for a little dimension.

I hope to get back into my corner after the party, so check back later and see if I was able to create some more.

Thanks for stopping by!

Jeanne

Thursday, January 22, 2009

Craft Corner Is Evolving...

Hi there! I'm sorry that I don't have any new cards to share today, but I did work in my craft corner...cleaning up and adding some things to hopefully make it a more efficient workspace for me. I tried working on a card yesterday, but I had about a 6x6 inch square open space to work in and that simply isn't conducive to being able to be creative.

Lauren Meader, of My Time, My Creations, My Stampendence blog, posted a video of her craft space earlier this week and I watched in awe. I completely expected her to have this fancy, shmancy studio with all the bells and whistles. And I was so pleasantly surprised to see that my assumption was incorrect. She works in a small space. A very organized and jam-packed small space. She graciously gives a tour of her space and details what she uses and why she likes it. It gave me inspiration to go shop my stash and make a quick run to Goodwill where I found some good organizational items for a grand total of $7!

Here's what my corner looks like as of just a little bit ago. I'm not done yet (are we ever done in the evolution of a crafting space?) but I got enough of a start that I wanted to share.

100_5509

You can see here that I've found a couple of wire shelf units to add to the storage on my table top. I was being over run with goodies. And with the printouts I use as inspiration for my cards (no computer in this room). That pink basket on the left holds printouts and idea books. The white basket next to it holds my pop dots and glue dots. The next white basket holds beads and goodies to make those great looking pins I keep seeing on cards. Next to that, under the shelf is a basket to hold pens. Directly above that pink basket is my new button jar. I decided to house them off the packaging and even snipped the shanks off of all of them so they are ready to be used. The jar was in the garage. Next to that is a ceramic container from my friend Kelly and it holds some of the metal goodies I've been collecting. Right behind that is the basket that holds my rhinestones. I put my lamp on the shelves and I like that it is a bit higher and hopefully will give me a little bit better lighting while I work. It's hidden by stuff in front of it but on the right side of the black shelves is a black wire utensil holder. This, in addition to the wire shelves and the white corner plate holder unit, is what I picked up at Goodwill yesterday. It hooks onto the black shelf. If you look closely, you can see some scissors poking up from the unit. I moved my tool caddy from Pampered Chef onto the top of the corner unit and tucked a bunch of my smaller items on the shelves. I pulled a couple of short shelves from the garage to house items and get stuff off of the floor.

100_5510

I pulled this book shelf and the 3 shelf unit in from the garage. My original thought was to stack the two bookshelves, but one was too narrow. So I moved that smaller one by my table (see first picture) with the shelves facing inside the table. I've moved my paper holders to fit on the bottom of both bookshelves. As you can see, I'm not fully done here, but I feel like I definitely have more storage space for all the little odds and ends I had taking up valuable real estate on my table.

I showed Steve when he got home from work and even he said it looked a lot neater. I have a shelf I want to hang on the wall...you can sort of see it on the far right of the second photo. I want to showcase cards and stuff on it.

ETA: I'd love to hear any suggestions you may have for improving my space. Please share!

In addition to this behinds the scenes organizing, I was able to finish Amy's giraffe today! She was ecstatic when she saw me holding it while waiting for her to come out from her class. It looks just like the one I made for Hattie. Now Jessica wants one! LOL

That's it from me today. Hope your Thursday was a good one. We've enjoyed near record warmth these past few days, but it is slated to come to an end tomorrow with a 35-40 degree (F) temperature drop. Wonder if my urge to spring clean will disappear as well...

Thanks for stopping by!

Jeanne

Tuesday, January 20, 2009

Grateful Elegance Thank You Card

Happy Tuesday to you! I hope today finds you happy and inspired.

I wandered into my corner today to make a thank you card. I need to make a second one, but only got the one done today. I am happy with how this one came out. I was inspired by this card created by Julee Tilman on Poetic Artistry. I don't own the particular set she used, so I improvised a little (okay a lot) by using Grateful Elegance from Verve Stamps.

100_5507 100_5508

I resized the card to be 4 1/4 x 5 1/2 and I think I got a little bling happy, but it works, doesn't it? It's a pretty straight forward card. About the only thing that is hard to see is that the flowers on the front of the card are popped up with pop dots.

I stamped the flowers in Hollyhock ink, and then colored them in with a Baby Pink Marker. The main flower on the inside is the same and the other flowers are stamped in Baby Pink. I used a Martha Stewart edge punch for the lacy look and also used the Cuttlebug to emboss on the front of the card with the D'Vine and Forest Branches embossing folders.

Supplies:
Stamps: Grateful Elegance (Verve Stamps)
Inks: Hollyhock, Baby Pink (CTMH)
Cardstock: Hollyhock, Chocolate (CTMH), Sweet Blush (PTI)
Accessories/Tools: Rhinestones, marker, Cuttlebug, embossing folders, pop dots

Thanks for the great comments on the hat I was finally able to finish. I've been wanting to say to those of you who have commented that you have wanted to learn how to knit or crochet to Go For It! It's not that difficult, I promise. You may not even need to buy a book or video because I have come across so many videos from You Tube that show how to do stitches. There are lots of websites that offer free patterns. Google is your friend! I have had to Google how to do a bunch of different stitches and have found help on each and every one I needed. You can do it! My friend Nona just made me aware of this website called Knit Picks. You can buy products from Joann's online. Heck, even Walmart sells crochet hooks and needles! If you have the desire to learn...you can do it! And it isn't all that expensive to start. I find it very relaxing in the evening to work on a project (well, except for the pattern that was incorrect, but that doesn't happen too often).  Anyway, I encourage you to take that step toward learning if you are inclined to. You will be so happy you did! Oh and if you need one on one help, maybe you can find some yarn shops in your neck of the woods and take a class. I know Joann's offers classes, even. Okay, off the soap box. I'm just having so much fun these days, I want to share the feeling!

Thanks for stopping by. I hope you have a great night!

Jeanne

Monday, January 19, 2009

It Wasn't ME!

Remember when I said yesterday that I gave up on the knitting project I was working on because it just wasn't working out right? I had emailed the author of the book and Nona both to see if there was a problem with the pattern. I hadn't heard back from the author, but Nona responded once she got back from the CTMH Album Retreat and said that she didn't remember having any issues with the pattern. I thanked her and told her I was giving up on the project. Then she emailed again and said that she just remembered there were corrections to the pattern and she very kindly included them in the email. Her book had been reprinted with the corrections, but I apparently have an issue that didn't have the corrections. The first corrected round was the round that had been giving me fits!! And if I made it past that round the other corrected round gave me fits, too. Whew! It wasn't me being a dork, it was the pattern!

So I took a deep breath and started the project ALL OVER AGAIN to see if the corrections would help. They DID! Yippeee! I was so excited. The girls didn't have school today and after a quick trip to the Butterfly Pavilion, I've been knitting up a storm since I got Nona's email with the corrections.

I'm ecstatic to report that I have completed the project! Yes, completed! Enjoy the Lotus Blossom hat being modeled by one of the cutest models around.

100_5506

100_5505

I think you can see why I couldn't fudge around with this pattern. LOL I've tried the hat on and it fits me just fine and I'm so happy. It's going to be a gift and needs to get mailed out soon. That's why it's been bugging me that I couldn't get it to work.

And...just a little while ago I got a response from the author telling me the corrections are posted on her website. I had looked around but didn't see any. I looked again today and figured out where they were (they weren't in a very obvious location, I don't think). Man, I wish I'd found them sooner, I could have saved myself days of frustration! Oh well. I was able to get this done and it will be on the way to the recipient very soon.

Thanks so much for visiting!

Jeanne

Sunday, January 18, 2009

Paisley Heart Valentine's Card

Happy Sunday to you!

I have to start off by saying, I caved. So much for resolutions. I went out and got the new Basic Grey Bittersweet 6x6 paper pad. Maybe it helps that I used a coupon? LOL Anyway, I wanted to play with a set I picked up at Archiver's recently~where I got the BG paper pad~called Paisley Spring. It's a Stampendous set, and an Archiver's exclusive, so I don't think you'll see it elsewhere. I'm having a lot of fun practicing my coloring with pencils and blending with odorless mineral spirits. What do you think?

100_5502

I tried to use colors that are in the Bittersweet paper and think I did okay. All of the paper is from the paper pack. I also recently picked up (with a coupon) Martha Stewart's new lace hearts edge punch~sorry, it is just too pretty to pass up. I think it's a versatile punch too, so I should get some good use from it. The card is definitely pretty straightforward. The little heart by the sentiment is a punch out of the hearts from the edge punch. The hearts at the top are a total and complete impulse buy when I picked up the paper pack. They had them on display at the checkout, just like they get you at the grocery store! LOL

Thanks for all the sweet comments on my cards from yesterday. I made the red heart card, start to finish yesterday. I think it may have taken about 30 minutes to do the stitching. It probably took a little longer to stitch the three hearts. I worked on cards for most of the afternoon yesterday and even had done something that ended up in the trash can, so I don't think it takes too long to do the stitching. Maybe along the same lines as coloring an image. And for Gloria who wondered what the insides of the cards look like...were I a better crafter, I would definitely finish up the cards on the inside, but alas generally, I don't. It's something I think about from time to time, though. Maybe I should try harder to "finish" the cards I make. We'll see.

As for the knitting project...I gave up and pulled it out. This pattern got the better of me. It's not that it was all that difficult stitch wise, but I kept ending up with extra stitches at the end of a round, even when I started out with the right number at the start of the round. What that means is the pattern for that row gets all messed up. Most of the time you can fudge around with a mistake or two, but for this project fudging wasn't going to cut it. I even started from scratch AGAIN and had problems at the same point of the project as I've been having. So, I gave up and am moving on. It was just getting too frustrating encountering the same problem again and again, to the point that I would do a stitch, look at the pattern, do the next stitch, look at the pattern, do the next stitch very slowly so the pattern would come out right. It's ultimately not worth the frustration I was feeling over it. Maybe another time I'll attempt it again. Oh and I know it is a pattern that is correct, because Nona made the same thing and didn't have the problems I am having. So it's definitely operator error. Moving on now. My girls are pestering me for giraffes, and I have several other projects I want to work on so it's not the end of my knitting world. LOL

With that, I will close for now. Hope you have a great Sunday! Thanks for stopping by!

Jeanne

Saturday, January 17, 2009

Stitched Hearts Cards

Now that I have a full tummy, I'm back to post the other cards I made today. I did some more stitching! I remembered I bought <---this book a long time ago and pulled it out the other day to see if there was anything in it I wanted to create. While the style of cards and pages in it are not my style, I think I'm getting better at being able to take a design and make it my own...finally!

Here's what I came up with using ideas from the book:

100_5500

On this card, I used two strands of DMC floss in three coordinating colors. I store my floss in numerical order and these three colors were in the same slot in the box. I love how the hearts look, but on this one, I confess, I wasn't quite sure what else to do to dress up the card! I suppose I could have made the card larger so that I'd have more room to play with. Simple is okay though, right? You can see I used my SU piercing template/mat to add a little "something" to the corners, at least.

100_5499

This card pretty much just evolved. I stitched the heart using one strand of floss. Well, I started out using two strands, but realized that was too thick to see the criss-crosses, so I took it out (carefully) and started again. **Oops, I just noticed a stray scrap in the picture. I took it off.** Anyway, this book shows how to fold squares of dp to make the shape you see in the center of the heart. It's 8 folded squares layered on top of each other and I glued them using a glue pen and some photo splits. I cut the shank off a button from Joann's and added a small rhinestone to the center. I liked the hearts on this button. After piercing holes again, I added larger rhinestones for a little more bling. The dp is more of that same paper from DCWV's Spring Matstack.

I appreciate your stopping by! It's been a good, productive day. Now I'm going to go see if I can finally figure out a knitting pattern that has been driving me to distraction for the past several days. I've started, pulled apart and restarted the same pattern at least three times! But the stubborn side of me wants to figure this out so I can finish! Wish me luck!

Jeanne

Angel on a Cloud Card

100_5501 Happy Saturday to you! I hope you have had a great first day to your weekend. Our family went to the annual National Western Stock Show this morning to wander around and pet a few animals. It was pretty crowded, but fun.

After we got home, I headed to my little corner and did some creating. For this first card, I used a downloaded image of Hey Cupid! from All That Scraps. I actually had colored the image the other day, using Prismacolor Pencils, odorless mineral spirits and blending stumps. I added the Stickles and set it aside to dry. I didn't get a chance to get back to the image until this afternoon. I had planned to do something entirely different with the image, but what I tried looked awful, so this is "plan B." My inspiration came from Becca Feeken's recent blog post that you can see here. I really liked how she nested the hearts to cut them out. I pop-dotted the red heart onto the scalloped heart and threaded the ribbon through the opening before tying the bow. I added small red rhinestones to the little angel for a little extra bling. The dp is from DCWV's Spring paper pack.

Image: CC Designs Hey Cupid downloaded image
Paper: Holiday Red, White cardstock (CTMH), Spring Matstack (DCWV)
Accessories: Rectangle and Heart Nestabilities, Cuttlebug, Prismacolor pencils, odorless mineral spirits, blending stumps, rhinestones, Stickles, striped ribbon (Archiver's Hot Spot)

I didn't feel like cooking dinner so I got a pizza and it's just about ready, so I'll close for now and come back a bit later with the other cards I made.

Thanks so much for stopping by!

Jeanne

Wednesday, January 14, 2009

Meet Georgina Giraffe...

100_5485  Isn't she cute? This was a free pattern from the Lion Brand yarn website. I signed up for their newsletters and the other day this adorable giraffe came through. She's about 15 inches tall from the top of her horns to the bottom of her feet. I started her last night and finished earlier this afternoon. I made her for Amy's best friend, Hattie, who just celebrated her 8th birthday this past weekend. The family went to Oregon and just got back to school today. I planned on making her a kitty cat, since Hattie loves cats, but when this critter showed up, I couldn't resist. I can make her a kitty for her birthday party, I'll bet. Both Hattie and her mom loved her!

I sort of had to rush to make her because I wanted to have a gift ready when I saw Hattie after school today. I planned on making it while they were gone, but you can see by my recent posts that I got a little distracted. LOL It occurred to me last night that they were due back today, so I got right to work. Luckily the pattern is easy to follow and she came together quite nicely, if I do say so myself.

Thanks for stopping by! Hope you are having a great Wednesday!

Jeanne

Tuesday, January 13, 2009

Winter Bear Card in Pink!

Happy Tuesday to you! We have had a nice, sunshiny day today, although the wind is a bit brisk. Thank you so much for all the sweet comments on the card I posted yesterday. I really appreciate your taking the time to let me know what you think. I do have a special person in mind for this card, although it will be tough to let it go. LOL

I was able to wander into my corner this afternoon and color in the Winter Bear image from All That Scraps. It's offered as a stamp and as a digital download. These digital images are SO cool! Kathi made an adorable card using this image that you can see here. Then I saw these cards on Sparkle's blog and knew I wanted to try my hand at using pinks to color it in. Sparkle is a pro at coloring with Copics! While I love the new Bittersweet Basic Grey paper Sparkle used, I don't own the pack (yet). I was going to use another paper, but I couldn't find a solid pink that coordinated well with the design of the paper I wanted to use, so I stuck with solid cardstock. 

100_5483 100_5484

I colored in the image with colored pencils (Kohinoor Woodless Colour Pencils) that I picked up at Michaels awhile ago. I'm sure I've seen them at Hobby Lobby and I'll bet other art supply stores would carry them. I saw a review of them on Gina K's blog and like what she had to say about the vibrant colors. I think they blend a little easier for this novice at blending than the Prismacolor pencils do. I like the whole marker idea, you know with the Sharpies and Bic Mark-its, but have decided that I would like to try to get better at blending with colored pencils with odorless mineral spirits (found at Michaels) because I also like the softer look I can achieve.

Anyway, you can see the results of my coloring today. I'm pretty pleased with how it came out. Although I think I should have used a lighter blue for the insides of the white areas. I probably should have checked my Prismacolor stash. lol

The card is pretty straightforward overall. Used the Cuttlebug Snowflakes embossing folder, Scallop Square Nestabilities, Martha Stewart snowflake punch, some ribbon a little bling and the opaque white color pen for the dots. An item of note might be the silver stud I put on the snowflake. I found that at Hobby Lobby and it's really a stud, like you would use a Be-dazzler tool to add it to your clothes. It has four prongs like a concho. Anyway, I found I could bend the prongs inward and add the stud with a glue dot. Then I added the rhinestone on top. Kinda nifty, huh?

I had a lot of fun with the coloring on this card. And I'm looking forward to practicing some more. ha!

Thanks for stopping by! Hope you are having a great day!

Jeanne

Monday, January 12, 2009

Paper Embroidered Flower Card

Happy Monday to you! I hope the beginning of your week is going well. We woke up to snow falling, softly at first, then much more heavily. We were expecting snow, just not so much in such a short amount of time! Steve said it dumped about 3 inches in an hour! Steve's commute took a couple of hours, where it's normally about 30 minutes, max. It was done by noon and the skies cleared, so it's all good.

I have a card to share with you that I have to confess I absolutely love! I worked on it yesterday and was SO looking forward to sharing it, but I didn't get it done and had to finish it today.

I was completely enthralled with this card made by Joanne on the blog called Mainly Flowers. Joanne creates the most beautiful paper flowers! Well, when I saw the daisy and stitched card, I HAD to find that pattern so I could recreate it. The link Joanne put up didn't have the pattern posted any longer, but I took a chance, and emailed the owner and asked if I could have access to the pattern. Ann, of Ann's Paper Art, very kindly emailed me and included the file! Then she posted the pattern again. It's a freebie, folks! If the link doesn't take you to the pattern, just click on the free patterns button on the left side of the screen. Here's the card, which is a case of Joanne's, but I love it!

100_5481 100_5482

close up embroidered flower card

I've done this technique before, but it's been a long time. It's not difficult at all, but takes time, patience, and tape! I printed off the pattern and used a T-pin to prick the holes. I used a foam mat so I wouldn't mess with the table top. You do have to be careful not to poke the holes too close together (or rather make the holes so big that they blend into another hole). Then you create the pattern using a needle and thread. I used one strand of DMC embroidery floss (from my counted cross-stitch days). Ann has directions on her website that explain the technique well.

To make the daisies, I confess, I bought the punch specifically for this card. I had some punches but I wanted a larger flower than the punches I owned. I had a 50% off coupon from Joann's and picked up the Fiskar's squeeze punch called Oopsie Daisy at Michaels...the store is closer. My flowers are a little larger than the inspiration card, but I think they work well. I punched two flowers for each daisy and inked the edges of the petals with CTMH's Baby Pink ink. I also sponged some Sweet Leaf in the center. I punched the PTI Lemon Tart cardstock with a 5/8 inch circle punch and inked the edges. Then I rolled a tool over the cardstock to shape it. The tool looks like an extra large embossing tool with the name  "Studio By Sculpey Style & Detail Tools Set Of Three" (picked up at Joann's). Link above should take you to the item on the website. Anyway, I rolled the tool over the cardstock circle on a soft surface and it shaped the circle enough that I could add a small pop dot to adhere it to the center. I hope that makes sense. I used a smaller tool from the same set on the flower petals to allow them to curve up just a bit.

I used a Corner Adorner punch called Iron Eagle to punch the corners and finally used the Martha Stewart fern leaf punch.

Textured cardstock is from Hobby Lobby (white) and DCWV (Fall Cardstock Stack).

The card size is 6x6.

I think that explains everything. I had so much fun creating this one and want to thank Joanne and Ann for their inspiration and help!

Thanks for stopping by!

Hugs,
Jeanne

Saturday, January 10, 2009

Scallop Circle Butterfly Card

Wow, that was a mouthful! LOL.

I'm back with the card I referred to in my earlier post. I was inspired by this card on the Just Give Me Stamps blog.

100_5479

Of course, I didn't have the die to make that pretty butterfly, but I did have Martha Stewart's butterfly punch. I think it looks okay with the blinged up butterflies. Actually, there's a somewhat funny story about the paper. In a previous post I mentioned I scored the 12 x 12 pack of Urban Prairie paper at Michaels for something like $5. Whooo hoooo me! Well, I've come to realize that the patterns are just sometimes too large to use on some cards. So the other night I couldn't resist the urge to head to Archiver's to see if they still had the 6x6 paper pack. Obviously, they did or I wouldn't be posting the card. Actually they had two pads on the shelf. I am considering myself lucky for giving into the impulse, because with my luck the next time I mindlessly wandered over to A's, they'd have been all sold out! (That's my justification thinking anyway).

100_5480 Inside of the card...obviously.

I don't think I constructed my card in quite the same way she did, but it still works.

As you can see, I used my Nestabilities, both circle and scallop circle. I even ran it through again to emboss the edges (go me!)

The pink is from the paper pack, the yellow is from Papertrey Ink (Lemon Tart, I think...the lighter one). The pink ribbon is PTI Berry Sorbet and the yellow dotted ribbon is American Crafts. The rhinestones are from Kaiser Scrapbook.

I think the card is pretty self explanatory, but if you have any questions, feel free to ask away.

I tried to create on Thursday, I really did! What I got for my efforts was a huge dose of frustration. I have wanted to try to figure out a way to make this starburst to add to a card, since I don't own the tag punches. I got the bright idea to use my Cricut and a cartridge to make the tags. Great idea, but the tags don't line up right, no matter how many times I tried. Guess you need the tag punches to make this. Sigh. Giving up on this one. Then I was going to work on another card, but even that was a bust. I can't  remember right now what I was trying to do, I just remember chucking it. LOL

I had my Cricut handy and thought I might be able to get a butterfly cut out from Walk In My Garden, for the card I've shared today, but the attempts I made weren't quite right (read-too big). I couldn't figure out the correct size and, not wanting to chuck the whole thing in the trash again, I decided to try the Martha Stewart punch.

It's a card that makes me feel happy, so it must be okay. LOL

Thanks for stopping by. I hope to come back again sometime with more to share...in the meantime, hope you have an awesome day!

Jeanne

Goin' on a Mouse Hunt...

Oh wait, the song really goes...going on a bear hunt, doesn't it? All I know is I've got that line, plus the line I'm NOT scared running through my head. LOL

I will have to come back and share the card I actually made yesterday...need to take a picture and it's too dark right now.

So, for now, I'll entertain you with the latest adventure in mouse hunting. Read on, or skip, if you are tired of hearing about mice.

I was woken up by my useless at catching mice 18 year old cat, Sarah, meowing for food treats. Yep, nothing like having a cat meow in your face early in the morning, I tell you! Anyway, I plod to the kitchen, because she has me trained that she will NOT stop meowing until some treats land in her bowl. And I see that the tube is no longer on the counter! Yep, we scored another mouse. This one looks like the smaller one. Gosh, isn't it sad that I can now tell the difference in the mice that have been making themselves comfortable in our home? This is the second mouse we've caught using the tube idea and I feel safe in saying it works! LOL I got to make another trip to the dog park at odarkthirty in the morning. When I got home, Steve asked..."Did you remember to pick up my lucky tube?" I laughed at that one. I told him we really need to pull out the bookshelves behind the couch this weekend and see if there is a nest we've missed under them. Of course, he says okay, but you need to clear off the bookshelves to move them. Sigh...I just love all the fun stuff I get to do and look forward to.

He leaves for work and we get Amy off to school. I decide that I'm not waiting for him to help me move these shelves AND I'm not taking all the stuff off of them! ha! But first, I needed to check the couch and chair again to be sure they have not decided to make the insides of the furniture their future "love" nest. I got the vacuum out and sucked up what little stuff had already fallen below the cushions.  No mice in either. Then I gingerly "walked" the bookshelves away from the wall after telling Jessica to hop onto the couch "just in case." The only things I had to take off were the scrapbooks I've got stored on a couple of shelves, they can be kinda heavy. No mice! But lots of poop! Yuck! Out came the broom and mop. And I even got onto the floor with a flashlight to peek at the couple of inches of openings at the bottom of these shelves. (remember...I'm not scared-in my best sing-song voice). Thankfully, no mice! Got that all cleaned up and then decided I was pulling out all the furniture in this room to keep the mice from having places to hide. I hadn't done this before, preferring to think that setting out all those mousetraps was going to scare them into leaving. Then I got to thinking...(I know...scary isn't it?) what could I use to seal up the gap between the bottom shelf and the floor, so they cannot hide under the bookshelves in the future? I thought of  towels, but decided that might encourage them to stay rather than discourage them. The answer comes later.

So now my room is feeling smaller and smaller as I pull out things towards the center and clean up poop (e-gads, I should have done this job a lot sooner). I pulled out the girls' computer desk and cleaned up. Then I noticed a gap in the wall by the fireplace. The guy who lived here before us did a lot of woodworking and he must have put the wood frame up around our fireplace to support the wooden mantle. Anyway, there was a one inch or so gap between the end of the piece of wood and the floor. I have NO idea what this opens up to, if anything, but... just in case... I wanted to close it up. What to use? What to use? I know! Packing tape (the clear stuff you use to seal up boxes for mailing)! So I rip off several strips of packing tape and cover the gap. Great, I'm thinking...if this is where they are hiding I may get to see them trying to get out. Can you imagine it...a little mouse tooling along thinking he's gonna sneak into this house where he's found lots of cool hiding places and food stuff, going to the opening and bonk, he can't get out and even gets stuck on the tape? Makes me laugh anyway. Then I see a 1/2 inch gap on the other side of the fireplace by my computer. I cleaned up what I could, taking extraneous items to the garage.

Then I noticed a message popping up on the computer screens...little or no connectivity. GREAT...I messed up the internet on this little (big?) mouse hunt. Another reason to just love the little critters, no? Called Steve and get the girls' computer back online, but mine is a no-go. To make it even more fun...the printer was offline as well. grrrrr I had planned on printing off some images to color while Jessica was at school. Sigh...oh well. It's not like I don't have a TON of other supplies to use, right?

Steve gets home from work and fixes the computer problem rather quickly...in my cleaning frenzy, I knocked the ethernet  box off the desk and somehow it caused a cable to go ka-put. It just needed a new cable, which Steve had in the garage. Then he decides to use insulating foam for the gaps in the wall. Only his can is so old it won't work.

A quick trip to the Home Depot netted a new can of foam and also some hardboard to cut down and fit over the openings in the bookshelves.

I didn't see any mice in my hunt today, thank goodness. But, get this...now Steve wants me to pull out stuff from under the kitchen sink to see if there are any gaps that need filling there. Sigh...it's never ending...

goin' on a mouse hunt, goin' on a mouse hunt. I'm not scared. I'm not scared....

Jeanne

Wednesday, January 7, 2009

Amy's Hooded Poncho~Take 3 & Other News...

I've finished my 3rd attempt at the hooded poncho. Actually I finished the other day, but didn't get to take a photo until this morning. Remember I made one for Amy, then Jess and now this because I absolutely did not like the previous ones. I figured out the mistakes I made before and this final version looks better. Still not terrific, but better. For one, it's longer! Even Amy commented on that. I still think she looks sort of like she's in a cocoon but I like the colors and the stripes. (btw, she chose to sit in the chair by my computer - don't mind the mess behind herEmbarrassed). I'm relieved to have completed a decent looking hooded poncho, but I think I am done with this pattern! LOL

100_5477 100_5478

And onto other news....I have to say, it was too good to be true. As much as I'd hoped we were done with mice, alas, we are not. We had a couple of quiet days, but the other night as I was sitting on the couch, knitting, I heard an unmistakable scratching noise. Remember, we have our couch in front of two very tall book cases (that are side by side). I looked behind the couch in the open shelves, no mouse. Under the couch, no mouse. BEHIND the bookshelves....MOUSE! Erggggghhhhh. The space is maybe 3/4 of an inch between the back of the shelf and the wall! Of course he was closer to the end of the second one, which is more difficult to pull out. Drat. Re-baited traps both conventional and tube ones and so far he's not falling for them. Double drat. I didn't hear him last night, but maybe he was regrouping. I was pretty tired though, so I might have dozed off...

Why was I so tired? The girls went back to school yesterday and I was busy all day (but don't have much to show for the busy-ness). Up to and including a last minute run to the doctor's office for Jessica, who at 4:15 started wailing that her ear hurt. Got in at 4:45 and sure enough, she has an ear infection. Sigh. Go from the doctor's office to the pharmacy, but they had only just gotten the fax of the prescription. It's now 5:55pm. Amy has a Brownie meeting at 6pm. Run home quick (Pharmacy is just up the street from home and Steve got home from work before us and started a quick dinner) and eat quickly. Luckily the Brownie meeting is also only a few minutes from our house. Get there in good time. It's an informational meeting, so it only lasted an hour. Took Amy home and went back to the pharmacy to get Jessica's amoxicillin. Got home gave her a dose and then hung out on the couch the rest of the night. Thankfully, she slept all night (in the past she's been awake all night when she has an infection) and no fever today, so she went to school. No swim lessons for her though until next week, even though she tells me her ear no longer hurts.

There are so many projects I want to work on, but haven't had an opportunity to get started! Hopefully, things will start to settle down and I can get creative. LOL

Thanks for stopping by...hope you are having a great week!
Jeanne

Saturday, January 3, 2009

I Felt Like Coloring Today...

Hi! Back again with a couple of cards this time.

Just to give a little update from the mouse post, I neglected to put a cover on the trash can, so I'm sure you can imagine how nervous I was driving with the mouse behind me. I don't think my back touched the back of my seat the whole time. LOL (I know that is silly, but some things you can't help). I get to the dog park and grabbed hold of the trash can, one hand at the top, one at the bottom and I FLUNG that rodent as far as I could. I saw him sail through the air and then run as fast as his little legs could carry him in the opposite direction as me. Whew! A lady noticed what I did, so I felt the need to explain. She was all kinds of impressed and will remember the tube idea. She complimented me on catching the mouse in a "humane" way. LOL I didn't explain that being humane was a coincidence. LOL

Alright, onto the cards. Yes, there are two! I do have to share a little back story to go along with the cards. I tried something new to me today. I've read about digital stamps recently on different blogs. The one that comes to mind most is Lauren Meader's blog, My Time, My Creations, My Stampendence. She's colored images that she downloaded from a site called Squigglefly. I was really intrigued, but worried that the images printed from the computer would smear, especially if you colored with markers. A very nice lady read my comment on Lauren's blog asking about that and she emailed me to assure me that she hadn't had problems with smearing especially after she heat set the images with a heat gun. This was before Christmas and you all know how sidetracked I got with the yarn projects. Well, today Lauren posted about a contest at the Pink Cat Studio blog and you could download a Lily Fairy image free from the site. I thought she was adorable and remembered what I'd been told about printing off images and heat setting. So, I downloaded and colored and this is the result:

100_5472 100_5476

Isn't she adorable? I'm not very good at coloring as you know, but I still think this came out flippin' cute. I even added some Prisma glitter to her wings, but you can't see that too well, unfortunately. It's pretty sparkly in real life.

I just bought a couple of Ornare templates from Ellen Hutson's store. I had a bit of Christmas money from my dad and have been eyeing these templates for a while. She had a one day sale on Monday and I took advantage of it. I was quite impressed when the package arrived yesterday. That's pretty fast service! I tried to take a close up of the piercing, but I don't think you can see it too well. I didn't want the holes to be too much, so I just used a straight pin to poke the paper. It might be just a tad too small to make the holes. Oh well. I got this and another template, but the second one must be out of stock as I don't see it on the website right now. I just used my Bic and Sharpie markers to color as well as the Flesh colored Tombow marker. The dp is from the Blossoms and Butterflies matstack. The cardstock is all CTMH, Clover Meadow, Bubblegum and Watermelon. I used a Martha Stewart border punch and a little bling to finish off the card.

When I decided I wanted to try to color a printed image my brain started whirring. I have a bunch of DJ Inkers CDs and discs full of images that I used to use when I was teaching and when I used to write the newsletter for the MOPS group I used to belong to. I hadn't used them in forever, it seems. So long ago that the stuff wasn't on my hard drive. But I knew where they were located and I brought them into the house and manually installed what I could. The floppy discs are so old, the computer doesn't recognize the information on them! Anyway, after spending a bit of time doing that, I printed off a bunch of images to color. I got one done! Here it is:

100_5474

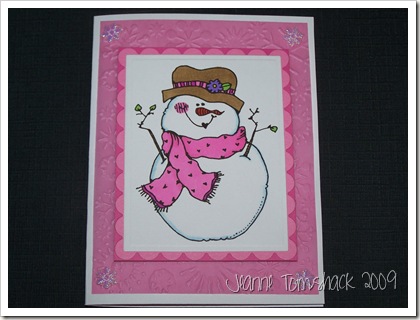
Again, I used the same markers as before. Something different I did, though, was run a piece of pink vellum thru my Snowflake Cuttlebug embossing folder. To be sure it would work, I had a piece of white cardstock behind it. Then there are those little snowflakes in the corners. This was a fun find at Michaels. They have their Christmas stuff on clearance for 70% off. As I wandered the store, I came across these packages of "garland" that were originally $1.29. That's a good price for how many snowflakes and little iridescent beads were attached. Figure the 70% off that price and a package was just 38 cents! Whoohooo! I probably should have bought more than one package, but just how many cards will I truly make that would need snowflakes? Anyway, I just cut apart the flakes with my scissors and added them to the card with glue dots. I'm tickled with how it looks.

On both cards, I pop dotted the focal pieces to have them stand out just a bit more.

I hope you've enjoyed my little foray into creativity today. I sure had fun creating! It's always nice when you feel the mojo.

Thanks so much for stopping by. I hope your weekend concludes on a great note!

Hugs,
Jeanne

Stuff I used:
Fairy Card:
Downloaded image from Pink Cat Studios blog,
Paper: Clover Meadow. Bubblegum, Watermelon cardstock(CTMH), pattern paper from Butterflies & Blossoms Matstack (DCWV)
Accessories/tools: Oval and scallop oval Nestabilities, Martha Stewart border punch, Prisma glitter, Quickie Glue pen, Bic and Sharpie Markers, rhinestone bling. Ornare Piercing template, straight pin

Snowlady Card:
Printed image from DJ Inkers software
Paper:
Bubblegum, Watermelon(CTMH), pink vellum (Hobby Lobby)
Accessories/tools: Rectangle and Scallop Nestabilities, Cuttlebug, Snowflake embossing folder, Bic & Sharpie markers, snowflake bling (Michaels)

I Can't Believe It Worked!

Good Saturday morning to you! I don't have any photos to share, but I have another installment of our Adventures With Mice. Read on, if you'd like. But, be forewarned, this could get long.

One morning last week, before the girls got up, I was catching up on reading my emails and blog entries. Steve was getting ready for work. It was quiet. I kept hearing a rustling noise, which is the tell-tale sound that a mouse is out and about. I almost always hear this noise in or near the corner where the girls' computer is located (the opposite corner where my computer is located). Which is odd, since it's fairly open (no hiding places). So, after a few minutes of hearing the noise I got up to investigate. Steve at this point was sitting at the kitchen table getting ready to eat breakfast. I looked in the corner and sure enough, didn't see any mouse there, but I sure could hear the rustling. As I turned to tell Steve it was around there somewhere, my eyes scanned our fireplace, which is between the two computer corners. Steve often throws papers in there to burn. Sure enough, one of those papers was moving inside the fireplace! I quickly slammed the glass doors shut and told Steve the mouse was in there. He didn't believe it, and came to look. We could see the critter running around in there, trying to find a way to escape. Now what? I wasn't about to open the doors again, even though Steve said I should put a trap in there.

The fireplace has a door (vent?) on the floor that can be opened up and on the outside of the chimney (in our backyard) there is another door to open. I think it is so you don't have to scoop out the ashes, you could send them all down this hole when the door is opened. The thought was I should go outside (when it was light out) to open the trap doors and let the guy scurry out that way and be gone. I tried it, and got it open (using a couple of sticks). I went back into the house to see if the mouse was still moving around in there. But then I worried the open doors might invite other mice IN, so I went back out and closed it all up. I didn't see any evidence that he had jumped down (there were ashes in the opening). I figured just keep the fireplace closed and let Steve deal with it later. LOL We (the girls and I) saw no movement in the fireplace the rest of the day. Steve got home from work and decided to light a fire. Great, bbq'd mouse, if he was still in there.  Thankfully, he didn't seem to be in there anymore. Not that I know for sure, because I haven't investigated too closely, but we didn't see him run to the glass doors to get out either. We think he might have climbed up the chimney and got away.

I was relieved to think that we might be done with mice finally. But experience this year has taught me not to celebrate too soon and I decided not to gloat on the blog. Good thing. THAT NIGHT I saw another fricking mouse scampering around the living room. This one looked smaller than other ones I've seen. GREAT...they had babies! I cannot for the life of me figure out WHERE they are hanging out! Steve got up and helped me look around. Then we discovered the HOLE in the chair. UGH. Yes, there was a hole in a chair we have sitting by the girls' computer. Steve and I quickly dragged it outside and he proceeded to take off the bottom mesh. No sign of a mouse OR a nest or anything. He did find some scraps of fabric so I could patch up the hole (which I did the next morning).

Are you laughing yet? Because it is comical!

So now Steve is more involved in trying to get rid of the latest mouse. He decides we should put dog food in the traps (remember I have like 7 or 8 of them IN THE LIVING ROOM alone)! No takers on that. Then he thinks raw nuts would be good...nope no go there either. Amy saw it the other night and it freaked her out.

We were out and about most of yesterday for Steve's birthday. We went out to dinner to celebrate. As I walked into the kitchen after that, I could swear I saw something run across my counter behind the sink. Steve said he'd SEEN the mouse on the counters (but never said anything to me....ewwwwww). But of course, we couldn't find him.

So, Steve gets on the internet and is searching out ways to get rid of mice, because now I'm thinking we just might need an exterminator. He doesn't think so (they cost money, you know). So he comes across this article? Post? Something where a guy explains that he had a mouse and he caught it without a mousetrap, in an hour, no less. It involved using a toilet paper tube or paper towel tube and a bit of bait. You balance the tube on the edge of the counter with the bait on the side of the tube hanging over the edge. Underneath the tube, you put a tall,empty trash can. The idea is, mice like tunnels (guess for the furtive aspect of getting around). He runs through the tunnel to get the bait, and falls into the trash can. I was TOTALLY skeptical, but our other methods weren't working and it didn't cost a thing. Steve set it up last night and we went to bed.

At about 4am this morning I thought I heard a thunk coming from the kitchen. Wishful thinking, I thought. Then I heard the sounds of something moving around, bumping into the sides of something. I finally get up and investigate. The tube is no longer on the counter! I creep up to the trash can and in the dim light of the stove light, I saw a mouse in the trash can! I gasped and jumped a foot first. I cannot believe it worked! I gingerly took the trash can and set it outside because if that puppy gets out, I want it to get out...OUTSIDE! Then I thought, I don't want him to get out by the house, so I found a box large enough to cover the top of the trash can.

I am leery of saying we are done with mice, but I sure hope so. I think this makes #3 or #4 that we've gotten this year. If Erin's theory of when you see 1 there are really 10 holds true...then we've got a ways to go!

If nothing else, I could have more mousecapade stories to "entertain" you with this winter! I still can't believe the tube thing worked! I'm going to take the trash can with the mouse over to a dog park to dump it. It's about a mile away from the house.

Thanks for reading if you got this far!

Jeanne

Thursday, January 1, 2009

Gold Star Birthday Card

Hello again! Well, I wandered into my little corner this afternoon to see if I could figure out a way to make this starburst, but without the tag punches (because I don't own them). That didn't turn out like I had hoped, although I might end up with something to show another time. I'm trying to use square punches, so we'll see what happens.

Since that wasn't working out, I thought I'd try another technique to make a card. Back in October, Becca Feeken posted this card with a simply stunning origami star. I contacted her to try to find a pattern to make one for myself. She said she was going to try to create a tutorial and I waited patiently. In the meantime I would do internet searches to see if I could find a similar star. I didn't have any luck. Then, last Friday, I got an email from Becca letting me know that she wasn't able to create a tutorial, but she did give me the information on the book she used. It's called The Origami Handbook by Rick Beech. The ISBN of her version is 0-681-32320-5. She thought it might be at my local library. Lo and behold it was and it was available to check out. Whooo hooo! I picked it up the other day and tried a sample star using copy paper. It wasn't working out at one step, so I put it aside. This afternoon I tried to figure it out again and had success. 

Tomorrow is Steve's birthday and I thought a "gold star" was in order, LOL. I'm pretty pleased with out this one turned out. (by the way, I'm trying out a bit larger of an image size. Let me know if it causes any problems on your end)

100_5461

I can definitely say that this looks much nicer in person. I used a gold metallic paper for the stars (I made three) that I picked up at Michaels and it's from the Paper Company. I cut the paper into 4 inch squares so it would fit on a 4 1/4 x 5 1/2 card base. The brown metallic cardstock is from Archiver's (before I realized Michaels sells the same brand) and is also from the Paper Company. The center is a button I picked up at Joann's. Right now all their buttons are 50% off (til Sunday). I cut the shank off and adhered it with a glue dot. I picked up some gold self adhesive bling at Michaels in the scrapbooking aisle. The sheets have several sizes and are only $1.99, a far better deal than the $3-4 for a similar item at Archiver's. Becca shared that she uses these on her cards and that she picks them up at Michaels. Thanks, Becca! All these items were purchased before my "non resolution" took effect...LOL The Happy Birthday is stamped in Black and is from Papertrey Ink's Birthday Basics set.

I think that's it! Thanks for stopping by. I may try to get a better photo of this tomorrow, when the light is better. We'll see!

Have a great night!

Jeanne

Happy New Year & Jessica's Poncho!

Happy New Year to you! I hope you had a pleasant New Year's Eve, whatever you chose to do. Our evening was quiet as I'm not a huge fan of going out and partying it up. We were all in bed and asleep well before the new year arrived. I actually had a sort of tough mommy moment yesterday when I had to tell Amy that she wouldn't be participating in the Brownie sleepover that was scheduled to take place last night. I quite honestly had a negative gut reaction to this activity when I first heard of it. It's not that I don't think Amy could have handled it, but I really felt she was too young for this type of activity, especially amongst girls she doesn't know too well. I remember sleepovers with close friends growing up, but I'm sure I was older than 7 when I participated. Thankfully, she seemed to take the news in stride and didn't throw a fit. I made her her favorite dinner as sort of a treat. She didn't even bring it up after we talked about it and I am/was relieved about that.100_5459

2008 ended with me working on more yarn projects. Big surprise, given my recent obsession with yarn, huh? I think looking at all the different yarns available is akin to being drawn to different pattern paper! I showed you the other day the beginnings of Jessica's poncho. I was able to finish it yesterday and she's quite happy with it. I really appreciated her patience in waiting for Mommy to make it and wanted to get it done as quickly as I could. I love the color combo.

I'm now working on another hooded poncho for Amy. I must be a glutton for punishment! No, not really. I just was so NOT happy with that project (even though you all were so encouraging of my efforts) that I knew I'd try to make it again. Amy mentioning quite a few times that it was falling apart (*blush*) added fuel to my desire to try again. I'm making very good progress on it and have already discovered a couple of things I did wrong the first time. Namely, I got larger needles to get closer to the gauge required for the project (sometimes the gauge is so important to a project, while other times not so much. It's a pain sometimes to stitch up a piece for the sake of checking the gauge-correct #of stitches per inch-in this case, it was important!). The needles I used the last time were too small. And I'm actually doing the stripes, which is helping to keep me on track. There was one part of the pattern that stumped me a little the first time and while I thought I figured it out, I now realize I was wrong, wrong, wrong! I've definitely figured it out now and am happily working toward the completion of the body. You can be sure I'll share when I'm finished.

I've decided not to make any hard-core resolutions for the new year. I never follow through and then feel bad about it. My goal will be to continue to strive toward bettering myself be it through knowledge, fitness, creativity or what have you as cliche as that might sound. As much as I love blogging (both sharing on my blog and reading others' blogs) I have found that it is quite enabling. I'm such a sucker for cute projects. Given the state of the economy (and my wallet) I am going to have to strive NOT to buy up supplies, just because I think a project is cute or whatever. I am going to make a conscious effort to use more of what I already have on hand rather than buy new stuff. (oh my gosh...that might mean I have to be creative all on my own-YIKES) Of course, there will be times when I may use up a coupon for a good deal, but my decisions will be much more thoughtful and will consider more the versatility of the product I'm looking at before buying. That being said...I just got a new flyer from Archiver's with two 30% off coupons...sigh...I have seen a stamp set for Valentine's that I like there...it's SO hard to resist. I'll look at it again and think long and hard, I promise.

I'm not sure if I'll make it into my corner today. Although, it is nice and neat and needs a good messing up. We'll see how the day plays out, I guess.

Thanks ever so much for stopping by. Happy New Year and let's look forward to another year of Creative Bliss!

Hugs,

Jeanne