Tuesday, November 30, 2010

Awwwwww....

Just snapped these photos of Jessica reading out loud to Grandpa...so sweet!


They need to be edited a bit, but just couldn't resist capturing the moment.

Dad and I have been having fun during the day doing some shopping while the girls are in school. Yesterday we also stopped at Gunther Toody's for lunch. After Steve gets home from work tonight, we'll be heading out to Texas Roadhouse for dinner. Yum!

While the girls were entertaining Grandpa yesterday afternoon, I popped onto the computer to catch up on emails. I started chatting with my good friend Erin and got her advice on something I wanted to do.
This past weekend I found the most beautiful cardigan/sweater that I will give to my friend Kelly for Christmas. 
The detail in the sleeve and at the bottom of the piece thrills me to pieces.
I also picked up a sleeveless top to go with it.
It's hard to see, but there is a striped texture in the black sweater. 

So, I wanted to add to this ensemble by making a necklace. But I couldn't figure out what to do. So, I asked Erin, who has made some really pretty jewelry, what she thought. She immediately came up with beaded crochet, but not the ropes that I have done before. She crochets with beads and wire! She referred me to her blog here and to Auntie's Beads for the how to video. She's so right, it was easy peasy to do! Thanks Erin.

Here's the result of my efforts (after a quick trip to Joann's this morning with my dad)
I still need to add the clasp/closure but I think this goes well with the set.

Thanks again for the inspiration, Erin!

Thank you for stopping by! I hope your week is going well.
*Ü*
Photobucket

Sunday, November 28, 2010

Feeling a bit Festive...

Hi There!

With Thanksgiving behind us, I thought it would be okay to share a few projects I've been working on this past week or so to help get things in the festive holiday spirit. I haven't pulled out any decorations or anything. I've just been inspired by some crafts I've seen on various blogs and in the craft stores.

Remember that pumpkin I cut in half and stuck in an open frame? Well, I discovered that ProvoCraft put out a seasonal cartridge called Winter Lace and it is just snowflakes! I lurve it and had to have it (on sale)! I took the idea and cut out two of the flakes. I glittered them, folded one and stuck them together. Although the cartridge has some cuts with a slit in them to make 3-D snowflakes, I chose not to do this for my project. I found this bare wood frame at the Dollar Tree. I might be painting it, or I might now as I kind of like the look of it plain bare.


And I knew I wanted to do a word in frames for the winter, so I did! Originally I was just going to use the same frames, but I found these at the Dollar Tree and really liked the idea of using silver instead of the gold. Kind of fits a winter them better, don't you think?

The papers on these two projects is from Martha Stewart. The letters are paper from DCWV and I used the Storybook cartridge again for the letters. What can I say? I love those letters! The paper, although it doesn't come across in the photo, is shimmery!

When I was roaming Joann's the other day, I came across an ornament that was basically pom-poms glued all over a ball. I really liked the look and how easy peasy. I've been trying to think of a ball design for the holiday (that I've had on my coffee table for the past several months) and thought this idea would work. I didn't like the pom-poms they had left at Joann's so I stopped at Hobby Lobby and found these sparkly ones on sale. I broke open the packages and just had fun hot gluing the pom poms. The look is a bit different than the one I saw in the store, but I like that it's eclectic (a fun way to say weird, right). And yes, I'll be changing the ribbon, I was just eager to share. It actually looks better in person than this photo shows.
On the blogs (and in the craft stores) I've been seeing ribbon covered cones and wanted to try my hand at it. I picked up the cones from the Dollar Tree and the ribbon from Hobby Lobby and Michaels. I found some thread spools and finials there, too. I painted the spool a Barn Red and so far have left the finial bare. I'm not sure just what color would be best actually. Here's a link to one of the projects that inspired me for the first tree. I was actually going to make the ruffle like she did, but found this wire ribbon at Michaels. Only, at first I didn't realize it was wired. I just liked the print. I was going to gather one edge on the sewing machine, but this was easier I think. I just crimped one edge and hot glued it to the styrofoam. I was working on this on Thanksgiving morning, actually. I'm thinking of adding the hemp and a bell to it. This is the partially finished project as those wood pieces aren't glued on yet.

This next tree was a bit of an exercise in patience, but I am thrilled with how it turned out. I started this one first earlier in the week. The ribbon was on sale at Hobby Lobby for a dollar a spool. I really like the gingham look, so those were a no brainer, but I wanted a third "color" and hit the jackpot, I think when I found the twill ribbon for the same price. I used just about a complete roll each of the gingham colors and a full roll, plus a little bit of a second roll of the twill. Each roll has 5 yards on it.
The patience came in from having to cut the bits of ribbon into two inch pieces, folding them and pinning them onto the cone. I thought about hot gluing, but figured I'd end up with too many glue strands. FYI, if you need straight pins, head to Wal Mart as a box of them is only $1.67 as opposed to over $3 at the craft stores! I needed a little patience for Jessica who really wanted to help pin the ribbon. I was happy to have her help, but the tv was on in the living room where I was working and, well, sometimes she'd stop to watch it. I'd have to get her attention to keep pinning. She was so proud to help me and said it was a lot of fun. So some extra love went into this project.

And finally, after seeing this post, I was inspired to create yet another tree:
How fun! It's just white glue and glitter, but what a sparkly look! I might need to find a fancier stand for this one. Hee, hee.

And that's what I've been doing lately. I have another idea I'm working on based on something I saw at Joann's. If I get it completed, I'll share.

My dad arrives this afternoon for his visit. He'll be here until Friday morning, so I probably won't have much crafty time this week. Just to let you know what's going on if I'm not posting much this next week.

Hope you have a great Sunday!

Photobucket

Thursday, November 25, 2010

One Gift Done...

Happy Thanksgiving! I hope you've had a wonderful day with your loved ones and didn't eat so much that you are uncomfortable. Ours was quiet, but nice. The turkey was yummy and the girls are healthy and happy. There's not much more that one can ask for. *Ü*

As my title indicates, I can check off one gift as being done for this holiday season. I have a mom friend whom I hang out with after school (not Susi) who really likes to wear newsboy style caps. I thought it might be fun to make one for her as I really enjoy her company while our kids are playing for a bit before heading home. I tried making a freebie pattern and got it done to the brim part and thought it looked a bit small. I had Jessica try to put it on and it didn't even fit her eight year old head, so I knew it wouldn't fit my friend(kind of frustrating when you know your gauge is right, but it was free, so I can't really complain too much). I decided to go ahead and buy the pattern I had been eyeing for a few days. It's on Ravelry and you need to be a member to access it (although it's free to register). It's called Swirls Cap created by Sophia Kessinger (if you decide to take a peek on Ravelry you can look it up by that information).
Here's how it turned out:


I'm a little worried this one might be a teensy bit big (although it fits my head comfortably, if a bit floppy). If it is, I can always make her another one and adjust the size. This worked up really quickly as it is double crochets (my favorite crochet stitch). The pattern didn't call for a button on the flower, but I thought it would look neat with one. I found the vintage button in my stash and am really pleased with how it looks.

As this Thanksgiving comes to a close, I'd like to thank you all for your visits and comments. I truly appreciate  your time and generosity. If I've managed to make you smile, I'm thrilled. I hope the rest of your holiday weekend is wonderful!
Photobucket

Monday, November 22, 2010

Happy Thanksgiving Banner

This project has been waiting patiently for me to finish it for about a week now.I was going to gussy it up a bit more, but, since Thanksgiving is just a few days away, I decided to call it done without any extra bling. Otherwise, it just might not get done at all. I used the Cricut for all the cutting. Storybook cartridge and Amber Autumn (DCWV) cardstock. The leaves are from Doodlecharms. So far the girls haven't noticed it. Big surprise, huh? They are sitting at the computer right next to the fireplace where this is hanging, too, as I type this. LOL


Thanks so much for stopping by.
I hope your week is off to a good start!
*Ü*
Photobucket

Impromptu Field Trip on Saturday

Steve got an email late last week about an exhibit that was going to be open for Saturday only at the Museum of Nature and Science. The subject of the exhibit? Fossils that were found just a few weeks ago in Snowmass Colorado! Fossils of mammoths, mastadons and a giant sloth. How cool is that?! Here is an article I found online about the discovery. History in the making is something you just don't want to miss out on. So, we went. I didn't bring my camera, thinking they wouldn't allow photos. Um, I was wrong. Steve pulled out his phone and took some pictures. And I thought you might like to take a peek. I tried to edit the pictures so you could see the detail better.
 This is the inside of the horn core. The horn core is the inside of the tusk. The tusk is actually a sheath over the horn core.


 These animals had huge teeth. And they get 4 sets over their lifetime.
 When one tooth is ground down too far, another set moves in to take its place.
Here you can kind of see the other set getting ready to move.
They think this is from an 18 year old female.

 Here is the tusk, the horn core is from inside this.
Another shot of the horn core.
 They had a few activities for the kids to participate in.
They also had these life size banner posters so you could get a feel for just how large these animals were.

 
Jessica loves to get her face painted!

 Cute mastadon, eh?
 Amy liked her hat.
This is the leg bone of something, I don't remember what.
They had some other fossils on display that weren't from the recent findings.
If you look by that lady in the green sweater, you can see the pelvis they had hung up. It's at the height it would have actually been for that animal (I think it was a mastadon...it was huge!)

Anyway, it was a fascinating exhibit.
After we were done, we had to go into the Gems and Minerals exhibit and then the Mummies exhibit.
Amy wanted to go to others, but we'd been there a few hours by this point and the place was packed. 
Good thing we have a membership and can go back whenever we want. Except to see these fossils they just found. It was so worth the trip over, I think.
*Ü*
Photobucket

Friday, November 19, 2010

Thankful Cards

Hi There and Happy Friday to you!

This week somehow got away from me and I didn't get to create nearly as much as I wanted to. I was able to finish up some cards today, though, and thought I'd share them with you.

This first card is pretty much a complete case of this one on Just4Fun2. I saw it way back in September. I really liked the wreath, but thought (foolishly) that I could recreate the wreath with stamps I own, or digital stamps. Um, not so. I didn't have any leaf images that I thought would work well (what's up with that?), so I put in on the back burner. But I couldn't get the card out of my mind, so I caved and bought the digital image here.(big cave, it's all of $2)There are some really neat images in this shop, but I just bought the one. I could so do some damage to my wallet, but with the holidays coming up, I am being good (sort of. If I was really good, I'd not be getting anything, ha, ha)
Anyway, I really, really liked Pat's card and didn't change it up much. I just used colored pencils and odorless mineral spirits instead of markers. It was kind of fun trying to blend the colors. My intention was to have the cross stitching the same as Pat's too, but I poked the holes on the leaf paper on the wrong side! Had I kept it, the little acorns would have been upside down. Oops. So, maybe that is my different take on the card. LOL It's harder to see than I thought it would be, but the sentiment is stamped right onto the Amber Autumn (DCWV) cardstock. I used that Hero Arts Happy Thanksgiving set for the sentiment.

I wanted to use the same Hero Arts set for another card and this is what I came up with. My inspiration was this card on Lea's Cupcakes and Sunshine blog (yes, I am stretching, it doesn't look much like my inspiration). I really liked the design. But again, I don't have leaf stamps that I felt would work(I'm surprised that I don't own smallish leaf images) But, I didn't cave and get the stamp set she used (again, trying to be good). I think it came out pretty nice for a clean and simple card.

Did you notice I put my name on the pictures? It's been a long time since I've done that. Maybe I'm a lazy blogger, but I don't edit my pictures (maybe I should, but I think my camera takes pretty decent shots). I don't always feel like opening up my PSE 7 to just put on a watermark. And Windows Live Writer no longer works for me. But I have this program that I got a long time ago for editing videos (when I thought I'd be creating more of them-hardy har har). It used to open up every time I stuck my photo card in the reader. I would just hit cancel when the pop up came up. Then it quit opening up. Just this week it started opening up again(sometimes computers are so hit and miss). And I hit cancel. But then....I wondered (for some bizarre random reason) if I could open up the pictures in this program to add my name to the picture. Lo and behold, it worked! Yay, I can put my name on my creations again, and it is fairly quick and painless. 

That font is called Kathleen, and I honestly don't remember where I got it. I liked how it looks like that script typewriter font from when I was a lot younger...anyone remember those? Yes, I realize I'm totally dating myself now, but I loved the look of reports typed with that font...always wished we owned one like it. LOL Yes, I used to type up school reports on a manual, then an electric typewriter. I was in high school when my dad brought home our first computer. It used DOS. Ugh, I hated it. I had so much trouble getting it to work. It was faster for me to type on the typewriter, so I preferred to do my reports that way. Ahhhh, you youngsters (and my kids) have it so much easier now, in terms of technology. 
And just so you know, I walked to school, uphill, both ways, in the snow. LOL (never mind that I grew up in Southern California...phffffft

Geez, that was quite a tangent...forgive my skip down memory lane and
 I hope you have a great start to your weekend.

Thanks so much for stopping by!
Photobucket

Monday, November 15, 2010

JungleQuest Fun!


The pictures aren't the best, but Amy and her friends sure had fun zipping along again, and again.
The workers there were fun, too. They'd pull ropes to get the kids swinging higher or spinning them or even stealing their shoes! One guy would "ride" along with them. Crazy.


Amy impressed the heck out of me when she climbed the rock wall just like a pro. I don't even think she slowed down. Up, up up she went straight to the top to ring the bell.


One last ride with her friend Hattie.
Hattie was talking like she wouldn't do the zip lines because they intimidated her. 
Thankfully, she was willing to give it a shot and discovered how fun it was. 
I was really proud of her.

And, although I missed a majority of the Broncos terrific win against the Chiefs, it was SO worth it to watch the girls have the time of their life.
Of course, now Amy wants to go again....
LOL

Thanks for stopping by!
I hope your week is off to a great start.
Photobucket

Saturday, November 13, 2010

Birthday Gifts for a Friend...

Okay, since the party is in just a few hours, I can pretty safely share these projects without the recipient (Hi Becky) seeing them. If I had posted earlier and said, don't look, I'm pretty confident she'd go ahead and look! When I said I was busy earlier, with not much to show for it, these are the reasons why.

Becky is a big fan of owls and, even before I asked her for ideas for a birthday gift she might like, I already had a plan in mind. She just confirmed what I was already thinking. Don't you love it when that happens?

Since I'm currently having a love fest with my Cricut I looked for owl images and wasn't disappointed. This owl is from the Cindy Loo cartridge.
Not much to explain as it is pretty straightforward. The only thing I might change, if I could, is the background paper. Unfortunately, I didn't have any other paper that would work well. 

I loved this foil accented paper in the Amber Autumn stack.

I'm really pleased with the end result of this little project.

*Ü*

Here is another owl, a squishier kind.
His name is Rupert.
(or whatever name Becky decides)
 The pictures don't really do him justice.
He is rather cute, dare I say a smidge elegant, in real life.
That's a really royal looking purple yarn. And a bit of dark green and tan.
What I really liked about this pattern is its unique design.
I hadn't done an amigurumi piece using double crochets before.
 And the "ears" are adorable!
I found the pattern here on Etsy. 
If the link doesn't work, type in Rupert the Owl and the listing will show up.
He came out larger than the sample shows, mostly likely because I used worsted weight yarn, and possibly, a larger crochet hook. That just means there's more to love, right?

I also asked Becky what ideas she had for her daughter, Julia, whose party we are attending.
Julia loves Hello Kitty.
Well, kitties of any persuasion, but Hello Kitty in particular.
So, I looked for a kitty image to use in my Cricut.
The one I found is not quite there, but close enough,  think.
Somehow, I don't think Julia will object.

And I lucked out when I searched for Hello Kitty crochet patterns. I found one here, that turned into this:
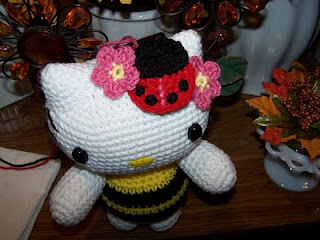
Bumblebee Hello Kitty!

 Complete with wings!
Isn't she a cutie bee?

The blogger translated the pattern from a Japanese one. She did okay, but hadn't tested it before posting. Luckily for me, I have enough crochet experience under my belt that I was able to adjust for a few errors in the translation. 

And, the pattern called for a crocheted ladybug, which I made, 
But the consensus was it was too big!
I had a some ladybug buttons in my stash that I was able to use instead.
I didn't realize when I started that Hello Kitty has a yellow nose. I thought it was black. But, thankfully I learned the real nose color before I used that color. LOL I'm hoping Julia will be happy with her kitty.

So, this is what I was busy with earlier this week!

Amy's team won their game today...yay!

Hope your weekend is going well.
Thanks so much for stopping by!

Photobucket