Showing posts with label card. Show all posts

Sunday, June 12, 2016

Channeling My "Inner Kay" :) Hey Gillfriend!

Hi There!

I've got a card to share with you today that was completely cased from my good friend Kay Miller. Here's the one she made and below is my version. I can't ever hope to blend as well as she does, but I did try to channel my "inner Kay" as I created this. I got a huge assist from my stamping buddy, Jessica. :) She did all the coloring of the critters.   I think she did an awesome job. 
I did the fussy cutting.
I thought I'd share that I listened to people who say if you watercolor something, don't immediately trash it if it doesn't work for the project you are working on. I had a background done for months that'd I'd keep seeing and thinking, should I trash this? Well, I never did and when I was working on this card, I wondered if I cut that piece up, would it look good as the sea water? I think it worked pretty well and it's finally used up. ;) And, while you can't tell in the photo, unless maybe it you enlarge it, the white piece is glittered cardstock. Adding the purple fish is my last attempt at doing something a bit different-even if it might be a fish that doesn't belong in the sea. It's my fantasy world and I think it'd be just fine. Ha, ha! The rest of the design is all her creative genius. 

I also finished coloring the seahorse picture. Go me! 


Now the tricky part is trying to decide what to work on next. 
I have many books to choose from!

Thanks so much for stopping by!
I hope you are having a wonderful day. 

Hugs!
Photobucket

Sunday, July 26, 2015

Leafy Thanks Card

Hi There!

I know it's not fall yet, but I recently saw the Autumn issue of Cardmaker magazine and couldn't resist the cover art. Oh so pretty! There are lots of fun techniques and card inside, too. I wanted to make that cover card!! So I did my best with what I had on hand.

(click to enlarge if you like)

I don't own the creative medium stuff that the cover card has on the background piece. I really do like how shiny and vibrant it looks, but didn't want to spend the money it would cost to get the stuff for possibly just one card. I got to work seeing if I could mimic the look with my crafty supplies. I tried some Perfect Pearls, but realized I don't have any fixative.  So, while it looked good, I couldn't "keep" the look from rubbing off. Darn. I tried blending some inks on white paper. Nope, no good. Hmmmmmm I found some Brilliance pigment pads from several years ago in Galaxy Gold and Cosmic Copper. So, I used those on black cardstock. It looked okay and still had a bit of sheen. Yay. I dried the first layer with my heat gun and blended another layer on top of that and dried it again. Good enough. I used a Darice woodgrain embossing folder to get the texture. 

The original piece used a tag, but I don't have any tag dies and I spent so much time working on the background piece, I didn't want to fuss with pulling out a die cutting machine and searching for a tag cut. So I opted for a Sizzix arched die. I cut that out of vellum and stamped the Lawn Fawn thanks (from the Happy Everything set) in Versafine black pigment ink and clear heat embossed that. Next, I cut a bunch of Lawn Fawn stitched leaves from various colors of cardstock(mostly DCWV, but also Ocean cardstock from Close To My Heart). I inked the edges with some Close To My Heart inks-Ocean, Vineyard Berry and Sunset. Then I hunted down my container of Waxy Flax from when I used to be a Close To My Heart consultant many, many moons ago. I also found some hemp. Tied some bows and adhered those down with glue. I wanted to add some sequins or something, but I don't have any in fall colors. I decided on some Dew Drops (remember those???).

All in all I am very satisfied with the end result. :)

Thanks so much for stopping by. I hope you are having a great day. 
Photobucket

Saturday, July 18, 2015

Floating Along...

Hello!

Thanks so much for stopping by. Things have been a little quiet here on the old blog recently. That is because my dad flew in for a week long visit. It's our summer ritual. One I'm very happy to be a part of. This year's visit was extra special as he celebrated his 85th birthday while here! Yay! My oldest brother was able to sneak away from where he lives in Idaho to be here as well. We had a little party for him and pampered him as much as he'd let us. To look at him, you would be hard pressed to believe he is 85. He is slowing down a bit, and suffers from diminishing eyesight due to macular degeneration, but he is always ready to go shopping! He lives in drought stricken southern California and aside from the joy he got from seeing his granddaughters, his next biggest joy was experiencing a few pretty loud thunderstorms. *Ü* He saw more rain in his week here than he has in a couple of years back home! Sure wish I could have sent some rain home with him, that is for sure.

Not long after he left, we got word that our good friend and neighbor took a fall and broke her ankle. :( Not only that, she messed up her big toe on the other foot! So not good! She's going to have a hard time getting around for the next month or two. I wanted to make her a card and thought this image might help her dream of where she'd like to be over where she has to be right now. I picked the image up at Tiddly Inks and colored it with my Prismacolor pencils and blended with odorless mineral spirits. My coloring is completely inspired by one of the samples shown with the digital stamp.
I was thinking if she could think about floating along on the water maybe she could imagine away any discomfort she is feeling. And while the drink may look like lemonade...it could have a little sumthin' sumthin' in it to help take away the pain, too, right? 

Anyway, that's it from me today. I hope you are having a great day!

Photobucket

Tuesday, July 7, 2015

Jane's Doodle Owl Watercolored ala Jennifer McGuire :)

Hi there!

On the 4th of July my local scrapbook/stamp store had a one day sale. Since we were in town I took some time to check it out. As I wandered the aisles I couldn't believe my eyes when I looked down toward the bottom of the section for owl stamps and goodies and saw the very same Jane's Doodle stamp set Jennifer McGuire used in her video on watercoloring and stamping here. That was last August and I've never quite been able to get that card out of my mind. I never expected to see it in this store! Lucky day for me!

Of course, when I got home I wanted to play with it, but had to wait. It was a holiday after all. :)

So, I got to work on it Sunday. Yes, this is a shameless CASE of Jennifer's card. I even used some Peerless watercolors. Not the ones she did as I don't have the same set, but who I liked the colors I had. I even added Perfect Pearls to get the shimmer. I took my time and let it dry over night. Then with bated breath, I cut through one wing. Ohhhh that hurt just a bit. In the end though, I did it because I just adored the card Jennifer had made. 

Here's how mine came out:

Tried to angle so you can see the shimmer.

He's a cutie!
(Feel free to click on any photo to enlarge it).
I even added Perfect Pearls to the background color. It's quite shimmery and I like it! 

Big smiles at how this one came out. 

Thanks so much for stopping by! 
I hope you are having a happy day. 

Hugs,
Jeanne


Saturday, June 20, 2015

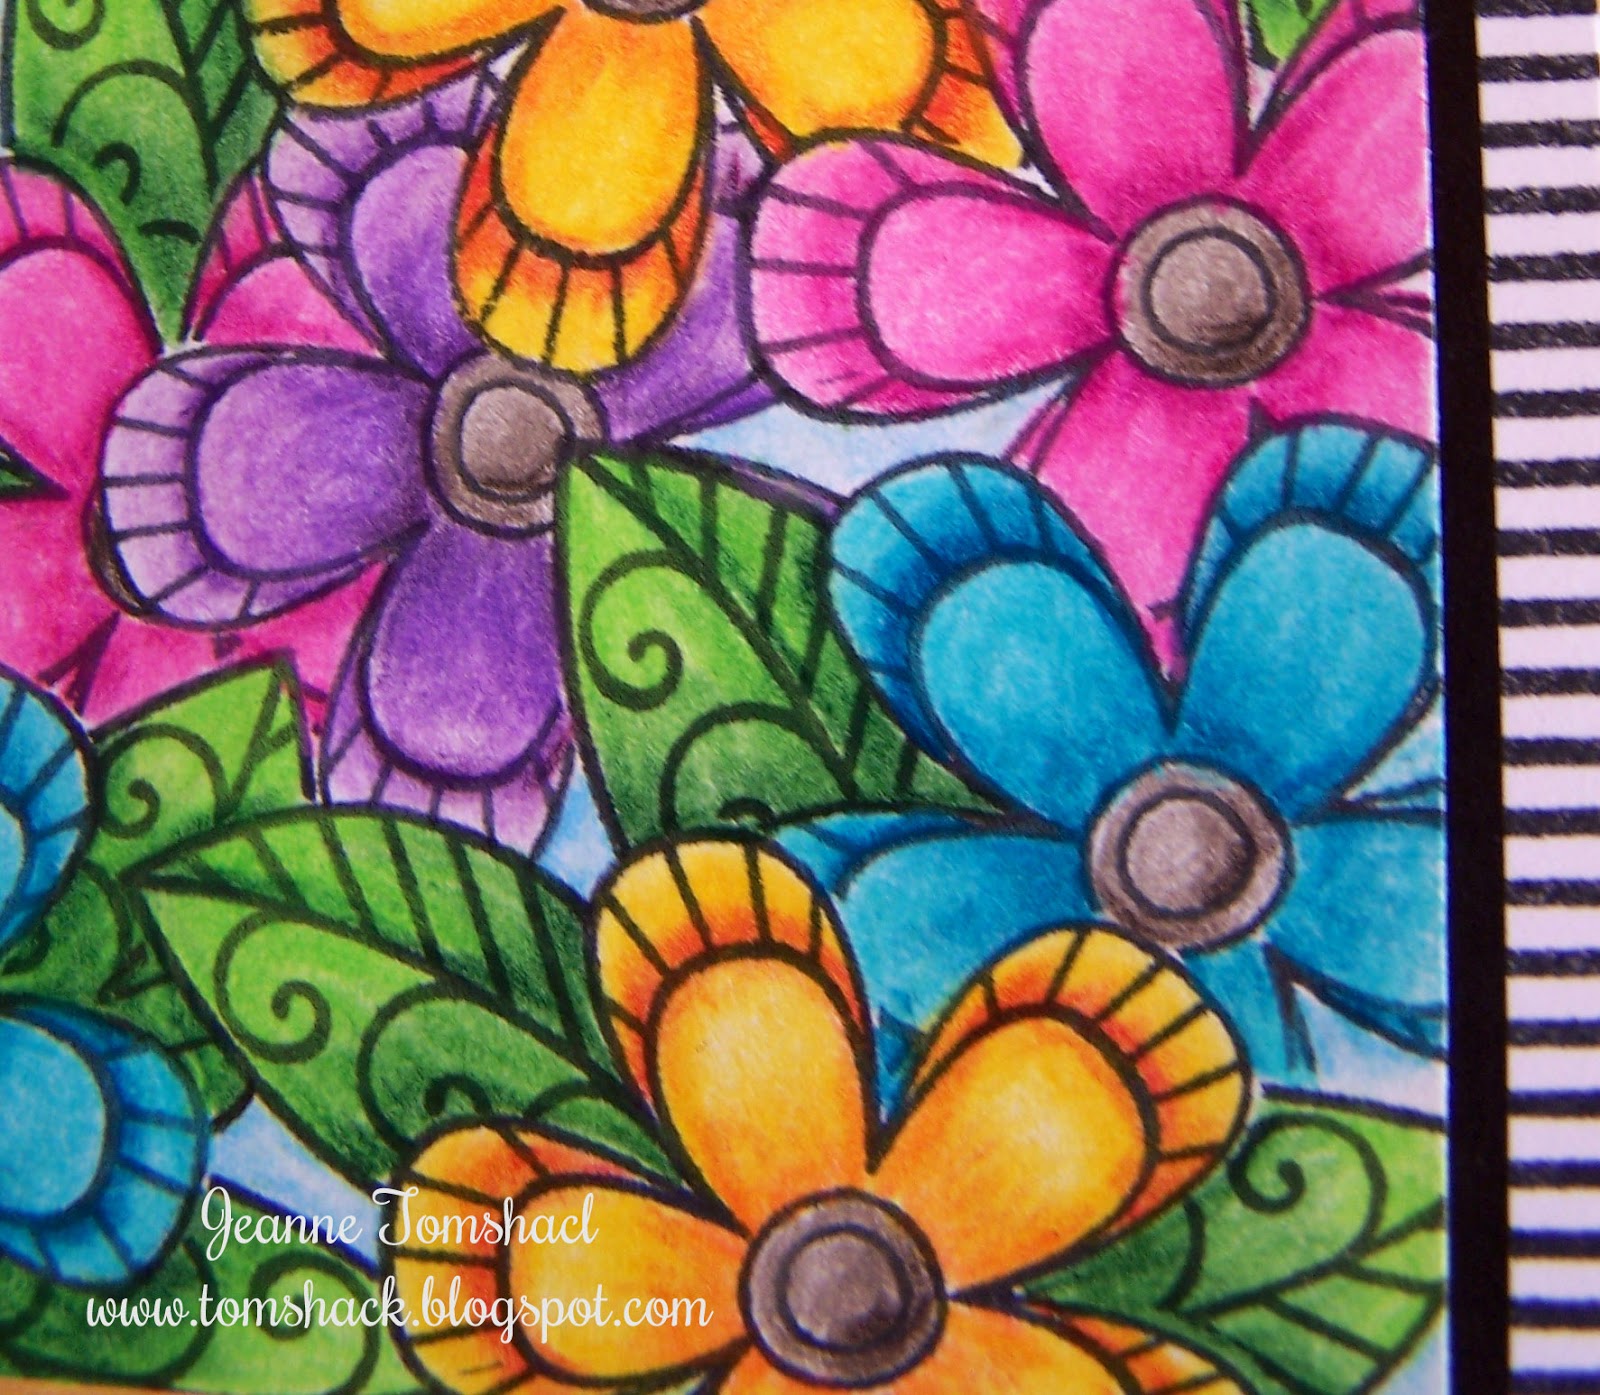
Doodle Flower Fun

Hi there!

I've got a card today that is completely inspired by a card I saw on Kelly Latevola's blog called You and Your Big Dreams. I have become a big fan of hers over the past few months. Her work is absolutely gorgeous and she is hilarious as well. She has a pretty cute little boy, too. She has no idea I'm singing her praises. If you haven't discovered her for yourself, you might want to take a looksee. :)

She has mad skills with Copics and she can doodle and enhance stamp images fabulously. Another thing she does that has impressed the heck out of me is mask. In the card I linked (and cased), she mentioned she used four masks to get the flowers and leaves to work. I wasn't exactly sure just what she did, but I sat down yesterday to try to figure it out. I think I sorta got it. I cut three masks of the flower and two of the leaf. By that, I mean I stamped the flower image three times on my all over sticky Post it note paper and two images of the leaf and I cut them out. Then I started stamping and masking. I absolutely did use her card as my guide. 

Then I started coloring. Only I colored with my pencils! I had fun trying to mimic the bold colors Kelly uses. I think I did okay. I didn't blend the colors with odorless mineral spirits on the flowers and leaves, I just used different pencil colors. 

Enough jabber for now...take a look at what I ended up with!
I love it!
:)

Squeal....

I really wanted to add some white dots, but, these pencils have a wax base and experience tells me the white gel pen doesn't play well with that, so I reluctantly left off the white. In the future, I might play with using some paint, but I didn't want to ruin this work. If anyone has suggestions on how I could add white dots, please share!
The side stripe strip is something I learned from a Jennifer McGuire video. She has a stripe stamp, stamps the image and she cuts a strip off to add to the side of the card. I usually forget about doing that, but not today! I wanted to add a sentiment, but wasn't sure which one, or where to put it. Not to mention I don't have fun single word dies. I could have found one to cut with my die cut machine, but again, not sure which one I'd want to use. 

Looking at this card makes me happy!

The stamp set I used is from a company called Dare 2B Artzy and the set is Doodle Flowers. My local scrapbook store carries some of this line and I really like the Zentangle aspect of the stamps. 

Thank you for stopping by and if Kelly stops by to see this, thank you so much for sharing what you love. It is very inspiring!

I hope you have a fantastic day.

Photobucket

Monday, June 8, 2015

Wryn the Mermaid

Hi Friends!

Way back in April, I saw this card on Handmade by Christine and was smitten with the way Christine colored the mermaid. I adored the purple hair! And I wanted to see if I could color the hair with pencils to look somewhat similar. So I picked up the digi image here at Tiddly Inks and started coloring. My crafting time has been so limited recently that I had to put the image aside. Well, yesterday I finished with the hair and added some sparkle. Today I fussy cut her and played around with some distress inks (Salty Ocean, Peacock Feathers, Tumbled Glass and a bit of Seedless Preserves). I added some misting of water mixed with Perfect Pearls and at the last minute decided it needed a few sequins. Oh and I embossed the Cuttlebug swirls onto the background piece. Thought they would mimic water, sorta, kinda. 

Here's how the card turned out. 
Feel free to enlarge if you want. I brushed on some Diamond Dust Stickles here, there and everywhere. 

And a close up, just because.

I have to admit I'm pretty happy with the final result. 

:)

Yay for summer break!
I can sneak away a bit more.
Eeek! 
Thanks so much for stopping by!
Have a happy day.
Hugs,
Jeanne

Sunday, May 3, 2015

Shimmery Butterfly Thanks Card

Hi There!

I recently started following a blog called Me and Minime Crafting. Marika is a wonderful artist and I've watched a video or two of her watercoloring. Oh my! Such talent. :) Anyway, she recently posted this card and I was instantly smitten. Butterflies! Squeeeee! I really liked how she heat embossed the image in white and chose to watercolor the butterflies green. I decided to try my hand at a similar look.
Since I felt a bit more successful watercoloring with pencils, I used them again. Why mess with success, right? These butterflies are from an old CTMH butterflies set (long retired, I'm sure). I forgot to note the name of the set, and I'm too lazy to go back and look for it. Let me know if you'd like the name of the set. I stamped them in Versamark and heat embossed with white. The first butterfly I made was all green. Then I started to wonder (uh oh) what it would look like with some blue. I liked the result! I set them aside to dry. Then I added some shimmer with my Wink of Stella pen. Only you can't really tell. I set this aside and left it alone until today. Should I mention I'm working hard now not to rush myself in finishing a card? 

I sat back down today and decided to fussy cut the butterflies out. Initially I planned to plop them onto white cardstock, but I got to thinking again...I wonder what it would look like if I washed a watercolor card piece with shimmery blue watercolor? I liked the result! (whooo hoooo 2 for 2)

You can see the shimmer much better in this second photo. :)

Finally, I wanted to add a sentiment and I really like the thanks Marika used. But I don't have that die. I noticed some wayyyyyyyy old Cuttlebug dies on a shelf. I mean these were released the first year the Cuttlebug was, if I remember correctly. I remember when purging before debating whether I should donate the dies as I'd not used them much at all. But I decided to keep them. Golly! Am I happy to have hoarderish tendencies when it comes to crafty supplies. :) I cut the thanks with a shimmer cardstock from Michaels. It's a recent release stack called Sophia and is part of the Recollections brand. Adds just the right touch. And to finish off the card, I added some sequins. 

Happy sigh!

Thanks so much for stopping by. 
I hope you have a happy day.

Hugs,
Jeanne


Sunday, April 26, 2015

Stenciled Happy Birthday Card

Hi there!

I needed a masculine birthday card and got to work this afternoon trying to come up with something using stencils and distress inks. I found some neat looking Faber Castell stencils at Hobby Lobby recently. They have shapes that can easily be used for backgrounds on cards using whatever technique one may desire. Using stencils is really making a comeback it seems. The only drawback is the stencils I got are paper. So, while you can reuse them for a time, they aren't going to last forever. Ah well. I'll have fun for a while anyway.

I decided some good "guy" colored distress inks include Peacock Feathers, Mowed Lawn and Spiced Marmalade. I used some old stencil brushes because I had seen a video where a lady made a great looking background using them, creating a stippled look. Weeeeeelll, I tried that to start out with the technique she used in the video and I'd probably still be stippling next week. I obviously didn't have the right touch (or the patience) to continue that technique. I started moving the brush in a circular motion while pressing down a bit(kind of like how I used to do this years and years and years ago-ahem). Ahhhh, now that looked a lot better and was much quicker. It probably doesn't look any different than using a sponge, but I didn't get any hard lines either, so there is that. Here's the final card.

And below is a close up of a mistake an opportunity to embellish I made. I wanted to clear heat emboss the happy birthday sentiment. But.....I didn't wait long enough for the ink to dry from sponging the colors on and the embossing powder stuck everywhere. Um, oops? Nah...I embossed it anyway and liked the texture it added to the sentiment. So I used it! The die is a Nestabilities Shapeabilities die. I cut a white rectangular piece of cardstock and used the same stencil brushes to add the colors to the rectangle. This is a nice low profile card that should be easily mailable. 


That's it from me today. Thanks so much for stopping by. I hope you have a great week!

Hugs,
Jeanne

Sunday, April 19, 2015

Flower Fairy Hello

Hi There!

Last month I saw this card and was smitten with the image and the colors Christine used to color this sweet fairy. Christine's coloring is terrific and I enjoy looking at what she shares. You might want to take a peek. I've added a few blogs to my Feedly over the past few months where the blogger is a fantastic colorist and seeing what they have created makes me want to color, too. Thanks for the inspiration, Christine (in case she ever stops by to read my little blog)! 

I had fun using my Prismacolor pencils and odorless mineral spirits to color this. I don't know if anyone is interested in what colors I use, so I don't keep track. If you are interested, please let me know. The pinks were colors I hadn't necessarily pulled out before and I liked how they looked. 

A heads up for those who like to use Wink of Stella pens and to color digital images. I honestly don't know what the liquid is in the pen (I've never investigated that) but whatever it is, it sure doesn't play well with printed digital images. It smears the ink. Remember when I mentioned something on that card that Jessica made. That's why she had to color another image I smeared the ink. So I forgot about that when I started to put some WOS on the wings of this little gal (after I had colored everything). I just barely started when I remembered. Thankfully it didn't ruin the work I had done(I'd have been so very sad to have to start coloring  the image again because of that). I ended up using lots of Stickles instead. 

I wanted to add a little more of something and I know sequins are popular. I've not gotten colored sequins, but I did like how these iridescent sequins(from Hobby Lobby) looked, so added a few for interest. Hopefully they don't detract from the image. 

The hello is from the Gingham Backgrounds set from Lawn Fawn. I just love that font! It's stamped in Watermelon ink from Close To My Heart. I also used their Stitched Rectangle die. 

That is all from me right now. I thank you very much for stopping by! I hope you have a great day. 

Hugs,
Jeanne

Sunday, April 12, 2015

Watercolored Butterfly Hello

Hello!

I was able to head into my crafty space this afternoon and I tried something new for me. And I think it worked out better than I'd hoped it would. :)

My friend Kay participated in a blog hop for Papertrey Ink way back in February. She posted a sneak  peek of  her card here. One of the things I especially liked about this card was her use of the quatrefoil pattern and distress inks. I copied this idea with a Memory Box stencil I picked up at my local scrapbook store (probably back in February). I used the same inks and that was as far as I got that day. This background piece has been sitting on my desk ever since. 

Then a week or so ago, I took a bit of a drive to a store that sells all the colors of Prismacolor pencils. I had some holes in my collection and wanted to fill them. :) They were having a watercolor demonstration. As you regular readers know, I am very much watercolor challenged, but I stopped to chat with the gal working the demonstration. She showed me how to use watercolor crayons and watercolor pencils. I have had a set or two of watercolor pencils collecting dust for years. I even have some watercolor crayons somewhere. Seeing someone demonstrate the technique in person was so helpful! I even got to try it under her watchful eye. Ever since that demo, I've wanted to try my hand at using my watercolor pencils. (I still have to look for the watercolor crayons I think I own).

I have to say, I'm quite pleased at how this turned out!


I used a new Hero Arts butterfly stamp and die set that I found at Joann's. Last month I came across this post and the idea came to mind of what I would try to do!

I used a Dazzle Versamark ink in Champagne and clear embossing powder to emboss the butterflies. Then I used General's brand watercolor pencils to lightly color along the edge of the embossed lines. I pulled out the color with a paintbrush dipped in water. 

I actually achieved a look that I liked! Whoo hoo! I have to say, I do like the control I felt I had with the pencils. 

I popped the large butterfly up with some foam dots. You can't really tell in the photo, but the body is covered with Wink of Stella shimmer. 

Finally, a watercolor session that didn't end in my being completely frustrated. 
There may be a little hope for me yet. 


Thanks ever so much for stopping by.
I hope you have a great day!

Hugs,
Jeanne

Sunday, November 16, 2014

Birthday Card(s) and Gift

Hello there!

Long time, no chat! I'm still here in my little corner of the world trying to keep up and catch up on all the stuff I need to do. After being a stay at home mom for 13 or so years, I never thought getting a part time job would throw my world into such the tizzy as it appears to have done. I think having two girls in middle school has helped keep me hopping as well. 

The job is going well, but it's definitely a busy one. I'm on the go from the moment I get there and I don't really stop until the shift is over. I can't remember if I shared that I am working as a cook/cashier in an elementary school kitchen. In my life before kids I was an elementary school teacher. However, I don't wish to go back into the classroom (I know myself~I wouldn't be able to balance mom and teacher very well at all-heck I can barely manage part time work and mom)so, this was a good alternative for me. I still have some contact with the kids, but I don't have to worry about lesson plans or grades and I am home when my kids are home. Win, win! The girls have had many after school/evening events over the past several weeks which has kept me/us on the go. Add a weekend activity or two and my crafty time is shot. But really, I know I am singing to the choir. I don't know how some of you moms handle full time jobs and kiddos and crafty time. Bless you for keeping it together better than I feel I am doing. Life is full and good, and my kids are happy. That is what matters in the end. *Ü*

I am trying to be crafty, but it's a different crafty, how's that? I have rediscovered my love of counted cross stitch. Like crocheting or knitting, it is something I can pick up when I have a minute and put down when my time is up or when my eyes refuse to stay open. So, when I have a minute that is what I have been working on. I showed you a couple of projects in my last post. Well, I have a few more items to share today, plus a couple of cards. Yay! 

Sit back, grab a cuppa whatever, this post is a little bit photo heavy. Fair warning!

A couple of months ago I came across a book from Annie's Attic called Easy Cross Stitch Cards & Tags. One of the projects on the cover was this owl. The card in the book is a Halloween swing style card, but  I have a friend whose birthday was approaching and I thought she'd like this owl on her card(and not necessarily the Boo! in the original design). She's likes to cross-stitch, too. This is stitched on perforated paper and cut out. I used lots of pop dots to give it a bit of dimension. The paper is Doodlebug, my favorite!  I was really excited to see ideas for cross stitch projects made into cards and look forward to trying to make more.

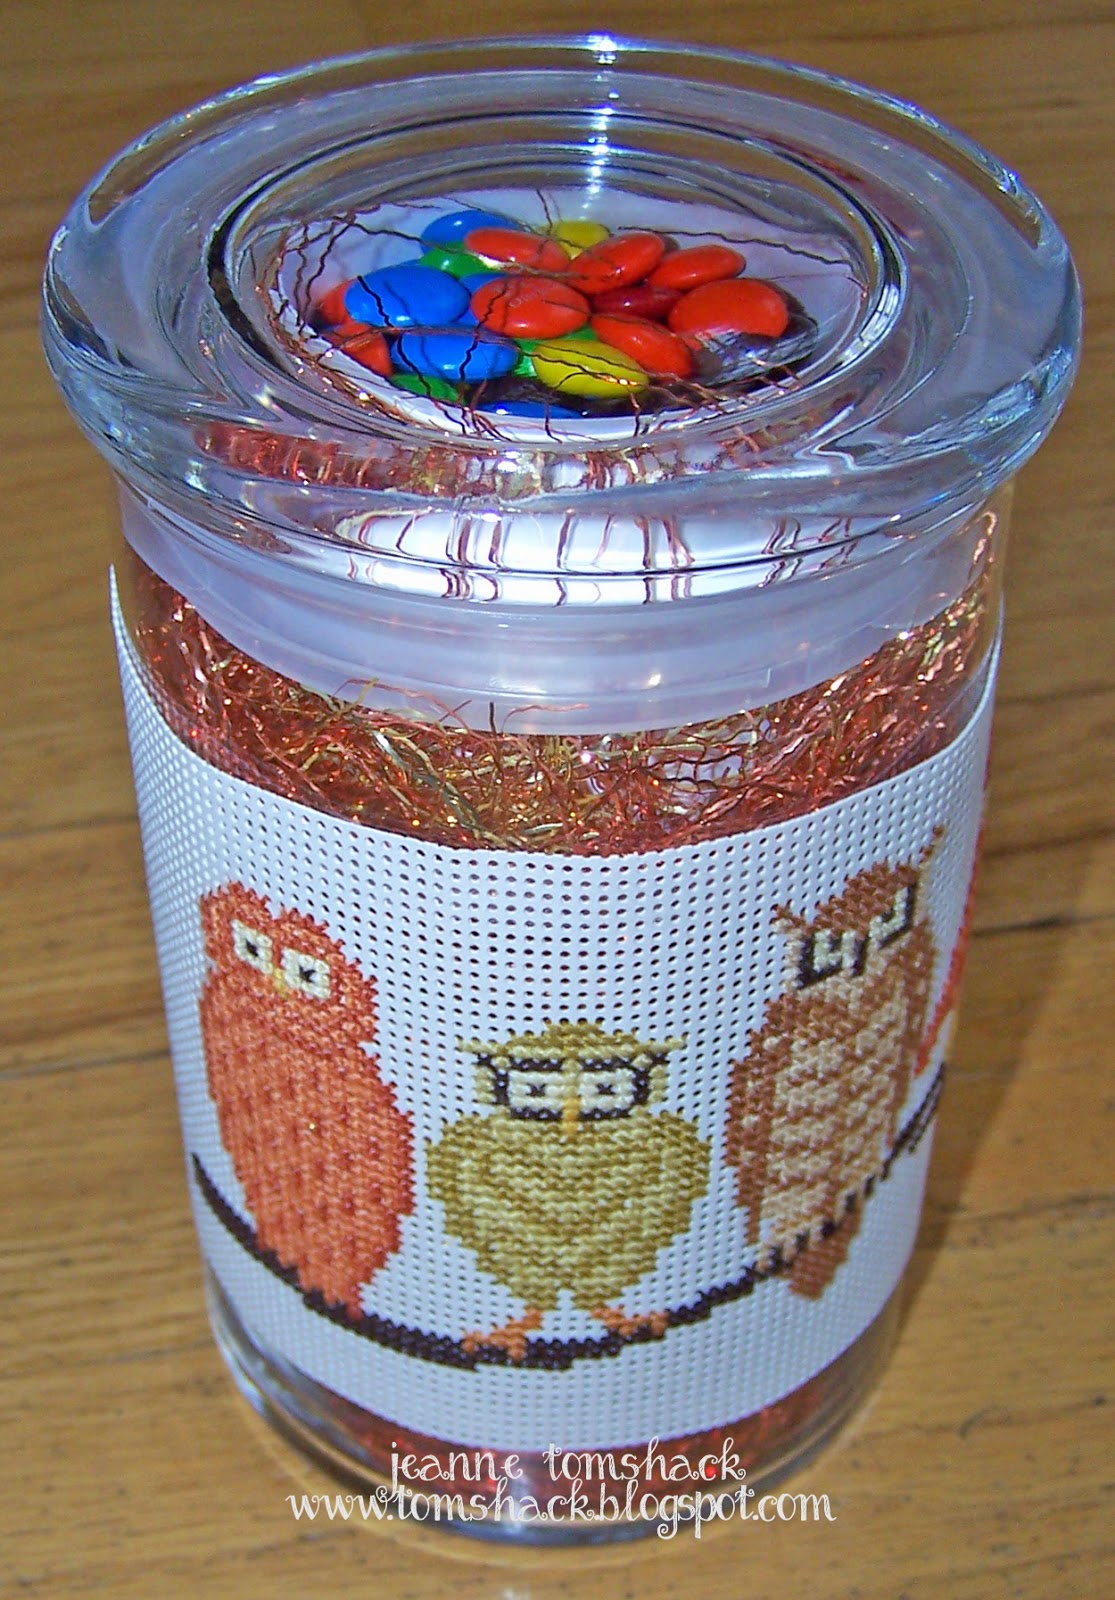
I also found a neat idea in a magazine called Just Cross Stitch. I picked this issue up at Barnes and Noble. What drew me in is the gorgeous wreath on the cover. Yeah, I actually thought I'd be able to whip that one out in time for Thanksgiving this year. Delusional much? Snort. I haven't even started stitching it. Inside though, I saw a neat Owl Candle Band and I thought my friend, who loves owls, would like this as well. Only not as a candle band. She's not a fan of candles (we have a lot in common, I'm not such fan of them either). 
It's kind of hard to take photos of stitched projects. I think the camera is great at emphasizing the holes in the paper! Click to enlarge if you like. This is also stitched on perforated paper. 

Here is my alternative to a candle band.
I found a jar at Hobby Lobby that the band would wrap around. I added a tube of cardstock.


I filled that tube with dark chocolate M & Ms.
yum

I added some tinseling fluffy stuff in fall colors to hide the tube.
And attached the band to the jar using super sticky tape. 

I got the tube idea from one of my new friends and co-workers who is a crafty gal. Her idea was to use the tube on a smaller scale as way to give money as a gift. She saw it on Pinterest, I think.

And finally, Jessica had a birthday last month. I saw a card idea I knew she would love on the Lawn Fawn blog here. I watched the video and figured I could make it, if I had the  images used. I got some help from a friend(thank you so much, sweet friend) since I didn't own the kitty and frame stamps needed (I had other stamps to do the rest) and got to work casing the card.


Jessica loved it! 

She has a cat loving friend who attended the birthday party who loved the card, too. 

So, when the friend's birthday came around, I made her one, too.

I used Distress Inks-Spun Sugar, Picked Raspberries and Squeezed Lemonade.  The frame and kitty images are from my friend(Lawn Fawn sets). The cupcake is from an old Doodlebug birthday set. The word birthday and hat are from Lawn Fawn's So Much to Say set. The letters for purr-fect are an Avery Elle letter set. The banner on Jessica's card is a heart stamp. I was in Michaels recently and came across a wooden stamp two-fer that had the banner on the friend's card. Whoo hoo! The coloring on the cat, frame and banner is done with Primacolor pencils and odorless mineral spirits. 

Whew! 
That is it from me today.

Thank you so much for stopping by and reading if you got this far.
Have a happy and creative day!

Hugs,
Jeanne


Saturday, September 6, 2014

Swinging Hi!

I'm back again with a second post for today(scroll down to see my Autumn Teddy card). Whoo hooo! Laura over at The Crafty Sister really has inspired me to color these past few days. Here's another card that I thought was adorable and had to case(hope she doesn't mind).  I really like the flower paper she used, but alas, don't have that paper pad.

Here's my version, using colored pencils and odorless mineral spirits. I think I printed my image off a bit too small. Some of the areas were teeny tiny and a bit of a challenge to color. Ah well. She's still cute. Hope she doesn't slide off the tire swing though...that's a bit of a drop, isn't it?

The tree paper is  from Doodlebug's Flower Box 6x6 pad. The hi is a Paper Smooches sentiment from  the Simply Said set. You can find the image here at  A Random Fan on Etsy.

That's it from me for today. Thanks ever so much for stopping by! 

Hugs, 
Jeanne

Friday, August 22, 2014

Happy Birthday Cards

I've got a card to share that I started working on a couple of weeks ago. I had trouble with creating it, so when I got frustrated, I'd walk away from it. When I felt like I could try again, I'd go back and get a little bit closer to finishing it. I tried last week to get it done, but the girls kept distracting me with this, that or the other. I'm sure you get the gist. Well, they are back to school now, so I had no excuses today when I decided to try and finish it. 

Success! 

I picked up a book on interactive cards at Joann's last month. One of the cover cards drew me in big time and it was the attempt at making this card that got me so frustrated. It wasn't that the card design was so difficult, it was the fact that I don't own the die that the person used to create the model card. I wanted to manipulate my Spellbinders Labels One die cut to work. I think I finally got it! Here's my version of the card that is on the cover of the book.


I decided to use a Hero Arts stamp set called Cupcakes. I really wanted to use the sentiment included in the set, but no matter how hard I tried, I couldn't get the stamped sentiment to fit into the opening when the slider was pulled out. That was another source of frustration with this card. I decided to use the computer for that part. I found the font,  Celia Garcia, on Dafont. The papers are mostly from DCWV's The Birthday Wishes stack (6x6 size) The happy birthday is from Papertrey Ink's Birthday Basics. (note to self; look for some new birthday stamps!) I used Sharpies to color in the cupcake image and fussy cut the images and attached with foam squares.  I used a Labels One Spellbinders die and my trimmer to cut the opening for the slider portion. I was going to decorate the inside, too, but you know what? I didn't feel like it anymore after I got it done today. I'm calling it good. :)

This next card was inspired by one that was linked on my friend, Alanna's blog. (Alanna's blog is fun. She is a sweetheart and makes great Clean and Simple cards-check it out if you have a minute) She was highlighting a new follower on this post and I clicked over on the link she provided. And proceeded to get all happy about the card I saw. I started following Katie's blog, too, and decided to case the card. Did you follow that? I keep trying to explain it and it seems so convoluted. Here's a link to the card I was inspired by.

It's a case for sure, the Paper Smooches kitty from Chubby Chums sure makes me smile. Doodlebug stripes seem to fit the card. The paper is from Doodlebug's Fruit Stand 6x6 pad. I colored the kitties with pencils and odorless mineral spirits. I tried to color the background with pencil, too, but it didn't look good. I thought I could color over it with Sharpie and get away with it, but seeing it here, that didn't work so well. In real life, it doesn't look that different. Hrmmmm, may have to restamp and recolor. Sigh.

Thanks so much for stopping by.
Hope you have a happy day.
*Ü*
Jeanne

Saturday, July 26, 2014

Inspired by Kay Cards

Hi There!

I know! Long time no see...again. I could give you all kinds of excuses, but I won't. We did go to Sioux Falls, South Dakota the week of  July 4th. And on July 8th my dad came to visit for a week. Fun times for sure. The girls were so happy to see their Grandma and their Grandpa practically back to back. Mostly though, my mojo has gone missing. And rather than work through it, I've been kind of avoiding the craft space. The few times I've gone in and sat down, I have been supremely frustrated because I didn't like anything I created.

Have you ever gone to Kay Miller's blog, My Joyful Moments? If you haven't, you really should. She creates wonderful clean and simple cards using a lot of different dies.  Her creations simply make me smile (and wish I had some of the really neat dies she has in her stash). She tells me she cuts stuff out and plays with the pieces to come up with her cards. I figured her cards could give me some much needed inspiration.

So, I sat down and  tried again yesterday, armed with some new resolve and a new to me Anna Griffin die called Flourish Scroll. Which works wonderfully well, by the way. As intricate as the cut looks, it popped out wonderfully with some gentle poking through the holes provided.  :)

I was inspired by two cards that Kay made:
This one~

And this one~

And here's what I came up with~


These were made mostly with dies. The flowers being really old Cuttlebug dies (like from not long after the machine came out, if I remember correctly). The swirls on the top card are Sizzix dies from several years ago. The doily is a Martha Stewart piece. The leaves and small flowers and the centers are punches. The cardstock is American Crafts and the flower center gems are Paper Studio brand from Hobby Lobby. The sentiment is from a CTMH set called For Every Occasion. I popped up the big flowers for dimension. Aside from the top card's swirls being crooked (and not fixable as I used liquid adhesive), I'm pretty happy with what I created this time. Yay!

Thanks so much for stopping by and thank you, Kay for the beautiful inspiration!

Hope you have a wonderful weekend.
Hugs,
Jeanne


Tuesday, June 24, 2014

Happy Summer!

Hi there!
Well, it's officially summer! Hope you are enjoying it wherever you are. It hasn't been too hot here, but I'm sure that won't last too long.
*Ü*
The girls and I are enjoying ourselves. We've done a few things, but mostly they are enjoying life being a little low key right now. Unfortunately, I haven't been able to sneak into my crafty corner as often as I'd like. But today I managed to. Well, I had to do some clean up before I could actually do anything. It's amazing how things start to pile up when you turn your back. 

Anyway, after some fiddling and futzing, this is what I came up with. I was inspired by a card I saw here. (edited to fix link) The yellow and black really caught my eye. 
I searched my stash and found a Close To My Heart Stamp Set that doesn't have a name on it. I'm pretty sure I've used it before, and Becky probably told me what the name of it was, but I didn't note it. (oops) The Happy Birthday is from Papertrey Ink. I added some gems and decided at the last minute to try putting some tiny ones on to mimic doodling three dots together. I like it! (The yellow ink is Sunflower from CTMH)

And just because it's not really summer until you have a "snowcone." I had to get some shots of Jessica making hers. It's a shaved ice machine, but the girls call them snowcones. Who am I to quibble? I'm happy they are self sufficient and make their own.  ;)


The juice is Strawberry Watermelon. 
Yum!
Well, they thought so. 
I like mine with lemonade, but we don't have any right now.
Best fix that soon.

Thanks so much for stopping by.
I hope you have a happy day!
Jeanne


Sunday, June 1, 2014

Casing Barb's Just Keep...Swimming!

Hi There!

My good friend, Barb over at The Buzz recently shared a really neat looking watercolor card here. She has been taking an online class on watercoloring and I've just been amazed by her creations. (You can see them here) You see, I am completely watercolor challenged. As I told her, it's not a bid for sympathy or anything. I just don't have the right touch. I remember becoming so frustrated years ago when I was a consultant for Close To My Heart and I would try watercoloring. Nope, watercolor and I just don't get along. 

When I came across the post I linked above, I was intrigued. Barb insisted that you can't mess this technique up. In her post she explains how to do the technique and I watched the video she linked as well. Seemed like it could be something I could do. I had most of the supplies on hand. Well, except the two ink colors I wanted to use, that is. What a perfect excuse to add to my stash of distress inks! *Ü* Armed with some coupons, I picked up Peacock Feathers and Spiced Marmalade yesterday. And wouldn't you know, Michaels put ink pads on sale starting today?! May have to add a couple of more colors to my stash this week.

I wandered into my crafty space this afternoon to give it a try. My first attempt...did not like! I couldn't get a good coverage of ink onto my watercolor paper. There were large patches of white showing through. I had no idea really how much ink to smear onto my craft sheet and how much water to spritz onto it. I dried my paper and reinked it, but still large spots of no ink coverage. I got a little worried that this easy sounding technique wasn't going to be so easy for me. I tried again on a new piece of paper, still a lot of white space. Hmph!! Then I got the idea to try on the flip side of the watercolor paper, the side that was a little more smooth. Ahhhhh....that looked much better!

And, after a bunch of fiddling and futzing...here's the final result...


I told you in my title that I cased Barb's work, but I did try to add my own little twist. I added some detail on the fish with a colored pencil and a colorless blender. I had some googly eyes in different sizes and I found some neat looking sequins in my stash. They are from Hobby Lobby, Make It Christmas. I need tips on how best to add sequins. These were a bit of a pain to get to stick. My extra touch is the spraying of the shimmer onto the background, all over the watercolored piece. I took the second picture in the sunlight to help capture the sparkle. You might need to enlarge to see it better. 

That's all for today. Felt good to get my fingers inky (and I do mean inky, this may be a somewhat easy technique, but it is also a little messy, hee, hee).

Thanks for stopping by! Have a great day.
Jeanne


Friday, February 14, 2014

A Heartfilled Happy Birthday Card

Happy Valentine's Day! Unfortunately for me, I was never able to head back to my crafty corner to make any other Valentine projects. :( My friend, Barb, though...wow! She's been busy creating lots of lovely projects. You should go check them out, here! That's just one post!

I do have a card to share that I made a while ago, but haven't posted. And, it's full of hearts! I watched Kristina Werner's Friday Focus video here and just really liked the idea of stamping a bunch of hearts. So, I did!

The heart stamp is from Lawn Fawn I believe. Although it doesn't matter, any small heart will work. 
I used Close To My Heart inks: Crystal Blue, Cotton Candy, Sunset, Pear and Dutch Blue. I colored the piece of vellum with a Chromatix (American Crafts) marker and was tickled at how well it coordinated. The Happy Birthday is heat embossed in white and is from the Happy Birthday set (retired) from CTMH. 

I also wanted to thank you for the well wishes for my girls. Amy was right as rain the next day and has been fine ever since. I did end up taking Jessica to the doctor earlier this week as she woke up feeling awful again on Monday morning. Her bug had developed into a sinus infection. She is now on antibiotics and is doing much, much better!

Thanks so much for stopping by.
Hope you have a lovely day!
Jeanne

Sunday, January 26, 2014

Happy Birthday Card and Cross Stitch Project

How's that for a blog post title? They are not combined, but someday I do want to incorporate a mini cross stitch project onto a card.

Today I have a card to share that took some time in the creating. I saw this great kit on SVG Cuts and fell in love with the house. While I haven't had the chance to make that, a friend's birthday was coming up and I wanted to make a card for her. I kept looking at the card with the honeycomb/hexagons on the front and the fun pop up heart on the inside. I wanted to use that file because I thought the friend, who is like a grandmother to my girls, would love seeing the heart pop up when she opened the card. The only thing was, I didn't want the "bee mine" to be cut on the front panel. I figured it couldn't be too hard to "erase" that from the design. Well, in the end it wasn't too hard, but I am still so new to the Cameo and the Designer Studio program, it took me a while(and some tips from a friend) to figure out how to get it done. My instinct on what I needed to do was correct, I just thought for a while it wasn't working when it really was. I had to release the compound path (for those of you with a Cameo). Then pieces were under the main front panel and I had to move it to see them and then I could delete the portion I didn't want cut. Whew. Because it took a bit longer than I had hoped to figure that out (and I am like a dog with a bone when I want something to work the way I want it to work) I was running out of time to be able to get the card into the mail and have it arrive on time. So, it's not as embellished as much as I might have liked. Still, I'm very happy with the final project and I learned a few things along the way. All good things! Hope you like it, too.


The card is a bit larger than 5x7, but there is an envelope file that you can cut as well. I love how Mary and Leo think of everything!

I used Close To My Heart cardstock and paper for most of the design. The cardstock colors are Twilight and Baby Pink. The pattern paper is mostly from a retired line called Chantilly (I just love the colors, plus, my mom used to wear Chantilly perfume and that memory makes me smile). The polka dotted paper is from a Christmas 12x12 stack I got at Michaels. 

The Happy Birthday sentiment on the front is CTMH, aptly named Happy Birthday Script and the inside sentiment is Papertrey Ink's Birthday Basics. 

Feel free to click on the images to make them larger if you like. 

And in case you were interested, I finished stitching the counted cross stitch design I was working on. 
The magazine shows the design put together as a cushion, but I think I may frame it instead. 
The colors just make me happy. 

Thanks so much for stopping by.

Hope you have a great day!
Jeanne


Tuesday, December 3, 2013

Whipper Snapper Penguin Ike Card

I've discovered a new to me, kind of local, scrapbook store recently. In addition to lots of scrapbooking goodies, they sell stamps (like Lawn Fawn and Paper Smooches as well as others). On a visit a few weekends ago, I got to chatting with the very nice clerk. She pointed out some new Whipper Snapper rubber mounted stamps they had just gotten in. Okay, I love Whipper Snapper images. My friend, Kathi, used to create super cute cards with them a few years ago (when she was still creating and blogging...miss your posts, Kathi!). It was hard to choose an image, but the clerk told me what she did with this Ike Penguin stamp and I decided to get it and play, too. *Ü*

Isn't he just adorable?!

The clerk at the store told me she uses chalks to color her images and what sounded like a blender pen. I have chalks and a blender pen that I haven't used in forever, so I dusted them off and got to work! It was fun, but I do think I like coloring with pencils a little bit more. ;)

Another item I picked up on this trip to the store is a Wink Of Stella pen (link added to show you what it looks like) in clear. I have heard others rave about the pen. How it adds just the right amount of shimmer with its brush tip. I put it on the ear muffs, the band connecting the muffs and his tummy. Unfortunately, the camera didn't pick it up very well. But it looks great in person. *Ü*

I used a Cuttlebug embossing folder, circle Nestabilities, a snowflake (Winter's Butterfly) stamp in Sky ink(CTMH) and some pattern paper from DCWV. 

Thanks so much for stopping by!
We are bracing for an Arctic blast, if the weatherfolk can be trusted. It's been in the 60s and sunny for several days, but with this system tomorrow the high is supposed to be 10! On Thursday, a high of 7 is forecast. Anywhere from 4-8 inches of snow is also predicted. 
Brrrrrrr!
Guess we've been spoiled a little too long. 


Photobucket