Showing posts with label Close To My Heart. Show all posts

Sunday, August 14, 2016

Distress Ink Panels Made into Cards :)


Hi There!

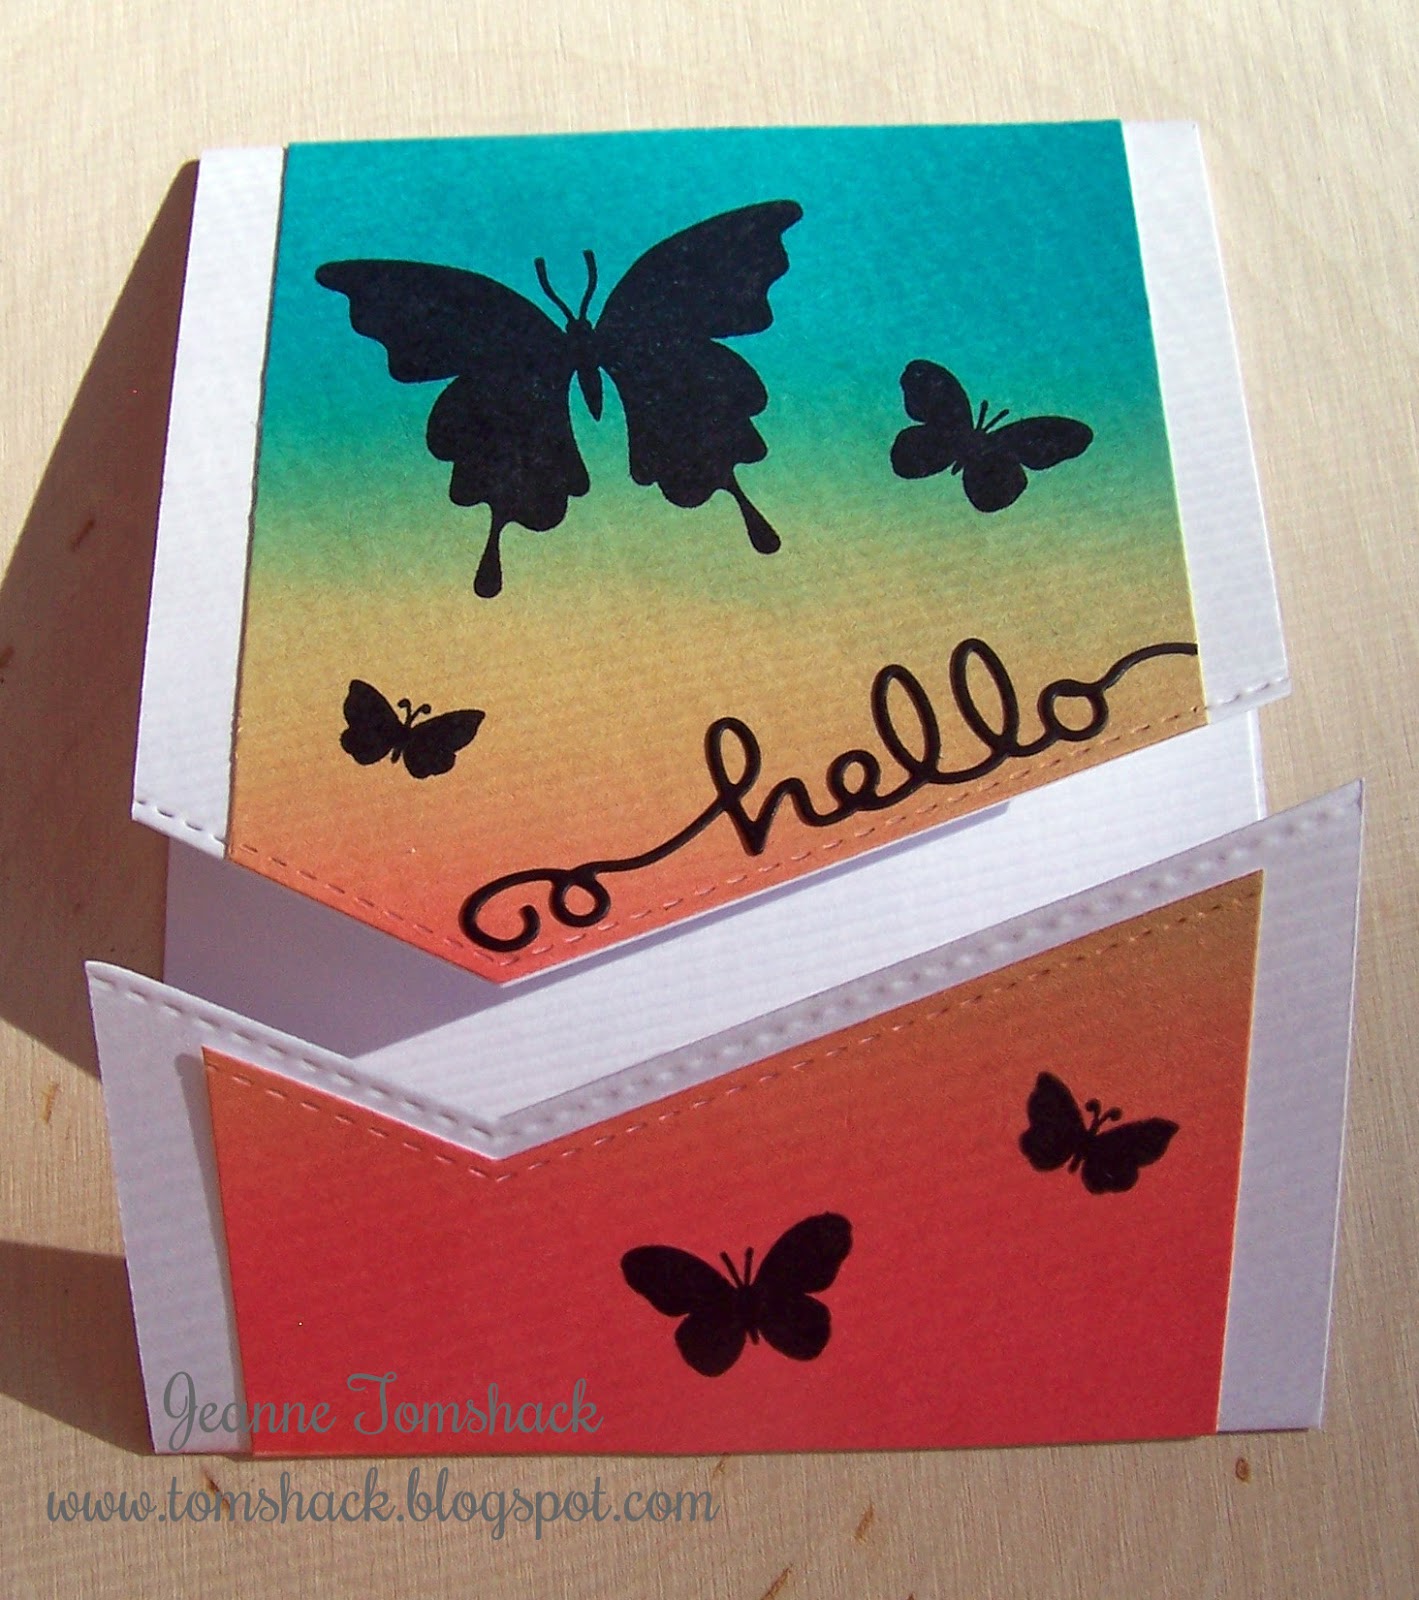
I sat down yesterday to make some cards from the Distress Ink panels I created the other day. 

This first one is a gatefold card inspired by cards made by Jennifer McGuire here. The idea of gatefold cards is inspired, but my execution of it leaves a little to be desired. 

I got the idea to add the distress ink panel after I cut the gate-fold with an MFT Dienamics border die. Of course, when I cut it, I was off just slightly. I probably should have been a wee bit more careful. So I cut the sides trying to make the edges line up. It definitely took some doing and trimming to get it right. 
I thought the black butterflies looked really pretty against those ink colors(Paper Smooches Graceful Beauties and Hero Arts Butterflies Stamp and Cuts). The hello is a die set from Penny Black called Doodles. I cut part of the doodly part off and glued it with my Quickie Glue pen. Thought about adding some black Wink of Stella on the butterflies, but decided against it. What do you think?

Here's what I did with one of the striped panels I created with the Post It tape. 
 The colors reminded me of an ice-cream parlor, so that's where I went with it. I stamped the images from Lawn Fawn's Here's the Scoop stamp set onto watercolor paper with black pigment ink and heat embossed with clear embossing powder. Then I watercolored with the same color Distress Inks and fussy cut them out. I added some Clear Wink of Stella to the topping and CTMH Liquid Glass(same type of product as Glossy Accents) to the cherries on top.  I cut the journal card and the banner from Lawn Fawn's Journaling Die Set. The banner has again, the same ink colors as the rest of the card.

My friend Becky gave me an early birthday present in the dotted stamp. It's called Charming Cascades and is from Close To My Heart. She has made a few cards with that set and I really liked the look. My birthday isn't until the end of the month, but she wasn't sure when we'd get together again and she wanted to give me a chance to play it with before school/work got in the way. 
Thanks so much, Becky. :) I stamped the cascading circles stamp in each of the colors of Distress Inks I used on the stripes, too. I inked the stamp more toward the middle and bottom of the stamp so the dots wouldn't overwhelm my background.  For Picked Raspberries, I stamped off once to get a lighter version of the color. In the end I covered just those circles with some Stickles to add a little sparkle because the stamping didn't look that great. Sparkles fix a  lot of boo-boos. :)

That's it from me for now. 
Thanks so very much for stopping by.
I appreciate the visit.
Hope you have a wonderful day.
Hugs,
Jeanne 


Monday, February 8, 2016

Valentine Cards

Hi There!

Happy Day After the Super Bowl. I cannot lie, I'm pretty dang happy that the Broncos got the big win! It was pretty satisfying, actually. I watched the commercials, too, but wasn't as impressed with those. And the half time show? Not that anyone really cares, but I couldn't hear the lead singer from Coldplay sing. Lady Gaga singing the National Anthem. That was beautiful. All in all a great way to end the weekend. :) This was after Amy had a basketball doubleheader on Saturday and we all went to the Father/Daughter Dance for Girl Scouts on Saturday night. The girls and their dad danced the night away while Mom helped at the snack table. Um, I felt like I was working another shift. Ha, ha

I also managed to get two cards made! Go me! I got the image I colored in my last post put onto a card and I futzed around with a second one.
Does inking up a background count as coloring for the 30 Day Coloring Challenge? If so, I did in a little bit of coloring. I think that's stretching it a bit, though. I was trying to channel Kay Miller with the inking of that background. I might have to leave that to the professional that is Kay! I tried it with Picked Raspberries and Festive Berries Distress Inks. The heart shaped sequins I found at Michaels in the kids Valentine section. The other sequins are sparkling clear from Pretty Pink Posh. Sentiment is from Close To My Heart. That little girl is fussy cut. The background paper is Doodlebug Sweet Things.  


My original thought with the little girl was that I wanted to make a shaker card. Only, I couldn't get it to look right. I had die-cut that heart, but the size of the heart with the size of the girl image just didn't mesh well. So I gave up on that idea and opted to put it on its own card. I found a blue glitter paper in my DCWV glitter stack that looked a lot like the blue hearts in the paper. I know you can't tell the scallop heart is glittered, but it is. I pulled out a Memory Box Heart flower die and cut it with glittered white foam. I snipped it off a bit to get it to fit. The blue sequins are from Hobby Lobby and the little iridescent hearts are Martha Stewart. The inking on the background is Peacock Feathers distress ink. The background paper is also Doodlebug Sweet Things. 


Thanks so much for stopping by! I hope you have a great week. :)
Photobucket

Monday, September 14, 2015

Playing in Darnell's NBUS Challenge

Hi Friends!

Back to participate in Darnell's NBUS Challenge. If you haven't "met" Darnell, you should go check out her super fun and fabulous blog, here. She is a great gal who has a very big heart and a truly wonderful way with words that will leave you in stitches. She coined the acronym NBUS-Never Before Used Schtuff and occasionally has challenges for us to break out and use our hoard or supplies. You can check out all the rules and such here. I believe the challenge ends on the 18th, so you'd better get a hoppin'.

Onto my card...I recently celebrated my birthday and my good friend, Becky, gifted me with, among other goodies, this great Impression Obsession gingham background stamp. She knows how much I adore the gingham look. I had to break it out and use it right away. Not sure that was truly the intent with Darnell's challenge, but it fits the criteria, so I'm going with it. :)

I got the idea for the card online somewhere, only a different background was used. 
I inked up all those Lawn Fawn leaves, the background and the (Lawn Fawn)thanks with Close To My Heart inks, What can I say? I was feeling like getting inky. The thanks is also covered with Wink of Stella. 

Thanks for stopping by.
I truly appreciate the visit. 
Have a great day.
Hugs, 
Photobucket

Saturday, June 13, 2015

Tank You, Dad and a Watercolored Flower

Hi Friends!

Long post alert. 

Did you see Kristina Werner's Tank you, Dad shaker card here? I thought she did a great job with it and I was inspired to make a version. I don't own the letters or the Lawn Fawn stamp set she used, but I didn't let that stop me! I found a similar style of lettering on the Artiste cartridge for my Cricut (cut at 3/4 inch) and I own the Paper Smooches version of fish stamps called Surf and Turf. 

And here is my version of the card. Mine is 4 1/4 by 5 1/2.  I think that is called standard size?


Close up so you can see some of the sequins I used. I also used Wink of Stella on the white space of the letters, but the camera didn't pick it up. I almost wanted to add something to the white frame, but was too afraid I would mess it up and didn't want to have to start that over again.

It was a fun card to make. I took my time and let it dry before adding to the background('m learning patience with watercolor techniques). I used the freezer paper method of masking that Kristina showed and it worked very well, I think. I will have to remember that!

The images are colored with Prismacolor Pencils. I didn't used odorless mineral spirits to blend this time.  Even though I used two layers of foam tape, the loose fish pieces still stick. Might be smart to add a third layer. Oh well. I think Steve will like this card that will be from the girls next weekend.

And here is my second card. I keep seeing these card where the image is heat embossed and then watercolored inside the lines. My friend, Barb's work really inspires me. So I sat down to play a bit yesterday. I heat embossed the stamps from an old June, 2013 Stamp of the Month Close To My Heart flower set called A Flowering Bunch with Versamark Dazzle Champagne ink and clear embossing powder. I might try this again with white embossing powder. Then I used Pear ink for the leaves and Vineyard Berry for the flower. I squeezed the ink onto the inside of the lid and picked up the color with a wet brush. I like the variations in color I was able to get. I originally was going to try to use different colors of pink, but in the end liked the variations of the single color best. 


I tried to get a close up to show the Wink of Stella I added to the images, but my darn camera didn't pick up the sparkle. 

The background stencil is one I picked up at Joann. I used Blush ink . The thank you is from Lawn Fawn and the die is Spellbinders. 

The sparkling sequins are a super happy mail surprise from my friend Alanna
Thank you SO much, sweet friend! Made my day!
:)

That's it from me today. 
Thanks so much for stopping by. I hope you are having a happy day.

Hugs,
Jeanne


Sunday, January 25, 2015

Blue and Gray Happy Birthday Card

Hi There!

Thank you so very much for the lovely comments on Happypotomus. The young lady who I made it for adores it and wrote me the sweetest thank you note. Made my heart happy for sure. Actually her mom threatened to keep it for herself. Ha, ha! Anyway you are very sweet for liking Happy as much as I did(and still do). 

I was in need of a birthday card or two and saw this on Wizard's Hangout. So pretty and I owned the main stamp set she used. Whoo hooo for me! I sat down to try my hand at it and this is the result after it was all said and done. I don't think creating clusters is my forte, so I copied the placement of the images as much as I could. It took me three tries to get the spacing somewhat right. So not my forte. But I tried and this looked okay to me.

I also made one in the yellows/oranges, but didn't get a picture of it. I already sent it off...was on a time crunch, of course. 

The three blue flowers in the center are fussy cut and popped up with foam squares. I added Stickles to the centers to keep this less bumpy.

Stamp sets are CTMH: Lifetime of Happiness (C1589), Curly Greetings for the Happy (old set B1143) and Happy Birthday (C1257, also an older set).

Colors are Heavenly Blue, Whisper, Slate, Lagoon, Pacifica and Black (all Close to My Heart inks)
The Happy is from an old CTMH set called 


Thanks so much for stopping by! Hope you are having a great day!
Hugs,
Jeanne


Wednesday, July 30, 2014

Floral Cards and Amy's Ow

Greetings from soggy Colorado! It's been very rainy here today and the high may not have gotten much above 60 degrees. Quite interesting for the end of July. We'll take it, but I sure wish California could get some of this moisture. :( 

I wandered into my crafty space yesterday and had enough mojo to make two cards! Yippee! One I actually stamped and colored last week, but I had to fussy cut the pieces out, which I did while watching TV. I was inspired by this card on Pinterest. Actually I pretty much just cased it using some Vintage Summer paper I had. I also used Lawn Fawn's So Much to Say for the sentiment. 
I colored the images with Prismacolors and blended with odorless mineral spirits. I also used some gems from Hobby Lobby and some from Michaels (two colors of red). I added a bit of Wink of Stella to the blue tips on the ends of the stamens. 
If I didn't have something to follow, my "cluster" wouldn't look near this good. LOL

My second card was my take on this card by Kay Miller. Her work is very inspiring and always makes me smile. Thanks, Kay!
I used the same arch looking Sizzix dies she did. The floral paper is Doodlebug (Fruit Stand), the green cardstock is Co'ordinations and the yellow is Buttercup from CTMH. The stamped flowers are from Girls Rock by CTMH and are stamped in Holiday Red, Watermelon and Sunflower. The tag is a Spellbinders die using a piece of solid red Doodlebug paper. That gingham is from Hobby Lobby. I popped up the flowers and the tag. How about that? I managed to pull a card together using a lot of resources. LOL 

I have to share something Amy made recently. She has really enjoyed using her Rainbow Loom and has created many bracelets, earrings, flowers and even a cover for her tablet. Last week she created this:

Isn't it adorable? She found the video tutorial on You Tube and followed along. 
So impressed and had to share. 

That's it from me today. Hope you are having a great week!
Thanks so much for stopping by.

*Ü*
Jeanne


Sunday, March 9, 2014

Baseball Birthday Card in a Box by Becky

Wow, isn't that title nice and almost alliterative! *Ü* 

My friend Becky liked the idea of the Valentine Card in a Box that I shared last month and wanted to try her hand at making one for an Angels baseball fan friend of hers. That's why we went shopping the other day. She wanted to pick up some goodies to use on this card (Well, and it's just plain fun to shop in a scrapbook/stamping store). She worked hard on her project yesterday and shared what she created with me. She gave me permission to share it with you. There are so many fun things to look at.  I think you'll agree she did a fantastic job! I'm sure her friend will be thrilled at the time and effort she took to create this awesome card. 


The particulars: baseball 3-D sticker and paper by Karen Foster; Angels stickers by WinCraft; All Star stamp set, Happy Birthday stamp set, Cranberry, Desert Sand and Outdoor Denim inks, Champagne, White Daisy and kraft cardstock by CTMH; scrap red cardstock


Thanks for letting me share, Becky! It's a terrific example of how versatile this card in box idea can be. 

Thanks so much for stopping by. 
Hope you have a great day!
Jeanne
(and Becky)
*Ü*


Friday, March 7, 2014

Thoughtful Flowers Card

I came across this pretty card on Pinterest this morning and immediately wanted to see if I could make a version of it. I had the Hero Arts cling Garden Bouquet stamp, but I didn't have the Distress Inks. That's okay, I had some new to me Close To My Heart ink pads that I felt would work instead. Here's my version of the card:

The colors from top to bottom are: Creme Brulee, Sunset, Smoothie, and Pear. I just sponged the colors onto the one inch strips I cut after I heat embossed the image with white. Then I adhered the strips to a scrap piece of paper and foam dotted that piece to the card base. The sentiment is from a Hero Art clear stamp set about friendship. It doesn't have a name on the packaging. Looking at it now, though, I might have to change it because it doesn't really make sense now that I see it this way!

Thanks so much for stopping by. 
I hope you have a wonderful weekend.
Jeanne
*Ü*


Wednesday, February 19, 2014

Card in a Box Valentine

Earlier this month I came across a neat looking pin on Pinterest. It was a picture of something called a "card in a box." I was definitely intrigued. The pin led me to this blog post on the Serene Stamper's blog. I printed off the directions and got to work. I forgot to share this after I made it and I hope you don't mind seeing another Valentine project well after Valentine's Day. You could create any theme you wanted.


I took several pictures to show that I was able to fit the folded box into an envelope sized for a 4 1/4 x 5 1/2 inch card. Now I didn't write any notes on my sheet and I cannot remember for sure if I modified any of the cuts to make it fit. Something is niggling in my brain that I might have. So, I'm mentioning it, should you attempt this and wonder how I got it to fit in the envelope. 

I used Doodlebug papers and a Close To My Heart stamp set that was only available last year for a Whoooo's Your Valentine promotion. I cut the hearts using Spellbinders dies. 

Hopefully, I'll be able to head back to my crafty corner one of these days in the not too distant future. 

Thanks so much for stopping by!
I hope you are having a good week so far. 
Jeanne

Friday, February 14, 2014

A Heartfilled Happy Birthday Card

Happy Valentine's Day! Unfortunately for me, I was never able to head back to my crafty corner to make any other Valentine projects. :( My friend, Barb, though...wow! She's been busy creating lots of lovely projects. You should go check them out, here! That's just one post!

I do have a card to share that I made a while ago, but haven't posted. And, it's full of hearts! I watched Kristina Werner's Friday Focus video here and just really liked the idea of stamping a bunch of hearts. So, I did!

The heart stamp is from Lawn Fawn I believe. Although it doesn't matter, any small heart will work. 
I used Close To My Heart inks: Crystal Blue, Cotton Candy, Sunset, Pear and Dutch Blue. I colored the piece of vellum with a Chromatix (American Crafts) marker and was tickled at how well it coordinated. The Happy Birthday is heat embossed in white and is from the Happy Birthday set (retired) from CTMH. 

I also wanted to thank you for the well wishes for my girls. Amy was right as rain the next day and has been fine ever since. I did end up taking Jessica to the doctor earlier this week as she woke up feeling awful again on Monday morning. Her bug had developed into a sinus infection. She is now on antibiotics and is doing much, much better!

Thanks so much for stopping by.
Hope you have a lovely day!
Jeanne

Sunday, January 26, 2014

Happy Birthday Card and Cross Stitch Project

How's that for a blog post title? They are not combined, but someday I do want to incorporate a mini cross stitch project onto a card.

Today I have a card to share that took some time in the creating. I saw this great kit on SVG Cuts and fell in love with the house. While I haven't had the chance to make that, a friend's birthday was coming up and I wanted to make a card for her. I kept looking at the card with the honeycomb/hexagons on the front and the fun pop up heart on the inside. I wanted to use that file because I thought the friend, who is like a grandmother to my girls, would love seeing the heart pop up when she opened the card. The only thing was, I didn't want the "bee mine" to be cut on the front panel. I figured it couldn't be too hard to "erase" that from the design. Well, in the end it wasn't too hard, but I am still so new to the Cameo and the Designer Studio program, it took me a while(and some tips from a friend) to figure out how to get it done. My instinct on what I needed to do was correct, I just thought for a while it wasn't working when it really was. I had to release the compound path (for those of you with a Cameo). Then pieces were under the main front panel and I had to move it to see them and then I could delete the portion I didn't want cut. Whew. Because it took a bit longer than I had hoped to figure that out (and I am like a dog with a bone when I want something to work the way I want it to work) I was running out of time to be able to get the card into the mail and have it arrive on time. So, it's not as embellished as much as I might have liked. Still, I'm very happy with the final project and I learned a few things along the way. All good things! Hope you like it, too.


The card is a bit larger than 5x7, but there is an envelope file that you can cut as well. I love how Mary and Leo think of everything!

I used Close To My Heart cardstock and paper for most of the design. The cardstock colors are Twilight and Baby Pink. The pattern paper is mostly from a retired line called Chantilly (I just love the colors, plus, my mom used to wear Chantilly perfume and that memory makes me smile). The polka dotted paper is from a Christmas 12x12 stack I got at Michaels. 

The Happy Birthday sentiment on the front is CTMH, aptly named Happy Birthday Script and the inside sentiment is Papertrey Ink's Birthday Basics. 

Feel free to click on the images to make them larger if you like. 

And in case you were interested, I finished stitching the counted cross stitch design I was working on. 
The magazine shows the design put together as a cushion, but I think I may frame it instead. 
The colors just make me happy. 

Thanks so much for stopping by.

Hope you have a great day!
Jeanne


Sunday, December 15, 2013

Embossed Snowflakes Cards

I've been enjoying using heat embossing in my stamping recently. It's fun to revisit techniques you learned and kind of moved away from. When I saw this beauty of a card on Wizard's Hangout, I knew I wanted to play, too! I liked it in blue and decided it was so much fun, I wanted to try in pinks, too.


Oh, Wow!

I think these are about my most favorite cards so far this season. 
I'm so glad I saw the idea and was able to play.
Please follow the link above for great steps on how to create this look for yourself.

Stamps Used:
Merry and Bright
Frosted set from the workshop in the CTMH 2013 Fall/Winter Idea Book

Inks:
Outdoor Denim, Sky, Twilight,
Vineyard Berry, Hollyhock, Blush

Thanks so much for stopping by.
I hope you have a lovely day.
Jeanne


Saturday, November 30, 2013

Snowflake Card

I saw some really neat snowflake cards on Wizard's Hangout, here. I thought they were very striking. I don't own the same sets as the ones Vicky uses however. So after much trial and error (and borrowing the Merry & Bright set from my friend, Becky (thanks!), here is what I came up with.
I liked the Gypsy and Whisper color combination. And I really like the linear look of the single snowflake stamp sold in the Autumn/Winter 2013 CTMH catalog(it's an M stamp). I had a hard time finding a small snowflake that looked right. I made this several days ago and didn't note the set I got that stamp from. Shoot. You'd think I'd remember, but I own a lot of snowflake sets. LOL The sentiment is from Merry and Bright. I added the gems from my stash.  A lot of cardstock ended up in the wastebasket, but I'm glad I persevered.

Thanks so much for stopping by!
Photobucket

Floral Birthday Using Art Philosophy

Hello! Hope you have had a wonderful weekend so far. Happy Thanksgiving weekend to those of you who read my blog in the US. We had a neat day. The Denver Museum of Nature and Science is hosting a Mythbusters Exhibition until January. We have wanted to go, but had to do so when Steve was available. Knowing the museum was open on Thanksgiving and that we eat at our normal supper time(no family in town), we decided to go Thursday morning. It was a great time as it wasn't too busy. 
Here are a few sort of decent photos I managed to capture with my phone camera and a bit of enhancing in PSE.
 Steve even got in on the hands on activities. This one was about building a structure that could withstand wind ala The Three Pigs. 
Jessica loved creating all kinds of structures with the different blocks available.
I'm so happy to have this picture turn out okay. This was a highlight of the exhibit. The question to answer was do you get wetter walking or running in the rain. You could do either through a walkway that mimicked rainfall. Then you could look at yourself in a mirror with a blacklight above it. You could then see how many waterdrops you got. Of course the girls went through several times, so the results are not really scientifically accurate. ;) Neat result nonetheless.

And onto the card I created. I saw the original here on Courtney Lane Designs. I thought the cluster of flowers and leaves were just so pretty. I don't own the Art Philosophy cartridge(for the flowers and leaves), but I have a friend who does (Hi Becky) and who is nice enough to let me borrow it. *Ü*

Here is my version of the card:

It's pretty much a copy and steal everything. I used CTMH cardstock and inks: Baby Pink, Buttercup, Pear, Sunflower and Cotton Candy. I used pattern paper from the Chantilly paper pack. The centers of the flowers are punched with circle punches.The focal piece is a cut from the Artiste cartridge (p. 33). The Happy Birthday sentiment is from Papertrey Ink's Birthday Basics set. I embossed the background with a Darice embossing folder. I meant to use it the other way, but didn't realize I had it "backwards" until after I  adhered the flowers. Oh well. I kind of like the detail of the debossed look. So, happy accident there! Oh the sparkly looking gems are from CTMH as well. 

Thanks so much for stopping by. 
I just love it when the creative mojo is flowing!

Photobucket

Monday, November 18, 2013

Snowflake Cards

I saw some really nice cards showcasing snowflakes while blog reading (here and here-you will have to scroll down to find the cards I saw...the kraft one was the inside of a card) and tried my hand at creating them for myself using a Hero Arts Winter's Butterfly set

These were stamped in Versamark ink and heat embossed with white embossing powder. The blue is Ocean from CTMH. The Merry Christmas sentiment is from Sparkle and Cheer by Taylored Expressions.
There is something really appealing to me with white ink on kraft cardstock. I used CTMH's pigment white and Desert Sand ink 

We haven't seen too many snowflakes around here just yet. I know they will be coming sooner or later though.

Thanks so much for stopping by.
Hope your week is off to a great start.

Photobucket

Monday, November 4, 2013

Advent Calendar Cubby and Warm Winter Wishes Card

As I was starting to write this post, I realized I have neglected to share a project I made last month. My friend, Becky, became a Close To My Heart consultant this year. Over the summer she came up with a workshop idea to create an advent calendar cubby using a My Creations Cubby and box cuts from the Artiste Cricut cartridge. . One day last month a group of us got together made our cubby. I just realized I never shared mine!
The paper I chose to use is a special paper pack in the Holidays from the Heart Gift Guide released recently. It's called Sparkle and Shine. We used the Magical Days set for the numbers and my version uses Ruby, Slate and Twilight ink. While not a difficult project to create, it did take time. But it was well worth the effort!
Thanks for putting this together Becky!


It's hard to tell in these photos, but one of the circles on each row of boxes is popped up to add a little dimension. Not too long after the workshop, Becky got the bright idea to decorate the back side of the cubby with different paper, thus you could alternate the cubbies each year. I think that is a great idea!

In the Autumn/Winter 2013 catalog, on page 69 you'll see a Workshops on the Go Frosted Cardmaking Kit. It comes with its own stamp set. You can also see samples of the cards you can make using the kit. I chose to use some leftover Sparkle and Shine paper, Ponderosa Pine, Ruby and Heavenly Blue ink along with a little cardstock and clear embossing powder as well as a rhinestone and a scrap of white ribbon to pull the card together. I stamped the tree image with full strength ink, then stamped it again (what CTMH calls second generation stamping). I used the same technique that I used on the Season's Greetings Snowflakes card on the snowflake image. This pattern paper is reminiscent of snow falling to me.


Getting ready to post this card reminded me that I hadn't posted the cubby project. 
Now I have posted both.

Thanks for stopping by. 
I hope you are having a happy day.

Photobucket

Sunday, November 3, 2013

Season's Greetings Snowflakes

I was completely smitten with this card I saw on Pinterest and was excited to try my hand at recreating it using my own stamps and inks. I'm thrilled with the end result. I liked revisiting a neat stamping technique.
 The two larger snowflakes are from a new stamp set from CTMH. The set comes with a cardmaking kit shown on page 69 of the idea book. The smallest one comes from an old CTMH set. I punched circles out of cardstock and after embossing the snowflakes, rubbed ink over the snowflake using a sponge. Very fun.
The ink colors are retired from CTMH, Bubblegum, Clover Meadow, Holiday Red, Orange, Sunny Yellow. The sentiment is from Paper Smooches Christmas Sampler sentiment set.  This would be fun to try again.

Edited to add: I didn't explain the procedure on how to create the snowflakes very well as I didn't want to repeat what the poster said in the blog I linked. But to clarify, I punched circles out of a separate sheet of cardstock. I laid an open circle over a snowflake, inked a sponge and rubbed it over the opening/snowflake to get the circle of color. You can easily overlap the colors as well. Hope that helps in understanding the technique.

Thanks ever so much for stopping by.
Hope you have a terrific day!

Photobucket

Scandanavian Wishes with a Fall Feel

The Broncos have a bye week this week, so I was fine with listening to football instead of watching. And that means I have cards to share with you! Yay!

This card uses the October Stamp of the Month from CTMH again, Scandanavian Wishes. I saw this card while searching for the gatefold card I posted previously. I was struck by the colors in the card that inspired today's card and wanted to try my hand at it using colors in my stash.


I played around and used Ruby, Sunflower and Topiary inks and cardstock colors. I also used a piece of pattern paper from Doodlebug's Happy Harvest.

Thanks so much for stopping by!


Photobucket