Showing posts with label snowflakes. Show all posts

Sunday, December 15, 2013

Embossed Snowflakes Cards

I've been enjoying using heat embossing in my stamping recently. It's fun to revisit techniques you learned and kind of moved away from. When I saw this beauty of a card on Wizard's Hangout, I knew I wanted to play, too! I liked it in blue and decided it was so much fun, I wanted to try in pinks, too.


Oh, Wow!

I think these are about my most favorite cards so far this season. 
I'm so glad I saw the idea and was able to play.
Please follow the link above for great steps on how to create this look for yourself.

Stamps Used:
Merry and Bright
Frosted set from the workshop in the CTMH 2013 Fall/Winter Idea Book

Inks:
Outdoor Denim, Sky, Twilight,
Vineyard Berry, Hollyhock, Blush

Thanks so much for stopping by.
I hope you have a lovely day.
Jeanne


Tuesday, December 3, 2013

Whipper Snapper Penguin Ike Card

I've discovered a new to me, kind of local, scrapbook store recently. In addition to lots of scrapbooking goodies, they sell stamps (like Lawn Fawn and Paper Smooches as well as others). On a visit a few weekends ago, I got to chatting with the very nice clerk. She pointed out some new Whipper Snapper rubber mounted stamps they had just gotten in. Okay, I love Whipper Snapper images. My friend, Kathi, used to create super cute cards with them a few years ago (when she was still creating and blogging...miss your posts, Kathi!). It was hard to choose an image, but the clerk told me what she did with this Ike Penguin stamp and I decided to get it and play, too. *Ü*

Isn't he just adorable?!

The clerk at the store told me she uses chalks to color her images and what sounded like a blender pen. I have chalks and a blender pen that I haven't used in forever, so I dusted them off and got to work! It was fun, but I do think I like coloring with pencils a little bit more. ;)

Another item I picked up on this trip to the store is a Wink Of Stella pen (link added to show you what it looks like) in clear. I have heard others rave about the pen. How it adds just the right amount of shimmer with its brush tip. I put it on the ear muffs, the band connecting the muffs and his tummy. Unfortunately, the camera didn't pick it up very well. But it looks great in person. *Ü*

I used a Cuttlebug embossing folder, circle Nestabilities, a snowflake (Winter's Butterfly) stamp in Sky ink(CTMH) and some pattern paper from DCWV. 

Thanks so much for stopping by!
We are bracing for an Arctic blast, if the weatherfolk can be trusted. It's been in the 60s and sunny for several days, but with this system tomorrow the high is supposed to be 10! On Thursday, a high of 7 is forecast. Anywhere from 4-8 inches of snow is also predicted. 
Brrrrrrr!
Guess we've been spoiled a little too long. 


Photobucket

Monday, December 2, 2013

KWerner Card Case-Snowman

I've been reading KWerner's blog again the past few weeks. I used to read a lot of stamping blogs, but cut down when my mojo took a major hit. Lately the mojo seems to be in overdrive and it's been a lot of fun watching stamping videos and playing. So anyway, she is doing a video series on holiday cards and I really liked this one and decided to CASE it.
I'm pretty happy with the final result. I colored in the snowman with pencils and odorless mineral spirits. I picked up an Impression Obsession snowflake die set that cuts all those snowflakes in one pass if you want. Then I covered them with Rock Candy Distress Glitter. I tried the Tim Holtz embossing diffusers found at my local Archiver's. I thought it was really neat that you could put the circle template down and it would only emboss that part of the folder. You can also emboss the background and leave the circle unembossed (is that a word? Maybe keep it smooth sounds better). I rubbed some distress ink over the embossed part. 
As I said, it's a CASE of the card she shares in her video, so if you wanted to see how to create it(or the supply list) you can check it out in the link above. Very fun!

Thanks so much for stopping by.
I hope you have a great week! 

Photobucket

Saturday, November 30, 2013

Snowflake Card

I saw some really neat snowflake cards on Wizard's Hangout, here. I thought they were very striking. I don't own the same sets as the ones Vicky uses however. So after much trial and error (and borrowing the Merry & Bright set from my friend, Becky (thanks!), here is what I came up with.
I liked the Gypsy and Whisper color combination. And I really like the linear look of the single snowflake stamp sold in the Autumn/Winter 2013 CTMH catalog(it's an M stamp). I had a hard time finding a small snowflake that looked right. I made this several days ago and didn't note the set I got that stamp from. Shoot. You'd think I'd remember, but I own a lot of snowflake sets. LOL The sentiment is from Merry and Bright. I added the gems from my stash.  A lot of cardstock ended up in the wastebasket, but I'm glad I persevered.

Thanks so much for stopping by!
Photobucket

Monday, November 18, 2013

Snowflake Cards

I saw some really nice cards showcasing snowflakes while blog reading (here and here-you will have to scroll down to find the cards I saw...the kraft one was the inside of a card) and tried my hand at creating them for myself using a Hero Arts Winter's Butterfly set

These were stamped in Versamark ink and heat embossed with white embossing powder. The blue is Ocean from CTMH. The Merry Christmas sentiment is from Sparkle and Cheer by Taylored Expressions.
There is something really appealing to me with white ink on kraft cardstock. I used CTMH's pigment white and Desert Sand ink 

We haven't seen too many snowflakes around here just yet. I know they will be coming sooner or later though.

Thanks so much for stopping by.
Hope your week is off to a great start.

Photobucket

Saturday, November 16, 2013

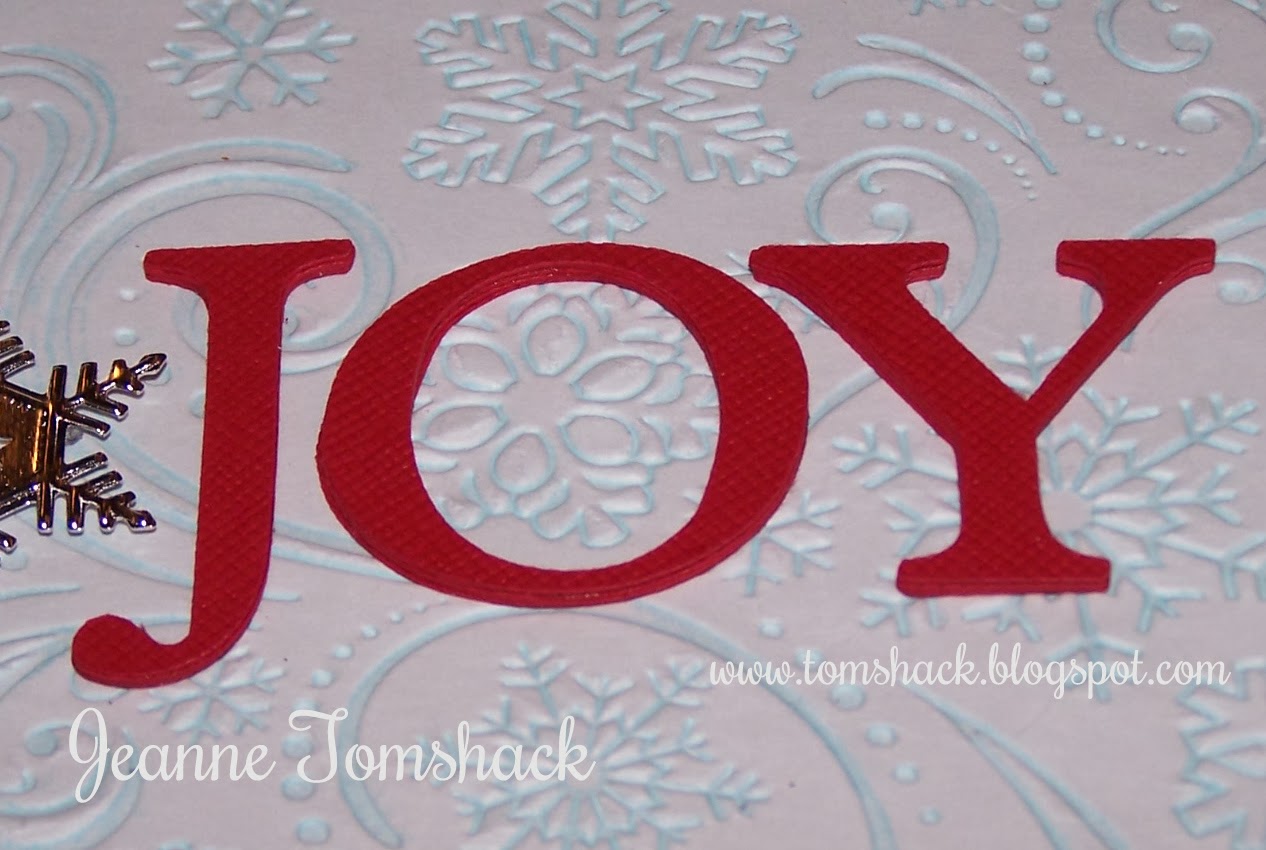
Joy Card

When I saw this card I was totally inspired. For the first time in a long time, I immediately knew what I wanted to do to make my own version of the card(quite the feat for this copier of cards). I had a lot of fun putting this one together and I am happy with the end result.
I have had this Darice Snowflake Background embossing folder for a while and just hadn't had the right inspiration to put it to use. I love the swirly feel of it and the leaf one I shared before. The technique is easy enough. Rub your ink color over the raised part of the embossing folder. You might want to be careful to not get ink on the non raised parts as that will transfer onto your paper when you run it through your embossing machine. In my case, I trimmed off any "oops" ink. Don't forget to rinse off your folder when you are done with the ink.

I wanted my letters to pop a bit, but don't have that same stamp set. I used my Cricut and letters from Plantin Schoolbook. I cut 5 of each to glue together to mimic chipboard height. I've seen that tip around blogland and am happy to have remembered it to actually use it!


I like how the glitter paper really sparkles. 

I thought I had the letters lined up in the middle of the card, but once I glued them down (with liquid glue, darn) I realized I was off just a tad. I could have started over, but I didn't want to, so I pulled out a metal snowflake sticker from Momenta (found at Joann's) to help offset my oops. 

I used Heavenly Blue ink and cardstock and glitter cardstock from CTMH. 

Thanks so much for stopping by! 
Hope you have a happy day.

Photobucket

Sunday, November 3, 2013

Season's Greetings Snowflakes

I was completely smitten with this card I saw on Pinterest and was excited to try my hand at recreating it using my own stamps and inks. I'm thrilled with the end result. I liked revisiting a neat stamping technique.
 The two larger snowflakes are from a new stamp set from CTMH. The set comes with a cardmaking kit shown on page 69 of the idea book. The smallest one comes from an old CTMH set. I punched circles out of cardstock and after embossing the snowflakes, rubbed ink over the snowflake using a sponge. Very fun.
The ink colors are retired from CTMH, Bubblegum, Clover Meadow, Holiday Red, Orange, Sunny Yellow. The sentiment is from Paper Smooches Christmas Sampler sentiment set.  This would be fun to try again.

Edited to add: I didn't explain the procedure on how to create the snowflakes very well as I didn't want to repeat what the poster said in the blog I linked. But to clarify, I punched circles out of a separate sheet of cardstock. I laid an open circle over a snowflake, inked a sponge and rubbed it over the opening/snowflake to get the circle of color. You can easily overlap the colors as well. Hope that helps in understanding the technique.

Thanks ever so much for stopping by.
Hope you have a terrific day!

Photobucket