Sunday, June 1, 2014

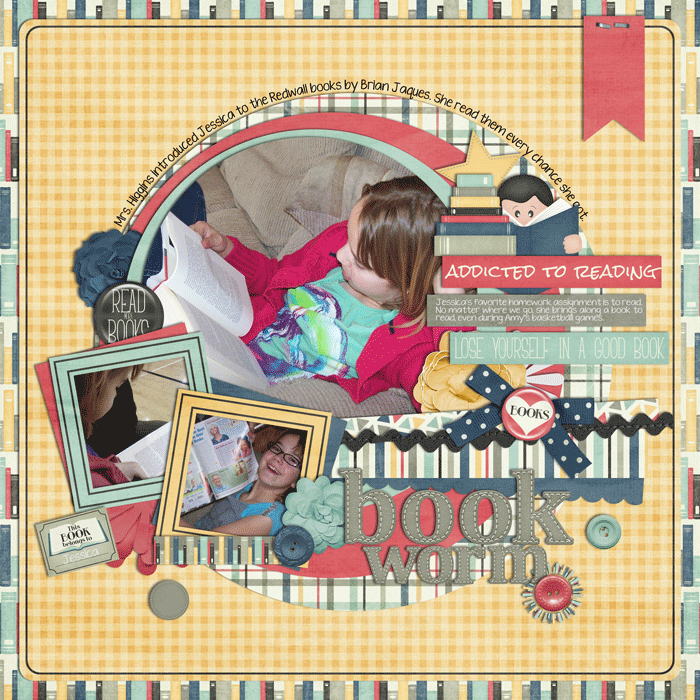
Bookworm~Digital Layout

Hi there!

I've been working on this digital layout for a bit and thought you might like to see it. Jessica is a voracious reader and worked her way through a series of books by Brian Jaques about animal characters in a place called Redwall this school year. She was introduced to them by her music teacher, whose daughter read them when she was about Jessica's age. There were ten or so full size hardcover books and Jessica read every one that her teacher owned. Whenever we go to the thrift store, the book section is her first stop, and she rarely comes away without a "new to her" book. We go to the library regularly over the summer, and throughout the school year she often tells me about the books she is reading in class. Gotta love a girl who loves to read!

I used a kit called Between the Pages by Heather Roselli from Sweet Shoppe Designs. I used a Cindy Schneider template as well, but I can't remember which one. 

It was fun working on this layout and I have some ideas for other layouts I want to create. 
I can share if you would like to see them.

Thanks for looking!
*Ü*
Jeanne


Casing Barb's Just Keep...Swimming!

Hi There!

My good friend, Barb over at The Buzz recently shared a really neat looking watercolor card here. She has been taking an online class on watercoloring and I've just been amazed by her creations. (You can see them here) You see, I am completely watercolor challenged. As I told her, it's not a bid for sympathy or anything. I just don't have the right touch. I remember becoming so frustrated years ago when I was a consultant for Close To My Heart and I would try watercoloring. Nope, watercolor and I just don't get along. 

When I came across the post I linked above, I was intrigued. Barb insisted that you can't mess this technique up. In her post she explains how to do the technique and I watched the video she linked as well. Seemed like it could be something I could do. I had most of the supplies on hand. Well, except the two ink colors I wanted to use, that is. What a perfect excuse to add to my stash of distress inks! *Ü* Armed with some coupons, I picked up Peacock Feathers and Spiced Marmalade yesterday. And wouldn't you know, Michaels put ink pads on sale starting today?! May have to add a couple of more colors to my stash this week.

I wandered into my crafty space this afternoon to give it a try. My first attempt...did not like! I couldn't get a good coverage of ink onto my watercolor paper. There were large patches of white showing through. I had no idea really how much ink to smear onto my craft sheet and how much water to spritz onto it. I dried my paper and reinked it, but still large spots of no ink coverage. I got a little worried that this easy sounding technique wasn't going to be so easy for me. I tried again on a new piece of paper, still a lot of white space. Hmph!! Then I got the idea to try on the flip side of the watercolor paper, the side that was a little more smooth. Ahhhhh....that looked much better!

And, after a bunch of fiddling and futzing...here's the final result...


I told you in my title that I cased Barb's work, but I did try to add my own little twist. I added some detail on the fish with a colored pencil and a colorless blender. I had some googly eyes in different sizes and I found some neat looking sequins in my stash. They are from Hobby Lobby, Make It Christmas. I need tips on how best to add sequins. These were a bit of a pain to get to stick. My extra touch is the spraying of the shimmer onto the background, all over the watercolored piece. I took the second picture in the sunlight to help capture the sparkle. You might need to enlarge to see it better. 

That's all for today. Felt good to get my fingers inky (and I do mean inky, this may be a somewhat easy technique, but it is also a little messy, hee, hee).

Thanks for stopping by! Have a great day.
Jeanne


Friday, May 30, 2014

Baby Granny Blanket

Back again! Yay! First off, I'd like to say a great big thank you to my friends who left me some lovely and encouraging comments on my last post. I really appreciate you stopping by, especially after my long absence. :) And I'm happy to post another project today.

Back at the beginning of May, Jessica came home from her assessment day with a piece of math homework. It was a decoding assignment that had some "breaking news." She had to solve the math problems to figure out the code. By the time she was partway through the assignment, we had a pretty good idea of what the breaking news was. Jessica's teacher is going to have a baby! I thought was a pretty clever way to announce the news to the class. :) I wanted to make her a little something before the year ended, but ran out of time, what with the other gifts I had planned to make. And I felt bad, since I had made gifts for the other teachers the girls have had that had babies. 

So, I decided to work on a small baby blanket last weekend. I had seen the pattern on a list I am on called Hooked on Crochet, from All Free Crochet. (All the patterns are free,  and many I don't care for, but often enough I find one that I really like and want to try). The pattern is called Nana's Favorite Baby Blanket. It's all double crochet stitches (my favorite) and it is small, like a "lovey" so I knew it would work up quickly. I found some great neutral yarn colors in my stash and started the project on Memorial Day. I finished it up Wednesday night. We took it to Jessica's former (!) elementary school and the wonderful ladies in the office assured me they would make sure she got the gift. Happy sigh.

I really like how the colors looked together and wanted to share the project with you. I ended up adding another round of each color to make the blanket just a bit bigger. My thought is that they can use it to tuck around the baby in the car seat or something. I didn't measure it but I think it's about 22 inches square. The color that looks blue in the photo is really a seafoam green color. The lighting around here today isn't that great, I guess. Oh well!


I had thought about making a card to go along with the gift, but I originally planned to take this to the school yesterday and I didn't have time to make one as we had errands to run. So the girls and I picked out a card while we were out that had a teddy bear holding a blanket, which we thought was too cute to pass up. 

I've also made a tatted bracelet for Amy and one for Jessica since I last posted as well. They are the same design that I showed before. This time one is purple and one is pink. 

Now I need to decide what to work on next. :)

Thanks so much for stopping by! I hope you have a wonderful weekend. 
Jeanne


Sunday, May 25, 2014

Made it to Summer Break!

Hello there! 

Oh my goodness, what a crazy time it's been for our family these past several weeks. Not bad, for the most part, just busy with the end of the school year approaching at breakneck speed and mom furiously trying to keep up and get everyone where they needed to be at the right time. I think this year has been the busiest yet in terms of activities. Friday was the last day of school and now we can all release a huge sigh of relief along with a heaping feeling of accomplishment. Yay! I know I have been very quiet and I am really hoping to be able to sit down and create  projects to share now that our summer vacation has started. Fingers crossed!

Hope you don't mind a photo heavy post right about now. I thought I would share the gifts I created for the teachers and staff at Jessica's school. This was her last year in elementary school and I wanted to give a gift to a few more people than usual to let them know how much we have appreciated them over the years. 

First up, though, Amy and the girls in her Girl Scout troop had worked very hard most of this year on earning the Silver Award and upon running a weekend encampment for Junior Girl Scouts in April, they succeeded. The award is service based and the girls planned the activities so that the Juniors would earn various badges by the end of the weekend. Amy taught the girls about making campfires. Amy and her troop had their end of year meeting and awards ceremony last week where she officially received the award. Yay, Amy! 

Here is Jessica with her teacher. 
I think great minds must think alike as she was coordinated outfit wise with her teacher, her best friend and the principal! *Ü*

This set was for Jessica's teacher. She had kind of a tough group of boys this year and when I saw this counted cross stitch pattern, I thought she'd appreciate it. I have tried to crochet a lion (school mascot) for most of the teachers over the years. Jessica liked this one with the cute belly button for her teacher. 

I 
The school had a new principal this year and she has been an amazing addition to the staff. I had to make her a lion, too and love the loopy mane. :)

After lots of thought and searching and trying out different ideas, this is what I came up with to give to some special people at the school. 

I used a technique called needle tatting to create the bracelets and earrings. 
Tatting has been around for a very long time and is more commonly made using a shuttle (or two). I don't know how to tat that way(looks way too confusing to me), but a few years ago I came across a book on needle tatting. I really like the lacy look. It's not hard as there are only a few "stitches" to learn, but it can get confusing figuring out which way to turn this or that. Thank goodness for You Tube videos! :)

Detail shots
Jessica and Amy both helped decide what color would best suit each recipient. 


Thanks so much for stopping by.
I hope you have a relaxing Memorial Day weekend.
Keep a thought for those who have served and sacrificed so that we can enjoy our many freedoms. 

Hope to see you again, soon!
Jeanne


Sunday, March 9, 2014

Baseball Birthday Card in a Box by Becky

Wow, isn't that title nice and almost alliterative! *Ü* 

My friend Becky liked the idea of the Valentine Card in a Box that I shared last month and wanted to try her hand at making one for an Angels baseball fan friend of hers. That's why we went shopping the other day. She wanted to pick up some goodies to use on this card (Well, and it's just plain fun to shop in a scrapbook/stamping store). She worked hard on her project yesterday and shared what she created with me. She gave me permission to share it with you. There are so many fun things to look at.  I think you'll agree she did a fantastic job! I'm sure her friend will be thrilled at the time and effort she took to create this awesome card. 


The particulars: baseball 3-D sticker and paper by Karen Foster; Angels stickers by WinCraft; All Star stamp set, Happy Birthday stamp set, Cranberry, Desert Sand and Outdoor Denim inks, Champagne, White Daisy and kraft cardstock by CTMH; scrap red cardstock


Thanks for letting me share, Becky! It's a terrific example of how versatile this card in box idea can be. 

Thanks so much for stopping by. 
Hope you have a great day!
Jeanne
(and Becky)
*Ü*


Friday, March 7, 2014

Scooting By to Say Hi

The latest newsletter for Paper Smooches hit my inbox yesterday morning and I was instantly smitten with a card created by Emily Leiphart. It used a scooter from Spiffy Scooters and a couple of super cute critters. I went shopping with my friend, Becky, yesterday and picked up the scooter stamp set just so I could make this card! Well, no, I've had my eye on this set for a while, but this card pushed me over to the "must have it now" side. I am so glad I was able to create this card! I came out just as cute as I'd hoped. 
This is the card that inspired me.

Here's my version.

I used colored pencils and odorless mineral spirits to color the images. Paper Smooches now carries a die to cut out the scooter image, but I don't own it, so all of the images are fussy cut. you can also see my very first real attempt to sponge clouds using a mask. I stamped the cloud image in the Spiffy Scooters set, cut it out and used it as a mask for sponging Tumbled Glass Distress Ink on the background. I used foam dots to pop up the images to give them some dimension. The "road" was eyeballed and cut. And while you probably can't tell at all in the photo, I did use my Wink of Stella clear glitter ink marker to add a little sparkle to the head lights on the scooter. 

I have to say this card got a thumbs up and oh how cute from Jessica when I showed it to her after we got home from school. Yay!

Thanks for stopping by!
Have a happy day.
Jeanne
*Ü*

Thoughtful Flowers Card

I came across this pretty card on Pinterest this morning and immediately wanted to see if I could make a version of it. I had the Hero Arts cling Garden Bouquet stamp, but I didn't have the Distress Inks. That's okay, I had some new to me Close To My Heart ink pads that I felt would work instead. Here's my version of the card:

The colors from top to bottom are: Creme Brulee, Sunset, Smoothie, and Pear. I just sponged the colors onto the one inch strips I cut after I heat embossed the image with white. Then I adhered the strips to a scrap piece of paper and foam dotted that piece to the card base. The sentiment is from a Hero Art clear stamp set about friendship. It doesn't have a name on the packaging. Looking at it now, though, I might have to change it because it doesn't really make sense now that I see it this way!

Thanks so much for stopping by. 
I hope you have a wonderful weekend.
Jeanne
*Ü*